
I notice many guides online for various light modifiers available. What I don’t see as much is a proper comparison of nearly every modifier available. Having sorted through my kit a few days ago, I realized I have numerous modifiers. In this article, we will compare modifiers so that next time you’re selecting one, you understand their functions.
Lighting is by far one of my favorite topics, and I really can’t go a month without writing an article about lighting in some way. This promises to be quite a lengthy article, so let’s dive in.
Zoom Reflector
The most basic of them all, this reflector gives off a nice focused light with gradual falloff at position 4 and an even flood at position 10. The shadow produced is quite hard. This light will bring out a ton of detail as it’s hard and specular, with a hotspot in the middle.


With 20-Degree Grid
Adding a grid to this light makes it more focused. Basically, you’re left with the big hotspot in the middle, with very dramatic falloff to the edge. Crucially, if you are using a grid with your zoom reflector, make sure to position it at 4 for maximum light output. The zoom position will not change the lighting pattern but will change the output.
With 5-Degree Grid
The tightest grid you can get. The result is the same as with a 20-degree grid, but with a much tighter light beam. Crucially, the falloff will always be gradated.
Snoot
Similar to a grid, a snoot will give an approximately 20-degree light spread and make the light harder. In a way, it is the hardest light source you can have if you don’t use a hardbox. That said, a snoot should only be used if you want to have a harder light, an actually harder light. Grids don’t change the size of the light source; hence, the contrast and softness stay the same.
Optical Snoot
Ultimate light control. Hard and deep shadows. As hard as light can get. 
Narrowbeam Reflector
One of my favorite hard reflectors. It gives very even light perfect for lighting backgrounds at position 4, while at position 8, it creates a true narrow beam with really dramatic falloff into an even pattern. This is something unique to the narrowbeam reflector.


OCF Magnum Reflector
The OCF magnum will double the power of your OCF flashes. It is similar to the Zoom reflector in shape, but crucially, the interior is very reflective, similar to the narrowbeam reflector. It is a very good on-location modifier that allows you to direct the light more.

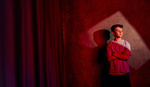
ProFresnel Spot
Another personal favorite, this modifier gives really deep light that can be thrown over large distances. The light from a Fresnel is special in the sense that it brings out a ton of detail while also creating deep black shadows. At position 4, it will be in spot mode; however, at position 10, it will flood the scene.

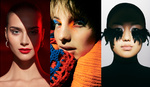
Profoto 3’ Octa
My favorite softbox to use ever. This softbox is the perfect balance between slightly hard but still soft and diffused light. It will give nice skin textures, warm up the light a little bit, and be a very versatile modifier for lighting people.
Profoto 3’ Octa With Grid
Adding a grid will reduce the light spill, and if you work in a small studio, you will see more contrast. It is because of the reduced bounce that you will see greater contrast. I tend to use a grid on my 3’ octa whenever I want to separate the key light from whatever is going on in the background.
Profoto 1x3 Strip Softbox
This small strip softbox will be a perfect light for lighting hair and acting as a kicker. You can use it to light close-up portraits as well. It will give a fairly even light in the vertical direction while keeping the light quite hard in the horizontal, which is perfect for sculpting faces or adding accents on garments.
Profoto Umbrella Shallow M
This modifier will give a nice, fairly soft diffused light due to the white interior. This modifier can be used for lighting backgrounds due to the even light spread.
Profoto Umbrella Shallow M With Diffuser
Adding a diffuser will further diffuse the light and make it more even as a result. This is a great opportunity to use the umbrella as a key light for the subject. Because the light is super diffused, you are unlikely to see any detail in the skin, which can be a benefit.
Profoto Umbrella Deep White XL
I rarely use the deep white XL without the diffuser because the modifier is unevenly lit. However, if you do have this modifier without any diffusion, you can still expect very soft diffused light due to the size and interior color. This can be great for getting good e-commerce pictures and even soft diffused light on the subject.
Profoto Umbrella Deep White XL with Diffuser
Adding a diffuser will make use of the full 165 cm of the modifier you are given. As such, you will be able to take advantage of the super diffused, soft, and even light pattern that it casts. Typically, there is very minimal shadow just because the light is so soft. This umbrella is great for lighting group shots and portraits as well.
Profoto Clic Dome
Moving onto the modifiers made for A-series flashes, the dome comes in handy if you want to create a more even light pattern. Crucially, the dome will not make your head act like a Prohead. Use the dome if you want to even out your light spread, but keep in mind that due to the size of the light, it will still be quite hard.
Profoto Clic Grid 10 Deg
The 10-degree grid does exactly as you’d expect: reduce the light pattern to 10 degrees. This is a great tool for adding accents to your images.
Profoto Clic Grid 20 Deg
The twenty-degree grid is not much different from the 10-degree version, which makes me wonder why make two different ones. Perhaps on an A2, it would behave slightly differently, but as far as the A1 goes, the difference is minimal. The light is hard and specular, making for some sharp shadows and dramatic falloff.
Profoto Clic Softbox
The Clic softbox comes with me on those trips where I really can’t take much kit. I reviewed this modifier and praised it for how easy and fast it is to set up. Expect to see nice soft diffused light. I would not light a full-body image with it, but it is perfect for anything half-body and close-up.
Profoto OCF Beauty Dish
Similar to the softlight reflector, this beauty dish will allow you to capture not only beauty images but also be used as a makeshift softbox if you throw on a diffuser. When it comes to the OCF range, this is my favorite modifier to use.

Profoto Bare Prohead
A bare Prohead will give very wide and even light coverage, which will be hard. As simple as light shaping gets, really.
Profoto Bare A1
As simple as speedlights go, this is a perfect hard light solution. I often use mine zoomed in and on-camera to create a very direct front flash light. Overexposing this will blow out the highlights but increase contrast as a result.
Chimera 3x4 Softbox
This modifier is quite special in the sense that it’s no regular softbox. It gives light like any other softbox, but the front of it is quite recessed, meaning that there will be more control over spill with these softboxes. I do prefer the 3’ octa over the 3x4 softbox, though.
Chimera 4x6 Softbox
The biggest one out there, it is a perfect fill light or key light for situations where you need soft, even light without any shadows. I love using this softbox for large sets both as fill and as a key, as well as e-commerce. Compared to the XL umbrella, this light is considerably softer.
Chimera Large Stripbox (1x6)
A large Stripbox made especially for lighting full-body images and made to be used on large sets, this one gives a controlled light pattern when compared to other 1x6 stripboxes. It is also a little wider, meaning that it gives fairly soft and even light that is perfect for lighting individual subjects. I use this modifier as a sidelight or as a background light the most.
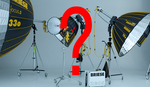
Questions?
Share any questions in the comments below!


Looks like a lot of work but it seems that many are a stop or two under exposed...shouldn't the BG be white in all the different set ups?
How else would you see the fall-off?
A brighter image, something that is how it would look in use, IMO would help.
I don't see how the under exposure helps to show "fall off".
Hmmm not sure the falloff is as important as the quality of light that each modifier produces. Perhaps exposing the subject equally in each frame would have been a better comparison?
Technically the falloff is defined by inverse square law, what you’re demonstrating is how much light is eaten up by each modifier between the source and the subject.
FWIW I did a simple adjustment in exposure, and you can easily see the difference . But I think this thread is dead.
Maybe the intention was to show how much each modifier reduces the light, but I don't see why that is a thing..?
Thanks for posting this. I have a bunch of reflectors that I have not even tried to see their effects on a subject. This might help.