
Frequency separation has long been a popular technique for skin retouching. However, for a lot of photographers new to photo editing, beauty retouching, and ACDSee, it can seem like a very difficult process. Within ACDSee Photo Studio Ultimate 2018, the process has been made easier with the addition of an automated frequency separation tool.
What Is Frequency Separation?
Frequency separation is a popular technique used to retouch skin in portraits. The process is achieved by separating the texture from the color and tones. This gives you the ability to easily retain important detail while doing skin editing and to avoid that plastic skin look.
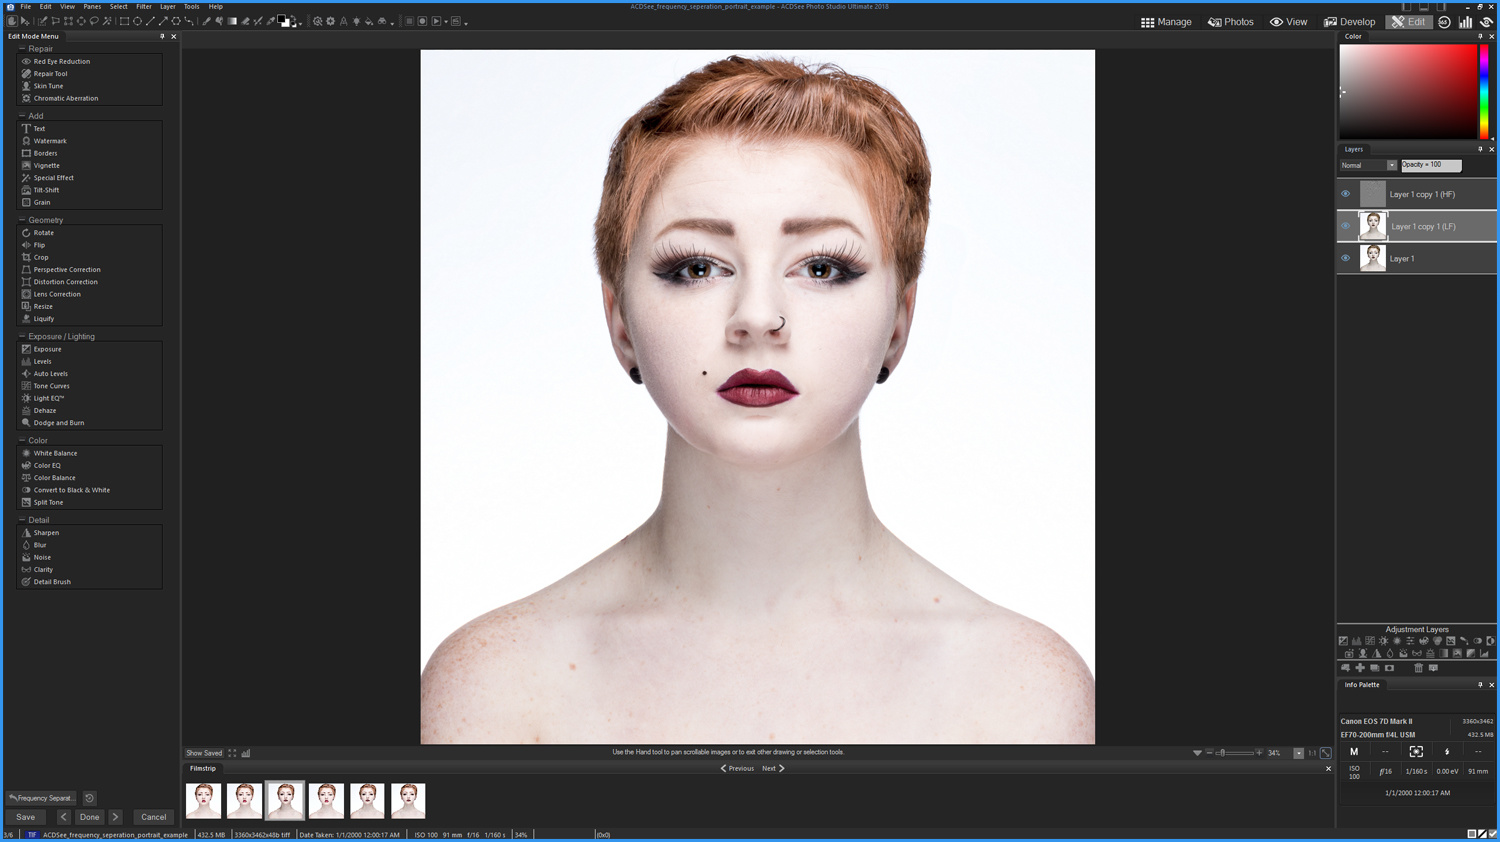
To get started, we are going to select an image and enter Edit Mode. Within Edit Mode, we need to duplicate the image layer. We can do this three different ways. My preferred method is to right-click the layer and select "Duplicate Layer." You can also click the Duplicate Layer button located below the Adjustment Layers panel. Finally, you can use the keyboard shortcut Ctrl+Alt+A. We want to add this duplicate layer because frequency separation is a destructive editing process and we want to keep a copy of our original image in the layers panel.

Right-click the layer and select "Frequency Separation" or press Ctrl Shift F.
With the new layer selected, we are going to use the frequency separation automated tool to create the two different layers. Right-click the layer and select "Frequency Separation" from the drop-down menu. You can also use the shortcut Ctrl+Shift+F. Now there are three layers: the original, a low frequency layer, and a high frequency layer.
With other software, you have to create each layer and apply separate adjustments, but with ACDSee, each layer is created with the appropriate settings to be edited immediately. If we hide each layer by using the eye button, we can see the effects applied to both new layers.
The high frequency layer will look mostly gray with a faint outline of the image. You will also notice that the blending mode has been set to Linear Light. This makes it so the high frequency layer when combined with the low frequency layer will look exactly like the original layer.

High Frequency layer on its own.
The low frequency layer has a Gaussian blur applied to it so when viewed on its own will look completely blurred with no detail visible.

Low Frequency layer on its own.
Color and Tone Corrections
The goal of this step is to make corrections to the skin color and tone as well as reduce any splotching. With the low frequency layer selected, navigate to the Blur tool in the lower left detail menu panel or use the shortcut Alt+U. Within the Blur tool panel, select the Brush tool so we can apply a Gaussian Blur to the exact areas we want. Each image will be different, so play with the Brush settings until you find what works for you. I typically will work with Gaussian Blur, but occasionally, in more difficult sensitive areas, I've found switching to Smart Blur is more forgiving.

Close-up of the Blur Tool,
This can take several passes to get the desired effect, but I prefer going slowly rather than overdoing the effect. You can also use the Opacity slider to reduce the overall changes and dial it down some if you feel you've gone too heavy.
Close-up of the Pixel Targeting Tool.
To get even more precise in your edits, you can take advantage of the Pixel Targeting feature built into several of the ACDSee tool sets. The Pixel Targeting tool can be used in a huge amount of ways and probably warrants its own tutorial. However, in a nutshell, this tool allows you to narrow down the selected pixels via three different criteria: tone, color, and skin targeting. This is great for reducing shadows, discolored splotches, and difficult facial features. Of course, this is all made easier and in some cases avoidable by having well done makeup in the first place.

Correcting Detail and Texture
If you need to remove blemishes, stray hairs, acne, or any wrinkles, it's best to do this process after correcting your skin tones. Remember the goal isn't to make the skin look perfect and flawless like a plastic doll but to remove things that were not fixable during the shoot or missed with makeup. The pores and slight imperfections in the skin give it texture, and we don't want to lose those.

Close-up of Repair tool.
With the high frequency layer selected, navigate to the Repair panel on the left-side menu and select the Repair tool or use the shortcut Alt+P. Within the Repair tool panel, you want to make sure the Clone box is selected. Like in the previous step, the exact settings used will differ depending on the images, so you just have to practice and find what works for you.
To fix these details, all you have to do is right-click on a nearby clean section of skin and then left click on the blemish. This step is fairly simple, and depending on how much you want to correct, it can be done very quickly.
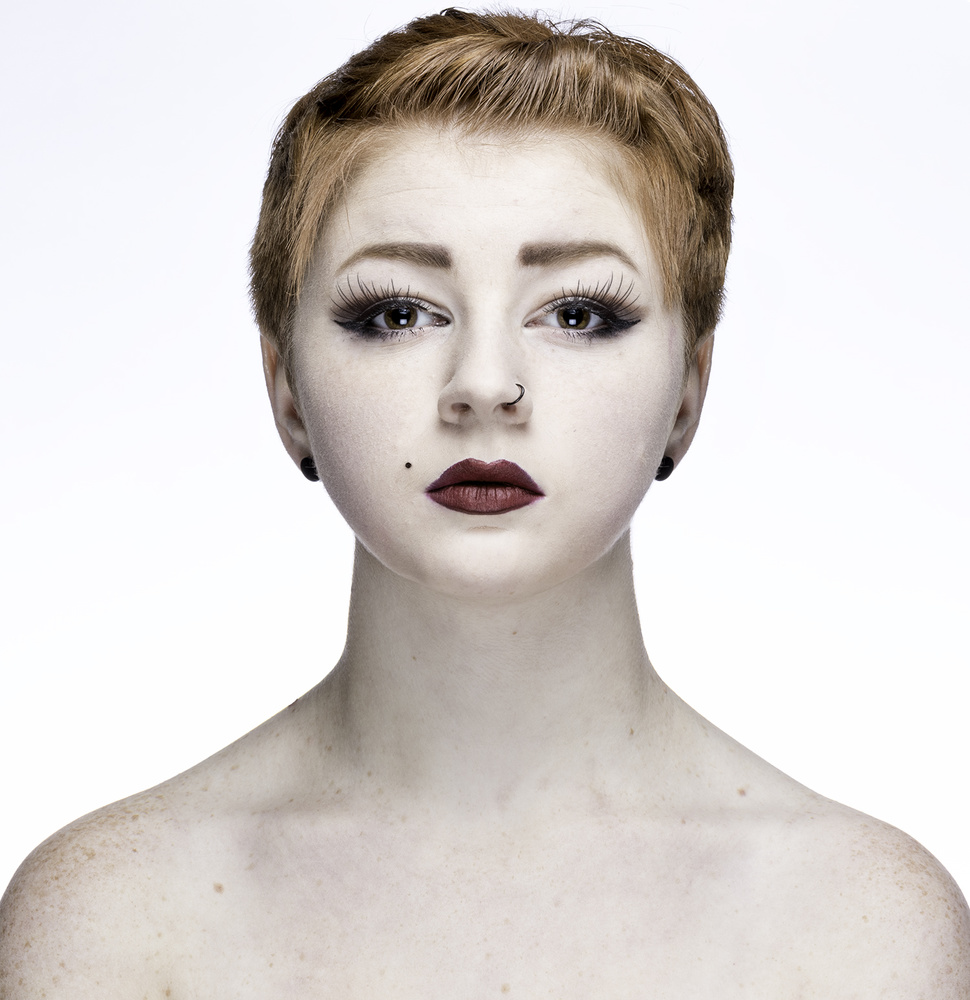
Final Edit

Tips and Shortcuts
When working on skin, it's always good to work zoomed in close if not 1:1 so you can see exactly what is being affected. To make moving around the image area quicker, no matter what tool you are using, if you press the spacebar, the Hand tool with appear, allowing you to right-click and move the image.
To see how your edits are affecting the original at any point, you can click the Show Saved/Show Previous button located at the bottom left of your image. This will toggle back and forth between image states.
If you've found you made a mistake, it is quick and easy to hit Ctrl+Z to undo your last action.

Close-up of Skin Tune adjustment layer.
As the last tweak to your frequency separation edit, you can create a Skin Tune adjustment layer that will allow you to soften and smooth out any last details that need attention. You can find Skin Tune in the Adjustment Layers panel located below the Layers panel or use the shortcut Shift+F.


I prefer before than after :/
You're not the only one :)
Thanks! There is absolutely nothing wrong with the before photo. I just needed to showcase the technique.
Could have done all of that for $100 less in 15 mins by dodging/burning in PS.
I think you missed the point. This is a tutorial for people who use ACDSee as an alternative to Photoshop.