
Don't get stuck with the standard wallpapers on your smartphone. Make your own in Photoshop CC using these simple steps and use your very own images to stand out from the crowd.We all love setting photos of loved ones, cherished pets, or a holiday snap as our mobile phone wallpaper or lock screen, but often the images either pixellate, or crop off essential parts of the photo. So in this tutorial I'll show you how to choose the best photos for your phone wallpaper, prepare them with the correct resolution, and even transform small or oddly cropped images into works of art that fill your phone screen.
1. Pick a Photo That Works

This closeup shot was taken horizontally, but it works just as well vertically. Look out for any photo that has a strong vertical look, portraits, landscapes with trees, and cityscapes all work well for this because of their vertical alignment
Smartphone screens are typically used in vertical orientation, so ideally your photograph should match this. Any subject which is big in the frame works well for these images, because they're viewed at arms length. Anything too small and detailed is difficult to see, especially when outside in daylight where the ambient light is brighter than the screen. It also helps to pick a photo that is bright and/or colorful. If you want to use a photo that isn't vertically aligned don't worry, below I'll show you how to create one from a horizontally oriented photo as well.
2. Make a New Document
Search online for your phone's make and model and discover the resolution and pixel density before setting up your Photoshop document
In Photoshop CC 2020 make a new document. You'll have to head to Google now and type in your phone's make and model to find out the screen resolution. The resolution comes in two parts: how many pixels long the edges are, and the density of the pixels on the screen. Higher end smartphones generally have a high pixel density.

Make sure the resolution, pixel density, and color mode are all set up properly before clicking "create". Also double check that you have your width and height resolutions the correct way round
For example, my Google Pixel 2 is 1080 x 1920 but the pixel density (or Pixels Per Inch) is 441 PPI — much higher than anything you normally view on the web which resides at around 72 PPI for most general work. You'll also need to keep the color space appropriate or risk discoloration of your photo. I recommend working RGB to keep things simple and useable on most screens.
3. Rotate and Resize

Images can be rotated and resized using the bounding box that surrounds the photo when it's been imported into the document. If you can't see it check you have "Show Transform Controls" selected at the top of the window when using the Move tool
Drag and drop your desired photo from the folder on your computer into the new Photoshop document you just created. Now, you may have a horizontal image that actually works as a vertical, or you might find a photo that just looks better at a slight angle. Either way, place the cursor near the edge of the bounding box around the photo and then click and drag to rotate the image. Hold shift while doing this to have it snap at 45 or 90 degree angles.
You may need to move the photo around, or resize it using the corner transform control points to ensure it still fills the canvas. Either make sure the aspect ratio is locked by ticking the little chain link button at the top of the window, or hold shift while doing this to keep the photo from becoming squashed.
4. Change Horizontal Shots Into Vertical Wallpapers

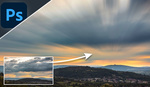
You can edit horizontal photographs to work in vertical orientation, but you need to duplicate the layers and add a little blur to make things look natural
Sometimes your favorite shot won't be vertical. In fact, lots of landscapes look better in horizontal orientation (which is why they're nicknamed "landscape" format). Setting these images as your wallpaper will either result in huge gaps at the top and bottom of your lock screen, or zoom up so close on the photo that it looks poor quality and ruins the vista. But there's a way around it.

Gaussian blur takes the focus away from the larger background layer and allows the eye to rest on the in-focus horizontal shot in the middle but still maintains a nice balance of color and tone in the gaps at the top and bottom of the screen
Place your horizontal shot on the new document you made in step two, so that it fits entirely within the canvas. Now, duplicate the layer and click on the photo layer beneath it. Next, use the move tool (V) to drag the transform control points and now fill the canvas with the photo. Then, head to Filters>Blur>Gaussian Blur and apply a strong blur that leaves patches of color and shape but removes most of the detail from the photo. Now those two big patches at the top and bottom don't look at obvious and naturally complement the main image in tone and color.
5. Save Your Finished Wallpaper
Now that you've prepared the design you just have to save it as a JPEG by going to File>Save As. Alternatively, if you want to keep the size down because you're running out of storage space on your device, then head to File>Save For Web (Legacy) or if you're feeling adventurous press Ctrl + Alt + Shift + S simultaneously. Then make sure the resolution is right in the export window that appears, and choose JPEG High in the Preset box at the top. Then simply transfer the image via wired connection, Bluetooth, WiFi, Airdrop, or email and save it on your phone as the wallpaper.

This finished wallpaper now works perfectly on my phone wallpaper background because the resolution and pixel density, as well as the color profile, matches that on my Google Pixel 2
Once you've got a Photoshop document set up, and before importing any media into it, you can save it as a template Photoshop document and use it to make future wallpaper backgrounds without having to set it up each time. Just save it as a Photoshop document with an empty layer in.
Alternatively, if you don't fancy setting up your own Photoshop document there are services out there that will automatically generate wallpapers for you without all the editing. Adobe Spark is one such service. However, I think learning how to make it yourself not only gives you greater freedom when creating phone wallpapers but also gives you valuable Photoshop skills that you can apply to any kind of photo editing for the future.


Or you could save all this time and money and just use the free Photoshop Express app. - Android Guide*
1. Search for a high resolution image you like and save it to your phone.
2. Open it with PS Express and use the 3:4 crop preset. Adjust if needed.
3. Export as full size 100% jpg. "Also select None for watermark. It's set to one by default. Don't need to do this again though."
3. Now select it as a wallpaper.
Your android phone will automatically resize it again to your phone resolution and saves it separately in the android system.
4. Optional* Delete the original downloaded wallpaper in "Downloads" and cropped version in "Photoshop Express" library if you like. Your phone will keep it's wallpaper.
Truly the article absolutely no one asked for, needed, or wanted.
Really ?
Can it also be done to my computer ?
How ? please make an article !
That's amaizing !
So 21st century !
This is very innovative !
Shocking !
Nobody knew !
I'm so happy you came to tell us !
Can't thank you enough !