
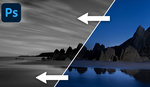
Lens filters are useful for achieving a variety of photographic effects in camera, such as long exposures of moving subjects. But did you know you can achieve the same great results with Photoshop CC?
Neutral density filters are great for darkening the whole of your frame when shooting, either to allow for wider apertures in bright situations or to extend shutter speeds when wanting to shoot long exposures of moving subjects. For example, a 6-stop ND filter might make it possible to shoot a 30-second exposure even while shooting during the day.
But what happens when you stumble across the perfect scene but don't have your filter with you? Or perhaps you just wish you could put that same long exposure effect on an image you've already taken. Luckily for you, it's relatively simple to do this in Photoshop CC using basic editing techniques you probably already know. So, follow along below to discover how to do it yourself.
1. Select Your Scene

I made a selection of the sky with the Quick Selection tool in Photoshop
I took this shot of a sunset in the rolling Cotswold hills in the UK a while back. At the time, I didn't have my ND filter with me. I saw the clouds were doing something special, though, and took a snap all the same. Looking at it now, I realize it would benefit from some long exposure movement in the clouds. So I started by first importing the photo to Photoshop CC. Once open, I went to the Quick Selection tool (W) and used the click and drag method to select the entire sky.
Be careful when using the keyboard shortcut for this tool, as there are three different options nowadays: Quick Selection, Magic Wand, and Object Selection. I used the Quick Selection tool because Magic Wand was a little too selective given the tones I have in the clouds, and there is no real object to speak of to use Object Selection. But, you may find one of the other tools works better for your photo.
2. Zoom in and Refine

I zoomed in to the image and refined my selection by using the subtract from selection option in the toolbar
Though the sky selection process was simple and it seemed to do a good job, I was aware that there were distant mountain ranges and hills that were much more subtle due to the haze in the sky. I zoomed in (press Z to select the Zoom tool, then click and drag to the right) and noticed that the Quick Selection tool did, in fact, miss these areas. So, I held Alt and deselected the mountains so that only the sky had a marching ants selection around it. Alternatively, you can just click the Remove Selection button in the toolbar at the top of the window. Adjust your selection until only the sky is highlighted.
3. Duplicate the Layer

Next, I duplicated the layer in order to create a layer on which I could place a mask
Arguably, you could do this step first, but I like to include it now after I've already made my selection, because sometimes, I prefer to just duplicate the selection first. For demonstration purposes, though, it's easier to show you how to mask effectively in the coming steps if we duplicate this layer now (it also makes it future-proof should you notice a mask wasn't exact in the first place). To duplicate the layer, right-click on it in the layers palette and click Duplicate Layer.
4. Add a Mask

With your selection made and the new layer duplicated hit the Add layer mask button to apply the layer mask
Now that you have your duplicated layer (appearing above the original imported "background" layer), click the Add Layer Mask button at the bottom of the layers palette to apply the mask. Zoom out to fit the window by pressing Ctrl + 0 and then hold down Alt and left-click on the eye icon to the left of the layer; this will make only that layer visible. Take some time to look over the mask and check for any inaccuracies in the selection process. If you notice anything drastic, hit Ctrl + Z a few times to undo until you get back to the marching ants selection and use the above steps to refine it.
5. Come on and Blur it Up

Use the radial blur filter to create straight blur lines in your scene that mimic something you might see in real life
It's now time to add the blur effect. With the image thumbnail selected on the newly masked layer, head to Filter>Blur>Radial Blur. I prefer to use the Zoom blur method as this is most realistic when matching up with real-life long exposure effects (clouds generally blow in just one direction, not circling as they move as you might get using the Spin method).
I also like using the best quality option because, well, why wouldn't you want the best if you have time for it to process? I've used a heavy blur amount here, set to +83, but you may want to experiment with this depending on how intense you want the effect to be. The last step is to pay attention to that little white example box on the right; from here, you can click and drag the middle focal point to wherever you like. I placed it just above a beautiful hill with a small copse on top. That's because I wanted the blurred lines to sort of point towards this area as I think it's the most attractive part of the frame. This is another benefit of Photoshopping the effect rather than relying on filters and natural movement: you get to choose where the movement occurs and in which direction.
6. Time to Review

Zoom out and take stock of how the image looks as a whole, if there are any issues you'll likely spot them in this stage
If you've made a good selection to start with and the blur filter is perfected, you should be pretty much done at this point. Occasionally, though, you might notice that the gorgeous radial filter you added may have unintentionally lifted some of the background colors or shapes into the blurred section. I purposely did this to show you how to get rid of it (do you believe me?), as it's relatively simple. Let's zoom in and take a closer look at the problem.
7. Refine That Mask

To remove some sections that have lifted into the blurred layer I refined the layer mask with the brush tool (B)
Now zoomed in, I can see that the edge of the horizon was just being dragged into view in the affected layer because I had set the intensity amount of the radial filter so high. It's a simple job to fix, though. Just click on the layer mask and use your brush tool (B) to paint away the ghosting effect. Don't forget: white reveals, black conceals. If you want to see where you're painting while doing this, hit the \ key on your keyboard to reveal the red layer mask.
Summary


Now that I've refined that layer mask. the mix between blurred and original layer is now indistinguishable. The effect, though not natural, is quite realistic, and the benefit is that I can do this with as many different photos as I like. It's also customizable, so I can increase or decrease the intensity in any photo I choose. Also, the direction and placement of that radial focal point is interchangeable, so you can create perfect long exposures every time, no matter the composition or subject placement.


I can't tell you how many times I've reached for the ND filters and realized they were in another bag.
This was a fairly easy horizon selection (no trees, etc.) but it's a technique that works. Thanks.
This is all very impressive and i guess usefull too if that's the sky you wanted but left behind your filters.
And now you can even completely change the sky seamlessly in Photoshop.
But isn't sad that the truly impressive photos taken by exceptional photographers spending hours and even days out there to achieve something great, is now being easily copied and achieved by sitting in front of a sceen for hours on end, convertng a very ordinary bland image into a 'wow, impressive' piece of work thanks to these clever programs.
For me then, it is no longer photography, it's nothing more than photoshop artistry.
I wonder how those dedicated landscape photographers honestly feel about all of this and even those who go out there just for the joy of capturing that moment and do so, perfectly, without PS et al.
Don't get me wrong, I too use PS and LR but i havent been that impressed witn all these new AI features. What it has done for me is make me go out there and try much harder to achieve it in-camera.
I agree with this. This is really cool and I'm glad this available to people but I'd rather do this kind of stuff the old fashioned manual way with filters. For me doing it in Photoshop kind of destroys the fun of it.
Get your remote and tripod out, take 30 1-second, properly exposed images, and make them into a smart object in Photoshop. If one of the images is not so sharp, delete it before making the smart object. You will still have a 29 second image. If 30 seconds is too smooth, try a 15 image smart object stack or 8 image. Lots of options to get the soft area the way you want it afterwards.
How many more cheats do we need until there is no reason to go outside and do the real hard work and actually be an artist?
Indeed, it seems these days all we focus on is how to "fake" everything in post, there is no more emphasis on how to do things like this the right way, quite sad.
Totally disagree with this thinking. It's not cheating. It's no longer Photography, It's Artography, Digital Imaging. What are you doing with your images? The so called purist imaging in camera, is not going to gain any monetary value, other than your own personal, edification, and, if your going to truly shoot only using in camera, then you better, use only Jpeg in camera, No Color profile settings, other than Natural, and No adjustments to the Natural Profile, No IBIS or Lens IS, None of the digital settings, other than, Shutter Speed, ISO, and Aperture, and spend all your time trying to get to the right place and plan for the perfect time and weather. Mr. Wardell, I am an Artist and Not a Photographer, cameras and ALL the other things used to create images are just tools, and nothing more. Mr. Wrzosek, calling everything Fake if anything is done in post, sounds Hypocritical to me, if you do ANYTHING with your images in Post! Fake can only be understood by the so called Purist's, in a Dying Purist world in Todays far greater challenging world of Digital Imaging. The value of an image is not substantiated by the weather, and if you planned to be there at the right time. The Value to most people, other than a Purist is, "I love the Way it Looks" Would I hang that on my Wall. Ansel Adams would be blown away by today's opportunities, and options in post, and he would also embrace it and challenge it, creating incredible Images.
The results from this "technique" look so fake and cheese, I would NEVER use these! Do it right the first time, or don't do it at all.
No thanks. This, to me, is not photography.
It's worth mentioning that this technique does not work for a large amount of different situations like seascapes or waterfalls. Cloud movement is the only one I can imagine right now.
I'm sorry, but this looks fake, at least this one example image you show. Very straight lines radiating out of a single point in the distance. Doesn't look natural at all because it looks as though the wind is blowing in different directions at the same time. Perhaps if this filter is used more sparingly it might help create some movement, depending on the scene. So it's good to know that the tool exists, it might help at times if you didn't have the real filter on you at the time of shooting. But it seems to be a limited technique.
This fake-y effect is not a "long exposure".
Aesthetics aside, don't forget non-destructive benefits of smart objects:
1. Convert to Smart Object
2. Make selection
3. Apply filter
Now you have a "smart" layer with editable effects parameters and blending, and your selection automatically included as effects mask.
As an architectural photographer I've done this a few times for additional impact, but you really have to pay attention to the rest of the scene, because the mind will unconsciously pick up on conflicting subtle tells if you aren't careful. Reflections in windows need to match the sky, and if the exposure is "long" enough to blur sky movement, it is also long enough to blur the movement of trees (like the ones in this image that are close to the camera) and grass, vehicles, people, etc... inconsistencies will kill the image.