
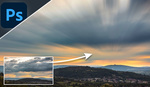
Follow along with this tutorial to discover how to transform lifeless color photographs into black and white fine art photos in just nine simple steps with Photoshop CC.
In this tutorial, I'll show you how to transform a color photograph taken with a relatively short shutter speed into a fine art black and white photograph that looks like it's been taken with an extremely long exposure. In nine steps I'll show you how to alter exposure, convert to black and white, create dramatic motion blur in water and even replace the sky to enhance the frame. I'll be using a combination of both Lightroom Classic to make basic adjustments and Photoshop CC for more intricate layer-based edits. If you'd prefer to do basic edits in Photoshop that's absolutely fine as well, Adobe Camera Raw would work just as well for this. If your image isn't raw you can open a JPEG or similar file and head to Filter>Camera Raw Filter.
I'll also demonstrate how using two different types of motion blur we can achieve realistic-looking long exposure effects that mimic real-life weather patterns and physical movements. To keep things accurate I'll also be masking each section so that the blur only controls one portion of my frame at a time.
1. Make Initial Edits in Color

Process basic edits like exposure first before moving on to black and white conversion
My workflow is to work on basic edits in Lightroom Classic first and then export them for editing in Photoshop CC. I like to make my initial edits in color for which there are two reasons. First up, I'm lucky enough to see the world in color and so this is how I naturally perceive the world. It's much easier for me to understand darks and lights and gradations of tone in between when things are in color because I can pick up on subtle visual cues. Second, I like to see how any edits I make are affecting the balance of tones, since they directly relate to my photograph whether in black and white or not. That is, if I make blues brighter while keeping yellows dark I will produce a different look than if I didn't.
In this image I made two adjustments, I boosted the exposure slider to 1.50 in order to brighten the image a little and I also boosted the whites slider to 31 in order to create a wider dynamic range between black shadows and white highlights.
2. Convert to Black and White

Convert the image to black and white using the Black & White tab in Lightroom (or Adobe Camera Raw if you're using that)
There are many ways to convert images to black and white, but my favorite method in Lightroom Classic is to head to the Black & White tab in the basic panel in the develop module. From here I can make further adjustments to the image before exporting to Photoshop if I need to. Alternatively, you can click on the Profile drop-down and select Adobe Monochrome. Once done, right-click on the image and select Edit in>Edit in Photoshop CC. The image will now automatically open Photoshop CC if you don't already have it open and will display the image loaded in the window. From here, I recommend shutting down Lightroom Classic in order to preserve RAM and CPU power for the edits ahead.
3. Blur the Water

Mask the area you wish to work on first and then apply a motion blur. Motion blur only blurs in one plane at a time, which means there's no meandering or changing direction once applied
Now in Photoshop CC I like to duplicate the layer (Ctrl+ J) before masking the first section. With the Quick Mask tool (W) I selected the watery portion of the beach at the bottom of the frame and clicked on the Add layer mask button in the bottom of the layers palette. The mask now applied I selected the thumbnail of the layer and then headed to Filter>Blur>Motion Blur.
In the window that appeared, I adjusted the angle to -3 to give a slight slope down towards the right-hand side of the frame, mimicking the natural curves on the sand. I then set the Distance slider to 1725 which is quite extreme, but what I'm trying to do here is replicate an extremely long exposure in the scene. I then clicked OK to apply the blur.
4. Replace the Sky

I used the Sky Replacement feature in Photoshop to add some interesting cloud formations in the top-third of the frame
There's little detail in the sky, which is a rare thing when shooting in the UK, unfortunately, this isn't what I want for this style of photo. I clicked on the original background layer and went to Edit>Sky Replacement. The Sky Replacement tool gives multiple options for choosing a type of sky and controlling its appearance. I recommend choosing a sky with lots of puffy, broken cumulus such as in this example as this will give nice streaking effects when we come to blur it shortly.
5. Refine the Sky Mask

Photoshop CC did a pretty good job at masking the photograph but it wasn't perfect, so I went in with the brush tool to refine it
Depending on the photo the Sky Replacement tool may or may not do a good job at masking the new sky replacement in the photo. Unfortunately, mine was a little out so I had to zoom in and brush in specific sections with the brush tool (B). I selected the mask thumbnail on the sky replacement layer and then pressed D and then X on the keyboard to select white as my foreground color. I then proceeded to paint in the sky around the cliffs. Use black as your foreground color (press X again) if you wish to paint over the foreground instead.
6. Add a Levels Adjustment Layer

Add a levels adjustment layer to control the sky layer. I added more contrast here to make the texture richer when applying the blur in the coming steps
At the bottom of the Layers palette, I created a new adjustment layer and chose a levels adjustment. To have the layer affect the layer beneath it, hold Alt on the keyboard and hover the cursor between the layers in the layers palette. The cursor will change to a bent arrow and box, left-click and the adjustment layer will now only control the layer beneath it.
I brought the shadows up to 62 so that the sky became much darker. In an attempt to keep highlights bright I also dragged the highlights control point down to 233. This increased contrast was essential to create a dramatic effect in the following step.
7. Convert Sky to Black and White

Conver the sky to black and white with another adjustment layer
The next step is to add a further adjustment layer to convert the image to black and white. Once applied you may wish you adjust the intensity of colors with the sliders in the Properties window that appears. This can help match the tone to the original image. It was largely fine for my purposes though as I'm going to add a type of motion blur before finishing the edit.
8. Check the Horizon

By isolating the sky layer I noticed that the horizon in the left of the frame was gradually fading in the horizon so I used the brush tool to add the rest of the fade fully to the mask
Before finalizing the edit with the last motion blur I always like to double-check the mask on the sky layer. By pressing Alt and clicking on the eye icon in the layers palette I can isolate the layer I want to look at. I noticed here that there was some fading in the mask down towards the horizon in the bottom-left of the sky. To remedy this I used the brush tool (B) and painted white over the affected areas.
9. Use the Path Blur Tool

I used the path blur tool which helps create motion blur that requires a change in direction
A really useful tool for addition motion blur with direction is the Path Blur tool. It doesn't appear under the regular blurs in the filters menu, instead, you can find it at Filter>Blur Gallery>Path Blur. From here a new window will appear. The Path Blur tool is quite power intensive, so closing down other windows/programs might be appropriate before you get to this point (especially Lightroom which may pinch some of the RAM or graphics power from Photoshop).
In the Path Blur window, you can click to create a custom path for the blur to affect. I make three arrows on the image to produce a consistent bottom-right to top-left motion blur but that also radiated out across the top-left of the frame. Notice how the clouds blur and give a curved effect? That's exactly what I wanted here, as if to mimic fluctuations in wind direction. This can help things look more realistic. Change the speed slider to change the blur intensity (I chose 373%) and if you need to refine the blur further experiment with the other sliders. I felt it was good enough as is so I left the other settings at default. Click OK and the image is now done.


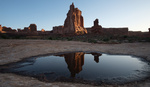
By converting to black and white and using motion blur I was able to create this long exposure fine art photograph from a scene I'd already taken with a fast shutter speed and in color. I used the replace sky function to add interest to the upper third of the frame before blurring it to mimic the texture one would associate with a long exposure. Remember to change the direction of the motion blur in your photo so that it mimics the natural direction in which the water or clouds flow relative to your scene.


i think it looks awesome. Thanks for sharing.
But I foresee dozens of comments complaining that it should be done in camera.... #eyeroll
Who cares where it’s done as long as the end result is good. What I’m taking issue with is the workflow which makes no real sense at all. Why do any baked in tweaks In Lightroom when it could all be done non destructively in Photoshop? The AI in the sky replacement is designed to work with colour images so why do the baked in b@w conversion in Lightroom adding the coloured sky to a b@w image? The basic concept is quite ok but he needs to sort out the erratic workflow.
While the whole idea behind the tutorial is pretty sound there are a few comments he makes that are a bit off beam. The idea of converting lacklustre colour images into winning b@w images is a bit optimistic. The fact that he started with a pretty dam good image that I’m sure would have looked great regardless of being colour or b@w. It’s about giving the idea that a failed colour image can be turned into a black and white work of art is what I take issue with. The other point is his black and white conversion methods. I would have thought, given the aim was to produce a b@w masterpiece, is that is where most of the effort should have gone into to achieve that wining range of tones. Simply clicking in Lightroom or Photoshop for a b@w conversion and accepting what you get don’t cut the mustard. This could have been a really good tutorial if he had written a more realistic intro and sought advice from an experienced photoshop user in regard to the workflow.
Thanks Jason - I unexpectly learned far more about getting a "long exposure" style image than I did about squeezing the most out of my B&W conversions. I can't wait to try it!
For days when I go out without a heavy tripod to stabilise a 5 minute exposure - your technique could be the step that "makes" an image for me. I'm so glad I clicked the link ! Do you have any more images in this style that you can post - or can F-stoppers get you back just for that topic?
Do you have any more such "unexpected" tips hidden away in your technique list?
Best wishes - Paul