
I am a big advocate for tethering. It helps me do a lot of things, from teamwork to backups and more. I’ve always tethered. However, when going on location, this can become a challenge. What do you take, and what do you leave out? Well, here is my on-location tethering setup for 2024.
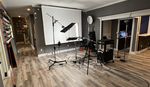
In my studio, I use a trolley to tether. This allows me to be mobile with my setup and take the trolley anywhere it needs to be in the studio. However, bringing a trolley on location is not always possible, as it is a large setup. I do take it when the scale of the production allows, though. When it doesn’t, I bring a scaled-down version of my tethering kit. Coincidentally, this is also the kit I can travel with, as taking a trolley on a train would simply not work. I use this kit when I am shooting away from flat ground. For example, when I was doing a shoot in the hills, I could not bring a trolley. Another instance is when I am in a busy location. Having a trolley takes up a lot of space, while a scaled-down kit is a lot easier.
While I have discussed the benefits of tethering many times before, I want to quickly point out to anyone who’s new to my work that I tether all the time. It allows me to facilitate teamwork, enable image backup, as well as see the final product. You don’t have to use any of the products mentioned in this article, and I am not sponsored by any of these brands. In my kit, you will find TetherTools accessories atop a Gitzo Systematic tripod. Let’s dive in.
The Base
I use a Gitzo Systematic Series 5 tripod for this setup. While it is definitely in the heavyweight league of tripods, it is still lightweight enough to be taken on location. I use it together with the head when mounting my tether table as it lets me level the table easier as well as mount it in a second. Another reason would be that I mounted the head a while ago and have not found the Allen key to take it off, but I digress.
I did a full review of the Gitzo Systematic Tripod, where I talked about how easy it is to set up as well as how good and solid it is. The tripod can support a setup of 40kg. This is more than you need to have on a tripod. Having tested it myself, it can also hold up my own modest 70kg weight. I could easily have my large BenQ monitor on it if need be.
Because it is a tripod after all, I can put it anywhere with three points of contact to the ground. This means I can be sure that I can set up shop in practically any location in the world.
The Table
On top of the table, you can find a TetherTable Master. Not because I am a master of photography, but because it has the most space. I can easily have my 15-inch MacBook as well as the camera on it. Because it is so big, it is often cluttered with various gels and small accessories as well. This table is made from metal, meaning that it is very sturdy and can take a beating. At the bottom of it, there is a very cleverly made mounting plate, which can take a variety of mounts from Arca Swiss to a C-stand. You can really have this on any stand or tripod.

When it came to accessorizing the table, I went for a cupholder and a hard drive mount. While the table is big, I want to have my drives under it, as they take up unnecessary space. As for the cupholder, it is a perfect place to put your small accessories or a beer. You can use it for coffee too. It all depends on the time of day and the nature of the shoot. It slides under the table for transportation and portability.
Another accessory you will often see me use during location shoots is, of course, the Pixel Sunscreen. I believe TetherTools also has a version of this, but I went with the ThinkTank a while ago, and it’s not broken, so why fix it. There are plenty of pockets inside it, as well as a hood which you can hide under for complete darkness. It is a really good accessory for your TetherTable and location shoots. It fits perfectly inside the bag for the TetherTable, too.
Lastly, to secure the setup, I would typically use an AeroSecure strap. Unfortunately, it seems I’ve lost mine so I will be buying another one soon. This strap prevents your laptop from falling down, and actually does a very good job of that. While my laptop did fall from the tether trolley, it never fell from the tether table. Another reason you must have this strap is that the Pixel Sunscreen is very large and can catch wind easily. It’s not expensive and prevents pricey repairs.
I tether into a MacBook Pro 15” from 2019, which desperately needs to be upgraded. It is running the latest version of Capture One to allow me to quickly edit, see, and show the images to the team behind the photo. I really love Capture One and am super glad to have made the switch to it a while back.


Another really good tool that I found to be useful is the new On-Site 25,600 mAh 150W battery pack. Strapped in neatly to a tripod leg, it is able to deliver plenty of power to your laptop. While not as powerful as a Jackery 1000, it is also not nearly as big. I use this daily as a power bank for my phone as well. TetherTools have managed to make this product very versatile. What is more, it can charge my phone noticeably faster than any other power bank I used in the past. This product is part of my everyday carry as a photographer; the camera isn’t actually. I can’t praise this enough, honestly. It is way better than the D-Tap batteries running into a 220V socket and then into the computer. In that setup, not only did you need to bring more kit, but also it was heavier and bulkier. A lot of energy was lost in this setup as well. I shouldn’t even mention that a D-Tap battery takes a very long time to charge, nowhere near as fast, lightweight, and energy-efficient as the new solution.
The Cable and The Camera
I shoot on a Canon 5DsS or a Canon 5D Mark IV. As this is a location setup, I make sure to use extension cables alongside the usual tether cable. I do use the TetherTools cables as they give a very stable, reliable, and fast connection between the camera and the computer. In fact, I didn’t see a noticeable difference between tethering with one cable or with the extension. These cables do come in two colors: black and orange. I say go for the orange. I lose my camera on set way too many times and always use the cable to find it. To guard the connection, I use a baseplate which fixes the cable really well. In the past, I used the Jerkstopper; however, now I see that it is not nearly as solid as the baseplate. Spend the extra $50 on a plate as it will save you from a $500 repair.
Lastly, my connection with the extension is also protected to prevent any dust or elements from getting in the ports, but also to save me from losing images when the cables accidentally disconnect. It is all in orange, which adds style points.


Please mark this article as Sponsored.
For reference, this is what Digital Tech's use on commercial sets. Any digi with 30 seconds of experience actively avoids tethertools equipment.
Laptop on Sticks solution:
https://inovativ.com/pages/digisystems
In combination with their cart's:
https://inovativ.com/pages/cart-workstations
It depends, Jon. I've seen digitech's use cheap tripods and projector tables as well. I think this is pretty much the setup most photographers will take on locaiton. A RocknRoller cart is far cheaper than an Inovativ solution, and it does 99% of the job. Frankly, I can't justify such an upgrade or need for most people to use such a solution.
You might want to reread the name of your click bait article if that’s your argument.
Nice set-up. In the latest version of capture one, if your camera gets disconnected, it automatically downloads the shot images when the camera reconnects.
yes!! I love that feature -- it's called re-tether :))