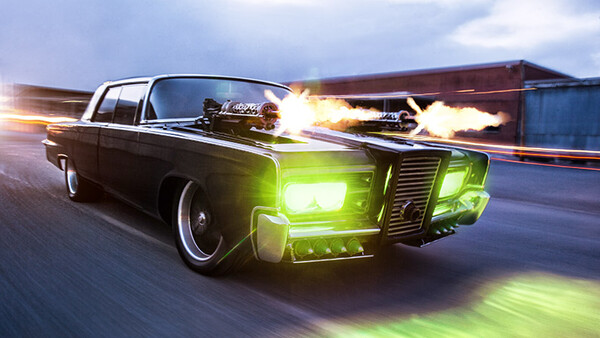
For a couple of years now, I have been shooting a personal series about movie and tv cars, and the people that either own the original vehicles or build replicas for themselves. I call it the Unicorn Project (see more from the series here). Recently, I had the chance to photograph one of the screen-used Black Beauties from the 2011 film, The Green Hornet. I thought this would be a perfect opportunity to try out my new automotive rig from Rig-Pro for the first time to simulate high-speed action shots.
Using an automotive rig is essentially a long aluminum pole, in this case, suction-cupped to a vehicle with a camera mounted on the other end. Using this, combined with a slow shutter speed and proper planning, and you can create shots that make a car safely look like its going very fast where the car looks completely sharp without needing a chase vehicle going the perfect speed or VR software.
This is not an easy feat and I know my first attempt at automotive rig photography is pretty decent, but has room for improvement. Many of my images had vibration blur and I didn't take enough extra plates of the background, which added a lot of unnecessary time to my post-production process. At least this is a learning process and I know my next attempt with be much better because I'll learn from my mistakes!
The guys over at Rig-Pro were kind enough to make a bullet-list of tips to keep in mind when setting up for a rig shot:
- location scouting is essential, and you're looking for smooth, with curves, and on a hill
- set up early in the day, it'll save you valuable time during the shoot
- wax the spots where the cups will be on the car
- mark the cups "F" & "R" with masking tape, as well as where they were located
- always bring an assistant if possible
- choose an interesting focus point, like a headlight, or wheel
- low angles work good for car with big cabin's, like Subaru STi's
- high angles work good for cars with small cabin's, like Lamborghini's
- once you install the rig, don't move it, any you can use any part of any shot
- mark your circular polarizer spots with masking tape, so you never have to look through the viewer
- pushing is a last resort, just releasing the brake, or using a cable pull are much better options
- start at f22 and work your way down to f11
- start at 1.5 seconds, and work your way up to 4-6 seconds
- make sure to do several static shots
- use your 1.5-2-second shots for the wheels, and ground, as they will have more detail, and convey motion better
- use your 4-6 second shots for the background, as it will be more streaked, and smoother, and give the best impression of speed
- parking lights, headlights, brakelights, passing cars, use everything
- straight wheels for straight backgrounds, turned for curves
- wheel-face towards the viewer 98% of the time, but tire-towards the viewer can work
- hold, or push down slightly on the camera during the shot, it'll keep it more steady
- however slow you're going, it's not slow enough
- never have the engine running if you can help it
- if you're shooting in daylight, make sure to have your ND handy
- check your cup pumps often
- remember that rig shots with the driver visible have much more impact
- windows up usually works best, but consider the driver here
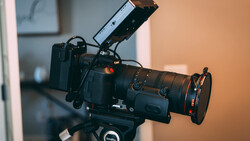
I want to add that for the rig shots I used a Canon 5D Mk2 without its vertical grip to minimize weight, and thus, excess vibration. For the portraits and static car shots, I used my Phase One 645DF+ IQ140 digital medium format. Also, didn't want to risk my medium format on the rig attached to a moving vehicle just yet.
As for removing the rig in post-production, there is no simple way to go about it. It just requires careful clone stamping and blending and a lot of patience. Nik Software's new "Nik Collection" was used to help with adding and removing color saturation in the ground, sky, and headlights (Viveza 2 control points) and adding texture (Color Efex Pro 4). There was a little bit of noise from the long exposure, which I reduced using Nik's Dfine 2 software.
Have you had success with rig shots? Would love to have you share them in the comments section! Remember, this was my first time attempting this on my own. I'm pleased with my results, but I know I learned a lot about getting extra shots of the car stationary as well as the headlights on and off. Also, I wish we had more time in the day. Setup took a bit longer than expected because it was my first time, so we ran out of daylight and also the opportunity to take more images. I look forward to making more attempts in the future! I will be visiting with Black Beauty again.
If you know of any replica or original movie/tv vehicles and their owners around the United States that should be photographed for this series, please message me! Thanks!


14 Comments
Awesome, very detailed, very informative. I need to try this now (well if I can come up with a poor mans version of the Rig Pro that is)
Very good work !
Great! I'm a big fan of this kind of shots, also have my own rig-pro kit, it's awesome.
Some of my latest work: http://500px.com/RaulGzz
Very cool!
Here are a few of my recent Rig Shots
Very good information! I've been doing rig shots for about 6 months now, continually improving and learning better technique. here's my most recent one: http://www.flickr.com/photos/jcareyphoto/8718656144/in/photostream
Great tutorial as always. Did one similar, with a link to your sneak peek a while back at http://www.ryoungfoto.com/2013/04/rig-shot-tutorial-scottsdale-commerci…
great write up as usual, i built a rig a few months back but only had time to try it once, must get out there now summer is on the way (UK) my first attempt
I think that there is a mayor slipoff with lighting, which is: lights from machineguns are not throwing any lighting or making shadows. that could have been solved by attaching some flash units on to the crane/rig, but then again, long exposure and frozen machinegun light/flame just wouldn't seem to be natural.
IMHO more post processing is required here to make it mint.
Fantastic shots and a great tutorial! I'm also looking forward to you following up with the machine gun tutorial.
"- choose an interesting focus point, like a headlight, or wheel". I wouldn't. The focus point of any vehicle (doesn't matter what it is) would be the absolute centre of the grille. As a front, 3/4, you cut a really nice diagonal line across the car with the depth of field. I realise the depth of field might be huge anyway (given the fact a slow shutter speed needs a tiny aperture), but with rigs you need edge to edge detail - not the furthest front light or trunk to be slightly out.
so hmmm.....the thing connected between the car and the camera....can be replaced with a PVC pipe???
pvc droops and bounces WAY too much to use for a rig. rigs (including those from rig-pro) are typically 12-20 feet long and are made of aluminum electrical conduit
I'd recommend using a grip rather than a photo assistant if you are doing these types of shots. They are more familiar with car rigs. If you threw some pipe starters under the car (depends on clearance under the car) and triangulated the rig it would get rid of the camera shake. Also, magic arms are kind of flimsy, throw the camera in a cage tapped 1/4 20 and 3/8 16 and rig it to the pipe with some cheese borough clamps instead. Same goes for the maffers. Use some 6" suction cups that are 3/8 16 and throw some cheese boroughs on there. It will also make the rig safer (using maffers like that isn't really a good idea, if I did that on set I wouldnt work again!) Adding a mast will help get rid of the wobble as well but will add to your post work. Not sure about rig pros quality but you can get pipe from your local scaffolding company that will work and is rock solid. For rigging hard ware check out modern and American, I wouldn't deal with photo companies for this, stick to the people who do it best (film industry vendors). If you are in LA film tools is a good place to start, although quite expensive. Other wise contact your local film equipment rental company and they can help you out.
great tips