
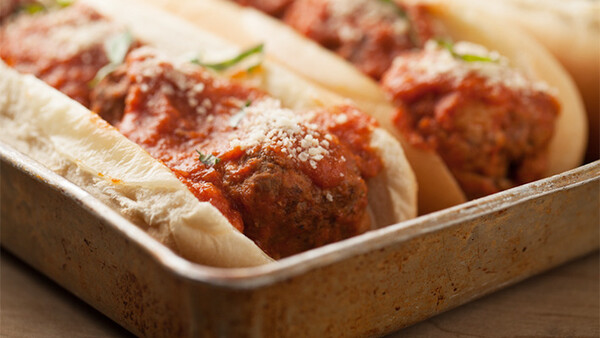
Food styling can take place in the production kitchen and in front of the camera. How do you know when and where to style your food? The answer will depend on what food you are shooting. For food with long shelf lives, like cupcakes, the dish will generally be camera ready when it leaves the kitchen. If the dish involves a sauce and a variety of garnishes, the styling will occur both in the kitchen and in front of the camera. Here is a behind the scenes look at a dish that involves styling in both locations: The Meatball Sandwich.
The base of the meatball sandwich consists of bread, provolone cheese slices and meatballs. These items can all be styled in the kitchen. If you are doing your own styling, I suggest that you figure out your lighting and camera settings before you begin styling. If you are working with a food stylist, have your lighting and camera settings figured out before they leave the kitchen and come to set.
 Here is a look at the lighting options for this sandwich. In option A, I used a gray tile background and an un-geled flash. In option B, I used an aged wooden board and a flash that had a warming gel placed over it. I decided that the warmer wooden look in shot B fit in better with the recipe. The sauce and meatballs in the recipe were homemade, so the warmer feel to the picture worked better for the look that I was going for. Once the lighting was figured out, it was time to move to the kitchen to prepare my sandwiches.
The next two shots were taken in the kitchen so please excuse the unflattering light.
 The sandwich is assembled in a series of layers. The first layer is the cheese. You could put the cheese on top of the meat balls at the end, but for this recipe, I wanted to highlight the meatball and sauce. Covering them with large slices of cheese would take emphasis away from the meatballs and sauce. Adding the cheese to the bread also prevents the bread from becoming become soggy when the tomato sauce is added. The cheese acts as a barrier. The recipe calls for thinly sliced provolone cheese. Provolone cheese slices are circles, so I cut the circles in half and laid them on the sides of the bread (pictured above). The next step is to add the meatballs.

To add the meatballs, first remove them from the sauce that they were cooking in. Second, let the meatballs drain on a plate. I will add the sauce to the sandwich when it is in front of the camera. Third, place the meatballs in the roll between the slices of cheese. When placing the meatballs, I wanted to equally space them and have the roundest parts of the meatballs facing out. Once all the rolls were filled with meatballs, I places the tray of sandwiches into the oven for a few minutes to melt the cheese onto the bread. The sandwiches are now ready to go in front of the camera and have their styling completed. This part of the styling can be done away from the camera, because the dry meatballs on the cheese will hold longer than the wet sauce. Sauce will generally spread across the food they are added to. Moving the dish with sauce applied will cause this spreading to happen even faster. To keep the sauce in its desired place, wait until you are in front of the camera.
 Do you have a lot of garnishes to use? Place them on a metal baking tray for easy transport and organization. To finish the styling of the sandwiches, I will need basil, grated Parmesan Cheese and the tomato sauce that the meatballs were cooked in. I will add the sauce to sandwiches with a spoon. You could uses a syringe, but the larger pieces of tomato in the sauce could clog it. Carefully add the sauce over the top of each meatball. Start with small amounts of sauce and gradually add enough until you have created the look you desire. Remember that it is easier to add sauce than remove extra sauce from the sandwich, so don't add too much at once. When adding the Parmesan Cheese, I added a pinch of cheese to the top of each meat ball. I did this to help distinguish the individual meatballs in the sub. Once all of the rolls had sauce and cheese added to them, I added the basil garnish. Below is a comparison between the styled and unstyled sandwiches.
 Styling the sandwiches this way allows for a variety of shots. Here are two of my favorite shots.
 Garnishes are small details that will often need adjustments to achieve the look you desire. Waiting until you are in front of the camera and under your set's lighting will help ensure that these small details are exactly where you want them to be.
Every food will be a little bit different when it comes to how it is styled, but remember that the styling will happen either in front of the camera or in a kitchen. Spreading sauces and garnishes are two things that will effect this.
Here are a few more things to keep in mind when you are figuring where your food will be styled: your set and shooting location may determine where the styling is done. If you don't have a kitchen on site, you will have to bring the food already prepared to set, or do the styling on set. If you are shooting in a restaurant, a Chef may wait to add a delicate garnish or a sprinkling of seasoning at the end. If there is a long distance between kitchen and set, it may be easier to do the styling in front of the camera. When working with a food stylist, always have a conversation about what will be styled in front of the camera and what will be done ahead of time in a kitchen. Clear communication will prevent any confusion and help ensure that your desired shot is captured!
Here is the lighting set-up. It consisted of one light with a foamboard reflector.

Want to learn more about food photography and styling? Check out issues 1-5 of photographing FOOD.


Join the Fstoppers community for free
-
Post comments and join in the discussions
-
Browse the site ad-free
-
Share your work and get featured in the community
-
Compete in the photo contests for fun and prizes
13 Comments
Great Job as usual Taylor!
This is making me hungry, so I think you did your job!
Yeah great job, they look gorgeous :)
Thanks Bert Chris and Melinda, and Bob! Glad you enjoyed the article
Its great to educate people on food photography, and the photography is good. But if the focus is on styling-then it needs to be strong. The grungy metal pan is a huge distraction to the food. I would also have used shredded Parmesan and more basil for better color contrast.
The photography is fine and the article again fine. That said I can't help thinking a meatball sandwich is hardly the most challenging food for a food stylist?
I think that's part of the point, it's a drastic contrast between the two, despite the simplicity of the food.
Excellent article. This is something that I have been thinking about a lot. I might not have the cooking skills yet but this is a great break down.
What you order vs what you get.
Great job! =]
So pretty much just make the food look good? Got it. LOL another fine waste of time courtesy of fstoppers.
I mean, you can always eat the food when you're done photographing it...
Nice work.
Sorry, but the cheese should have gone on top. As a cook, someone that loves to eat and is completely into the aesthetics of food, nothing is better than a melty, cheesey, gooey, slightly brown plate of goodness. We'll see the meatballs, don't worry. But that cheese would have been the money shot. As is, it looks like someone that doesn't really know how to cook or eat made those sandwiches and they are fine, but not outrageous. If I came to a blog like that, well, I would not be impressed and I would move on.