
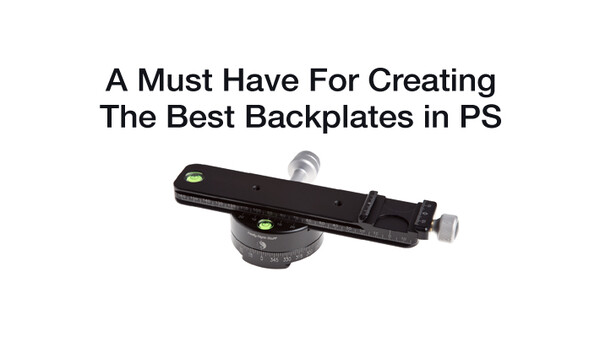
As more and more photographers are shooting backplates on location and subjects in the studio, I've found the best tool for the job isn't necessarily your lens or the camera but a specific tripod head that finds the no parallax point in your lens. This was by far our favorite purchase of 2013 here at RGG Photo.
The Problem With Traditional Tri-Pods
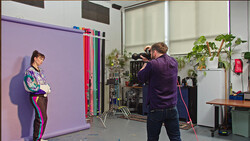
I've had some really great opportunities to create some panorama backplates only to have Photoshop completely destroy and warp the image I was trying to create. I realized this was due to my tripod and lens combination. The foreground elements were being moved too much in relation to background elements and Photoshop couldn't quite figure out the backplate I was trying to create without warping the entire image to an unusable state. In the above video I explain the benefits of using a tripod head specifically made for creating panoramas, especially of panoramas indoors in tight spots. These are invaluable tools if you want to maximize your time alone shooting backplates to then shoot models in the studio. This saves both time and money in production costs by not having to bring an entire crew and model on location.
Start By Making 32 Bit Tiffs
Furthermore in the video I highlight my preferred method to creating a backplate with the most dynamic range by building 32 Bit Tiffs to start with. This gives me the most range and elasticity to push my tones to where I want them and to create a photo that will give me a great starting point to work off of. You will notice that I used eight 32 Bit images to start with, processed the images to a good starting (personal preference), exported them as 16 Bit Tiffs, and then stitched them together using the auto feature is PS6 CC photomerge. This resulted in an image at 300 DPI that is 12322 pixels wide by 5899 pixels high, which is a great starting point for a backplate and working with the information needed. Just keep in mind that working with images at this size can drastically slow down your machine and use up a ton of your system's resources.

You will notice in the photo above that very little distortion in the horizon and very little parallax in things like the light pole on the left of the image. If I were using a super wide angle lens here the image, especially the horizon, would look totally different. Because of the tripod head using the nodal point in the lens I was able to create an image with very little distortion.
Using a No-Parallax Tripod
Really Right Stuff describes the No-Parallax Point positioning as "absolutely critical anytime you're shooting a scene that has diverging/converging lines (roads, paths, fence lines, windows, etc), especially when these elements are in the foreground and close to the camera. In that case, skip to the bottom of this tutorial for further recommendations. Once you've found the No-Parallax Point for your lens, make a note of it so that you can easily repeat your setup the next time." Check out their guide to finding the No-Parallax Point in your lens. Also check out Known No-Parallax points to find the exact measurement settings for your lens. To buy the tripod head click here.
Please keep a look out for part two of this series where we will finish the image. Again I will be the first to admit that this image is nothing special, but just an example to show you the vast benefits to using a tripod head such as this one to create a focal length that doesn't exist with any lens in the world.


Join the Fstoppers community for free
-
Post comments and join in the discussions
-
Browse the site ad-free
-
Share your work and get featured in the community
-
Compete in the photo contests for fun and prizes
13 Comments
The RRS pano head is pretty average, imho. It's nicely built, but it lacks clickstops which are a godsend when shooting telephoto or multirow panos (or 360s, for that matter). It's also pricey as hell.
Sunwayfoto sell their top of the line Arca-based indexing rotator with a disc clamp for around $180, and it's built like a Sherman tank (or, I guess, a Type 99??). Not the dodgy Chinese ebay job the name might otherwise suggest. Similarly, an entire NodalNinja4 360 degree package is less than the price of just a RRS rotator and slide.
Right on Broseph! Not to mention that any seasoned tinkerer can easily customize and improve the functionality/durability of many cheaper Chinese ebay jobs—let alone the Sunwayfoto unit.
If you're going to use this technique a good amount, you really should buy PTGUI. The ability to manually set control points can save many of the images Photoshop could never handle. Photoshop doesn't have near the control PTGUI does.
I'll second that. PTGUI is a godsend the world of stitching.
Hugin is very good as well, and it's free: http://hugin.sourceforge.net/
Both PTGui and AutoPano can take the individual exposures and blend them to HDR while stitching (maybe Hugin too?) You could have tossed the individual images on Autopano and hit one button to get what you spent forever doing here.
Also, a real panohead isn't that expensive, if you get one at the intro level. The ability to do multi-row panos is worth it.
I hope I don't come off sounding critical; I just want to put that info out there.
The RRS unit is a nice mount, but rather pricey. Looking at the video, I realized I could use my $50 Adorama macro focusing rail to adjust the optical center, with finer adjustment to boot. Taking a quick look at the Adorama site, they have a very simple macro focusing rail for $20 that would accomplish the same feat: http://www.adorama.com/MCFRSS.html
The more sophisticated rail can be found here: http://www.adorama.com/MCFRS1.html
The advantage of using these rails of course is that you also have a macro focusing rail!
Spy Black,
That post about the Adorama rails is exactly the same as I was going to post! You are dead right. Also, unless you know exactly where the focus nodal plane of a lens is getting close is about the best we can do. And the Adorama rails suffice for that. I have them and think the tip is great! Better than doing it on the camera tripod mounting point.
You can use the calibration process that was outlined at the RRS site, which is standard practice for calibration: http://www.reallyrightstuff.com/s.nl/it.I/id.33/.f
What is a Backplate?
An image used as a background for compositing purposes. In this specific scenario, the junkyard landscape is used as a backplate. It looked like Gary was going to add a model on top the center vehicle, but that's outside the scope of this article.
If it is a background, why not call it a background. This is dumber than 'dragging the shutter' for 'slow shutter speed'.
It's best to think of the word backplate as a specific kind of background. You could technically call it a background but there are many other objects that could be classified as such. Although I do agree with your sentiment on 'dragging the shutter', the more you can speak lingo, the more confident the art buyer or director will be in your ability to perform in a commercial environment.