Recent Post Production Articles

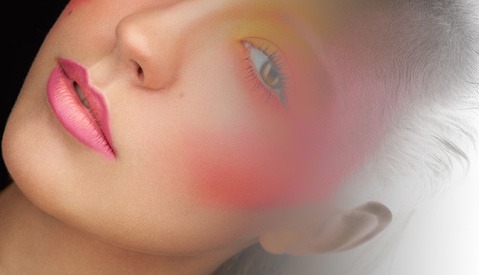
Quickly Fix Red Flushed Skin Within Lightroom

It’s officially hot outside in my neck of the woods, but that doesn't mean I can to take a break from shooting outside! I still have to sweat it out, hauling my gear around from location to location and that means my clients have to feel the sting of the summer heat as well. Although it’s steaming out, I don’t want my images to look like they were taken inside the nearest oven set to broil. Thankfully, there is a super quick and easy way to fix those heat flushed skin tones.

Adobe's New Dehaze Tool Can Recover Incredible Detail

In case you haven't had a chance to play with Adobe's new Dehaze tool, Photographer Bimal Ramdoyal, a redditor with the handle "manual_mode", shared this before and after image he shot during a blizzard that he then processed through the new tool in Photoshop (also available in Lightroom). The results, needless to say, are pretty impressive.

Creating Colorful Portrait Effects In Camera and In Photoshop

So a few weeks ago I found sometime to shoot a personal project, a summer inspired beauty shoot. The idea behind the shoot was to focus on summer and to play with bright and vibrant colors. Prior to the shoot a spent days experimenting with new techniques and different ways of introducing color into my shoot. In this article I want to share a couple of techniques I used to create colorful effects in camera and also how I recreated one of those effects in Photoshop.

Is The Future Of Mobile Filmmaking Closer Than We Think?

While there’s never been a sure fire way to win work and sustain a living as a photographer or film maker, and particularly not today given how much change we are seeing, having your own unique vision can help set you apart from the crowd. Young film maker Paul Trillo has shown time and again how an interesting perspective can separate him and his work from the pack. After watching his recent innovative short, you'll likely never be able to look at your phone in the same way again.

How to Use a Negative of an Image to Improve Your Retouching

Great retouching is all about small details. They often make the difference between a well-retouched image and a world-class retouched image. However, seeing some of the details can be tricky. Especially when you are on the go and retouching on a laptop screen that doesn't offer the precision of a well-calibrated screen with a large color gamut. A couple of months ago I showed you a trick to see more details than what your eyes might see on an image by using a solar curve. In today's article, I am going to show you another technique that I often use to clean up small details. It is so easy you might end up wondering why you did not think of it before.

Dramatic Beauty Tutorial Part 5: High Contrast Black & White Conversion

In the final part of the Dramatic Beauty Portrait Tutorial, we will look at how I do my Black and White conversion. This image is a dramatic image so it calls for a punchy and high-contrast black and white conversion. In this tutorial, I will show you how I stack blending modes and adjustment layers to get my image exactly where I want it. You can follow these steps in your own images or use the techniques and customize them for your own use. In the video you will also see how to use layer masks to create targeted adjustments for your high-contrast black and white portraits.

8 Tips for Taking Epic Adventure Photos

If you're like me, photography is not just about weddings and portraits. I love getting outdoors with my camera and exploring the mountains and forests around my hometown of Seattle, Washington. Anything from a day hike to a multi-night backpacking trip is always an opportunity to photograph my adventures and share these beautiful landscapes with others.

8 Common Client Objections and How to Overcome Them

As you build up your clientele, you will undoubtedly encounter a host of requests that can blindside you. Many photographers will learn quickly how being a good salesmen is just as vital to their business as the quality of their photographs. Below I have compiled a list of the most common customer concerns, and how to best overcome them while building value in yourself and in your brand.

Dramatic Beauty Tutorial Part 4: What Is Negative Dodge and Burn

In my opinion, mastering negative dodge and burn is the key to any beauty retouch. There are many steps and many hours that go into a great retouch, but negative dodge and burn is as essential, if not more so, than any of them. The term "negative dodge and burn" is one that I first heard from fellow retoucher Pratik Naik. It was the concept of having a specific process of removing distractions and smoothing tonal transitions through dodge and burn that was responsible for one of the biggest jumps in my own personal retouching game.

Los Angeles Filmmakers Show Us What 'Grand Theft Auto' Would Look Like in Real Life

In the growing wake of low-budget, special effect action minis whose audience has become larger and larger on YouTube, Sam and Niko's "Real GTA" steps the game up once more with a perfect assimilation of the popular "Grand Theft Auto" video game into real, Los Angeles life. Complete with sound effects recreated as similarly as possible within the actual game, the same Los Angeles street scenes, and smashing special effects (like the famous wads of cash exploding out of recently killed bystanders), "Real GTA" reminds us both how ridiculous and subsequently fun it is.

Editing Tips : Before + After Images

Heck yes! I'm pretty dang pumped about this post. Ever since the middle of high school, I've been immensely interested in "the process." You know, that middle bit between point A and point B that nobody but the artist ever sees. I've always loved peeking behind the scenes to see where something started and what kind of work and thought went into creating the finished product. I know I'm not the only one because a lot of you have asked to see before/after's of certain shots on my Facebook so I decided to create a new series that not only shows you the before/after's (hover...

Google and VFX Studio The Mill Release 360-Degree Film 'HELP' for Mobile

The era of 360-degree filmmaking is upon us. Google, in collaboration with The Mill and production company Bullitt, has released the 360-degree short film "HELP" for free on Google's mobile storytelling platform Spotlight Stories. The film is full of explosions, aliens, and action all within a beautiful 360-degree world.

Dramatic Beauty Portrait Tutorial Part 3: Basic Skin Retouching

In Part 3 of the Dramatic Beauty Portrait Tutorial, we will finally get into the first main step of the skin retouching process. Basic skin retouching involves addressing subtle skin and texture issues on our portrait images. We will not only look at techniques for skin retouching in Photoshop, but also discuss the theory behind our decision process during the retouching process. I will also show optional techniques for those looking for quicker or alternative options during their portrait or beauty retouching. In case you missed it, during Part 1 of the tutorial we went over the lighting and shooting of our image and in Part 2 we looked at the "pre-editing" process.

Take Your Time-Lapse to the Next Level by Blending in Real-Time Video

With less expensive gear being introduced all the time, we have seen a boom in time-lapse films in recent years, making it easier for just about anyone to make their own time-lapse clips. But with the deluge of videos comes innovation and the need to differentiate yourself. Filmmakers have used time-lapse in some creative ways with production techniques like multi-axis motion and post-production software like After Effects to achieve wild results. A relatively new approach is compositing live-action footage over time-lapse video, and it is pretty easy to do.

VSCO Releases Film 07 – The Eclectic Films Collection

Today the crew at Visual Supply Co. revealed the seventh film pack iteration, VSCO Film 07 - The Eclectic Films Collection. This pack has a refined, cleaner, less gritty feel with focus on the nuances of color.

10 Tips for Easier, Better Text Graphics in Your Next Video Edit

In just about every video I edit, during my last or second to last round of revisions I find myself having to add titles, credits, name graphics (lower thirds), and one or two other pieces of text to help explain and give context to the video. Here are my go-to techniques for cranking out decent looking graphics both quickly and efficiently.

How to Easily Create a Tasteful HDR Image Using Photoshop

A lot of people associated HDR with over-processed, surreal images. This is not always the case. Shooting HDR can be very useful in different circumstances. It is often seen in real estate and landscape photography and can be very useful to balance a wide range of light levels. There are many programs out there for merging images together to create an HDR photo, but one of the simplest ways to create these dramatic photographs is using Photoshop's built-in HDR Pro.

Create Realistic Lighting Effects Using Knoll Light Factory

Flare has become a huge part of modern photography for how it can add both depth and excitement to an image. Many of us have resorted to manually creating lighting effects using Photoshop or by layering pre-made textures above our photos. Red Giant, however, looks to replace and augment this rather tedious process with Knoll Light Factory.

Use Luminosity Masks to Enhance Your Landscape Photography

Our cameras today are extremely powerful with settings and features that help us archive stellar image quality. But sometimes the images we come home with just don't capture the true essence of what was photographed and what our eyes saw. The photo is just a bit overexposed or underexposed and doesn't capture what we felt in that moment we pressed down on the shutter button. We fiddle and tweak in Photoshop with sliders and brushes, but there is another tool to add to the arsenal: masks. Specifically, luminosity masks.

Dramatic Beauty Tutorial Part 2: Preparing Your Image for Retouching Using Lightroom and Camera Raw

In Part 1 of our Dramatic Beauty Portrait Tutorial, we looked at the lighting setup, gear breakdown, and shooting of our dramatic beauty shoot. In Part 2 of the tutorial we will now look at two different ways of exporting and preparing your image for retouching. The first method involves creating versions in Lightroom and exporting directly to Photoshop. The other method utilizes Adobe Camera Raw and the ability to make variations within Photoshop. I will also discuss the overall goal of our pre-edit stage.

Coolors Is A New App That Quickly And Easily Generates Beautiful Color Palettes

Coolors is a fantastic new app that I stumbled across the other day. It is an incredibly easy and intuitive way to generate a beautiful 5 color palette for any situation. Primarily developed for designers it has instant appeal to us photographers. We deal with colors in most of our work and knowing how to match and complement effectively can make or break the images we create.

How the Retouching Academy Beauty Retouch Panel Improved My Workflow

Since its first version, Photoshop has changed quite a lot. The functionalities it offers are greater now than ever before. But plugins are legion and for beginners it is hard to differentiate the ones that are truly useful and those that are just a waste of money. The Retouching Academy Beauty Panel has been around for a little while and was revamped very recently. I use it all the time when retouching but I get many questions about it. I am frequently asked if it is worth its price and if it makes my retouching any better. Here is my take on the panel, why I bought it, and above all, why I keep using it everyday.

Sneak Peek of Adobe Mobile Retouching Capabilities

Adobe has released a YouTube video highlighting some of the retouching features that may be available in upcoming Adobe mobile apps. While no release date is given yet, the video shows off some pretty impressive abilities that accentuate the mobile device's touchscreen and makes the application more user friendly for quick changes or creative endeavors. This video has us excited for what retouching abilities are being brought to our mobile devices. Watch the video and have a look for yourself.

Dramatic Beauty Portrait Tutorial Part 1: Complete Lighting Setup and Gear List

This is Part 1 in what will be an 8 part series for a dramatic beauty portrait. In the series of tutorials, we will go through everything from the gear used, to the lighting setups, and all the way through the complete retouching process. In Part 1, I will breakdown my gear list used for the shoot and I will thoroughly go through my lighting setup. In this video tutorial not only will you see the gear and setup, but also a behind the scenes look as me and my team go through hair, makeup, and shooting. The complete series of videos will be available here on Fstoppers and on my YouTube Channel.

Five Common Mistakes That Make Retouched Skin Look Unnatural

Retouching skin is about detail and patience. It can be a real time consuming and can require a high level of precision to keep the natural aspect of an image. Each of us has a different style of editing and our tastes differ. However when giving retouching lessons many photographers ask me about skin texture and how to keep it looking as natural as possible.

This is not a simple answer as it is mostly a combination of elements. In this article I have combined the five things I see most photographers do wrong or too much when looking for a believable skin texture and look.

Start to Finish Fashion Editorial Retouching: Part 2

In Part 1 of the "Start to Finish Fashion Editorial Retouching" tutorial, we looked at how to clean up a white background, how to liquefy clothing to achieve a better fit, and how to clone and heal out distracting elements in our editorial image. In Part 2 we will look at how to go about the more common and essential retouching steps including: skin retouching using dodge and burn, color toning, sharpening, and value adjustments. In this video, I take you through each step and give you insight into the "why" as well as the "how" of editorial retouching.

BTS Video Describes Process of Creating the Human-Like 'Ava' Robot In 'Ex Machina'

Hollywood's latest A.I. thriller, "Ex Machina," promised to take viewers on a fascinating and thrilling philosophical, ethical, and human journey. The Turing test, man's domination over machine, artifically intelligent machines' potential and perhaps inevitable self-awareness and domination over man, and an eccentric Silicon Valley-like billionaire-type leading the helm... how could this not be a great film? More on that later, but to make all of this happen, director Alex Garland and VFX supervisor Andrew Whitehurst had to create a robot that would connect so well with audiences that we would treat it as any other human character.

creative-wedding-shoot

When I saw this wedding shoot I was stunned into silence for a few moments. I really didn't know what to think of it! In my mind, when I think of wedding photography, I think of a world of immaculate white dresses, expensive shoes, thoughtful furnishings and of course, smiling wedding couples and their guests.

Healing and Fill Content-Aware Tools on Steroids Using Affinity Photo

Photoshop has been around for quite some time now. It works great and every photographer has gotten used to it. It is a staple in my workflow alongside Capture One and Photo Mechanic. Until a few days ago, I did not think I would hesitate changing my retouching routine. After a few years of trials and errors I am finally somewhere I feel comfortable with my post-production. However, after having installed Affinity I must admit that I might "cheat" on Adobe Photoshop.

BTS Video Discusses Sound Design in 'Avengers: Age of Ultron'

As we all know, even the most stunning visuals require an equally amazing and unique soundtrack to bring the audience's emotions to their full potential. Supervising Sound Editor and Sound Designer Christopher Boyles from Skywalker Sound discusses his work and the burden of creating original sounds for "Avengers: Age of Ultron" that will stand the test of time.

Watch How Photoshop Manufactures Beauty in 90 Seconds

This ingenious video has gone viral as the true level of photoshopping to manufactures 'beauty' is exposed. In this clip, we see 6 hours of photoshopping sped up to fit into a 90 second clip. All of these hours of work has gone into creating just one perfected image of a model.

guide to contour faces like a makeup artist

Before I learned about makeup I used to strengthen or create contouring in post the same way on every single picture. However, because everyone’s face is different, contouring should differ from person to person. Contouring not only can help create dimension it can also help alter shapes. Let see how we can make our model’s and client’s face look their best without going crazy with the liquify tool. Shadows and highlights are photographers and makeup artists best friends!

Accelerate Your Photo Editing Workflow with Color Lookup Tables

Color lookup tables (also known as LUTs or 3DLUTs) have been a popular tool used by colorists in the video industry for a while and are just starting to find their way into photography. LUTs are a great alternative to actions or expensive plugins that can help speed up your editing workflow.

The Fastest Way To View And Cull Thousands Of Raw Photos Is Now 100% Free For Fstoppers Readers

Lightroom has become the industry standard for editing images quickly but when it comes to viewing and culling images, it's still incredibly slow. On1 has recently launched Perfect Browse 9.5 as the fastest way to burn through hundreds or thousands of raw files and then import your favorites into Lightroom for editing. Oh, and did I mention, it's totally free for Fstoppers readers right now.

As a wedding photographer, I tend to shoot thousands of images at a time. Before I can edit anything, I need to go through each image one by one, delete the bad ones, and figure...

A Fast and Easy Way to Remove Annoying Dust Spots

Dust spots are inevitable, and removing them can sometimes be a burden. While there are many ways to go about removing dust spots, retoucher Chris Lambeth shows us a really quick and easy way to get rid of them. This method for removing them is completely new to me, but I'll be sure to incorporate it into my workflow.

Achieving Perfect Skin Tones and Color Using Capture One

You have probably heard it a few times: photographers raving about how Capture One is awesome for developing portraits from raw files. However, just like when I first installed it, you might not see any advantage over the current raw processor you are using. Then I found a few functionalities that made my workflow that much quicker and my images look a tad better before even retouching them in Photoshop.

Phlearn Photoshop Tutorial: How to Create and Place a Logo in Perspective

In this tutorial, Photoshop guru Aaron Nace of Phlearn.com shows you an easy yet effective way to take branding your images to another level. By placing logos or other branding elements into a scene's already existing spaces (such as billboards, truck trailers, or even clothing) you can really drive home the message you are trying to deliver. Follow Nace's simple step-by-step instructions to recreate this effect in your images.

How Retouching Made Me A Better Photographer

I rarely write in first person but because this is a topic I feel very strongly about, I want to tell you about my personal experience. When I was reminiscing with my wife about the one thing that changed my photography, it was the day I saw the light. Literally. The only way I was able to conceptually grasp light and the way it works was because I started retouching. There is no way to deny it, as I mastered retouching my photography was taken to the next level.

Sports Illustrated Swimsuit Edition Editing: Then and Now

We love Sports Illustrated Swimsuit Edition and we're going to guess by you clicking on this story that you feel the same. We've gathered up a few hilarious blasts-from-the-past covers and a few more recent covers and it got us thinking about how things have changed in swimsuit photography over the years.

Start to Finish Fashion Editorial Retouching: Part 1

Post-Production and Retouching is just as much an integral part of creating a great image or series of images as pre-production and the actual shoot, especially when you are shooting for a client and not just for yourself. Each genre of imagery, advertising, beauty, fashion, etc. has a slightly different set of rules and parameters when it comes to retouching. In this tutorial we will look at the complete start to finish of a fashion editorial image. Last week I posted the complete gear list for this exact shoot. This week we will look at the first part of retouching, including cleaning up our white seamless and correcting distractions in our image.

10 Editing Techniques That Changed My Photography

In the digital age you as a photographer are expected to be familiar and knowledgeable with Photoshop. It can be argued back and forth if this is right or wrong and whether Photoshop is ruining photography. But I see Photoshop as a tool, just as the darkroom was a tool to manipulate images. I have put together this list of 10 techniques that helps me get the most out of my images.

Retouching Eyebrows Like a Makeup Artist in Photoshop

Any good makeup artist will tell you that great eyebrows will make any face look good. Think of eyebrows like frames for prints: when they are beautifully crafted, they will make your prints standout. Eyebrows will do the same for a model's face, whether it is a male of a female model. They can totally change the expression and the look of someone depending on how they are shaped. Sometimes, a makeup artist can only go so far and we are left with work in post-production. So it is important to have a little knowledge on what the eyebrows should look like to get the best out of a model's face.

Hands-On Review with Macphun's New Noiseless Pro Noise Reduction Application for Mac

The popular Mac photography software company, Macphun, released a new application for the Mac that promises incredible noise reduction processing. Noiseless comes in regular and Pro versions, the latter of which include increased capabilities like RAW processing and included plug-in support for your other editing applications and both of which provide what is truly some of the best noise reduction available.

These Filmmakers Create The Ultimate Bachelor Party: Rambo Day.

What happens when you take a group of best friends who are all talented photographers and cinematographers and give them a near unlimited budget? The greatest bachelor party of all time. A group of friends decided that they needed to give their best friend a truly epic send off before his wedding.

This YouTuber Has Figured out the Perfect Viral Video Formula: Danger

Even if you don't know his name, you probably have seen this guy's videos. Devin Graham (now more commonly known on YouTube as Devin Supertramp) has blown up on YouTube with viral video after viral video. He's became known for his parodies of video games such as "Assassin's Creed," "Far Cry 4," and "Halo 5" in his "Real Life" series but more recently he has created a new genre: videos of people having fun in the most unique ways.

PhotoRec: The Free Photo and Digital Asset Recovery App

If you're a Mac user, stop what you're doing and download this. I'm serious. Digital asset management (DAM) isn't everyone's favorite topic but it's an incredibly important part of any professional's workflow. But when things go south, you need to have a recovery plan — that's where PhotoRec, the free text-based app by CG Security, comes in.

Google's Mobile Photo Editing App Snapseed Receives First Major Update Since 2013

It's about time, Snapseed. Google delivers big with the much anticipated 2.0 version of their free and wildly popular iOS and Android photo editor for the first time since 2013. Some of the the new features of the welcomed update include new filters, brushes, and a spot repair tool for quick cloning on the go.

Adobe's New Morph Cut In Premiere Pro CC Is Almost Like Magic

If you are a videographer or a photographer dabbling in video you know how much of a pain in the ass it can be cutting interview footage with just one camera angle. The feared "jump cut" in an interview can completely ruin the overall production and professionalism of your entire video project. Luckily, Adobe has recently debuted their new Morph Cut tool in Premiere Pro CC to help filmmakers fix this sometimes unavoidable problem.

The Easiest Photo Edit That You've Never Considered

As photographers we like to believe that everything we shoot is flawless straight out of the camera. The truth is that, most of the time, each of us spends more time and effort editing our work than actually shooting it. We will completely change the color or the crop of an image without thinking twice. Why then don't we at least consider one of the easiest way to completely change an image; the "horizontal flip."