
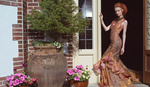
This week's Lighting Breakdown will focus on composite images, breaking down this specific fantasy image as an example for what you need to do to create believable composite lighting.
This photograph wasn't intended to be a composite, but living in a place where thunderstorms can show up at almost any time, I knew better than to trust to summer sun for an easy outdoor shoot. The day before this shoot was to take place, I checked the weather, and sure enough, they predicted thunderstorms during the time I needed to be shooting. In order to protect the shoot, which had been planned for a month in advance with team members coming in from out of state, I went to the location the day before and photographed back plates of the scenes I intended to use.
When the model was ready to head to location, clouds were already beginning to boil across the sky. We had been on location for no more than five minutes when the first crack of thunder warned us. Seconds later, my phone vibrated with the severe thunderstorm warning, followed quickly by a flash flood warning. We had to leave the location and take refuge in the studio.
At a time like this, when a shoot can't be rescheduled, a photographer has got to make the best of a bad situation. I had already chosen the backplates I wanted to use if we got rained out, so I pulled up the image to be sure of light direction and light quality: it was diffuse, directional light. To mimic the natural light created by the clouds moving across the sun and filtering through the canopy after 4 pm, I needed to create a large light source that was off-axis from my model. Rather than pointing the light directly at my model, I fired it at the white ceiling from a direction similar to the sun's position.


Because the ceilings weren't too high, enough light bounced around in the room to keep the shadows from getting too dark, which suited the way light behaved in my backplate.
While editing, it was important for me to pay attention to the color of the whites and blacks in the backplate so that I could match those in the photograph of my model after she was placed in the scene. After that, I did the color grading that brought the entire image together.
The lesson for creating composites in situations like this is to pay close attention to the quality of the light in the backplate. Is it hard or soft? Flat or directional? Are the shadows open or dark? Is there more than one light source? Is there bounce light? Is there atmosphere in the air? What color temperature is the light? All of these questions will point the way to the light choices you need to make to mimic the light situation in your backplate when you shoot your model.


Composites are a fantastic tool for storytelling, but sometimes, they're the answer to dealing with Mother Nature when she's got an attitude problem and your shoot can't be rescheduled.
Whether you planned for a composite or not, the lessons remain: pay close attention to the light in your backplate, and mimic that light when you shoot your model. Pay close attention to where your model is in the scene, because the light can change dramatically depending on where you plan to place them. Look at the light color, and recreate that with either gelled lights or in Photoshop.
Have you ever created a composite? What was your process?


A woman (Mother Nature) with an attitude problem? I've never heard such a thing! ;-)
I almost never do composites due to the difficulties you address. Having read your article, though, I feel better equipped to do so, should the need or situation arise. Thanks!
It's funny because it happen that I gave me the exercise of doing fairy a few years ago for the purpose of working on the composite issue ...
I still have them visible here : https://www.facebook.com/pg/SamtenPhotographe/photos/?tab=album&album_id...
Let me know what you think ;)
Funny, I've been working in a series of images based on Victorian era fairy paintings, and I've been dealing with not only lighting challanges but luminosity emission, as some of the fairies are luminescent. I have the luxury of shooting the models indoors, as they need to be scaled down anyway to their miniature worlds, and I shoot the background plates seperately.
One thing I do with the background plates, besides that they all need to be image stacked, is shoot an additional shot with a white ping pong ball to help me define the environmental light, shading, and color to help in lighting in the studio shots and, more often than not, re-lighting in post. If you're not scaling, I suppose a larger ball would be in order ( like a white soccer ball), but this approach greatly helps you see the effects of light in your scene.
I was just working on a composite and the lighting sources are not even close, what's your method of re-lighting in post? I love the ping pong ball idea, sounds like a must if your shooting for composites!
There are a multitude of ways to re-light, but one that I use often are levels adjustment layers set to screen/color dodge (dependent) and multiply/color burn (dependent) with opaque masks to paint through. Unless you're already silo'd, you may need one or more alphas (alphas are always part of the equations ;-).
You then use these in combination to lighten and darken areas as needed to change the apparent lighting on the subject. If you have the luxury of access to raw files, or are shooting the project yourself, you can also render out in 16-bit to give you some extra range if you think you may need it (I rarely do). Your project can get "heavy", dependent on your computer hardware, especially if you make "smart" layers.
Very useful article. Thanks for posting this.
Great work