
I recently noticed that a handful of photographers were producing images that had a look as if they were stills captured from films. A couple of the most well known photographers of this genre are based here in New York so I got them together and challenged them to not only come up with a dynamic personal project on the fly incorporating this cinematic look, but to share with us how it is achieved. Read on to find out how it all went down...
The power of the Fstoppers community is IMMENSE. I wanted to try and utlize it to do two things for this article. First, see how a number of experts who produce the “cinematic” look do it, and share that learning for the community. The interesting thing about this look is you can apply this look to any image, from a street portrait to a landscape shot. The content is far less important than how the image is processed or “treated” (color correction and grading, much like film footage is processed before we see it in theater).
Regardless of your love or hate for this look, I really enjoy the intersection between stills photography and motion, so this was something I found interesting to look and thought others might too.
Secondly, I wanted to use the power of the community to bring some photographers together for a unique project and challenge.
I came across the work of local New York City based cinematic shooters Dennis Cacho and Andrew Mohrer. If you have any doubt about the type of work I’m describing when I talk about cinematic style shooting, check out some of their work here:
Some of Andrew's shots:


Andrew, a Brooklyn native born and raised, and widely regarded cinematic shooter, explained how he got started with this look, “After wanting more and learning how to compose a better frame, I really got interested in the process of coloring my pictures and making these scenes look like frozen frames out of movies”.
For more info on Andrew, you can watch this short interview that was recently put up by Notion Boulevard:
Dennis, a native of the Bronx, also demonstrated a knack and eye for cinematic style shooting as can be seen in his shots here:


Andrew and Dennis both share a love of story telling. When I asked about their motivation to shoot this look, Dennis chimed in, “I loved seeing how much a single image could convey and tell a story that doesn't exist. The thing that caught my attention with cinematic photography was the framing and the dramatic lighting in most of the images.”
So How Did It Work On The Day?
Dennis and Andrew both shot with similar cameras on the day, but in very different ways. Andrew shot mainly with a fixed Zeiss lens, manually focusing using his LCD. Dennis switched up lenses and shot much more traditionally, through hthe viewfinder.
I was curious to see if I could build (even a some small way) something new in the photographic community. So our story began.
I set out with Andrew and Dennis and we spent a couple of hours walking together while they shot the streets. The challenge was to basically tell the story of the city, but interpreted through their own eyes and to see if we could tell a cohesive story with both sets of images.
This was a friendly challenge to them both to see how two photographers could work together, inspire each other and use their own vision and style to interpret the same scenes in different ways. While the results might not be fully cohesive, it was great to see them working together and inspiring one another.
Here are some shots of the guys on the day of the challenge:

Andrew (left) and Dennis (right) set off to capture the city

Zeiss manual focus with the LCD is Andrew's preferred style


Sam "The Tailor", a veritable Lower East Side institution. After posing for some street portraits, he promptly tried to invite us into his store to try on suits.
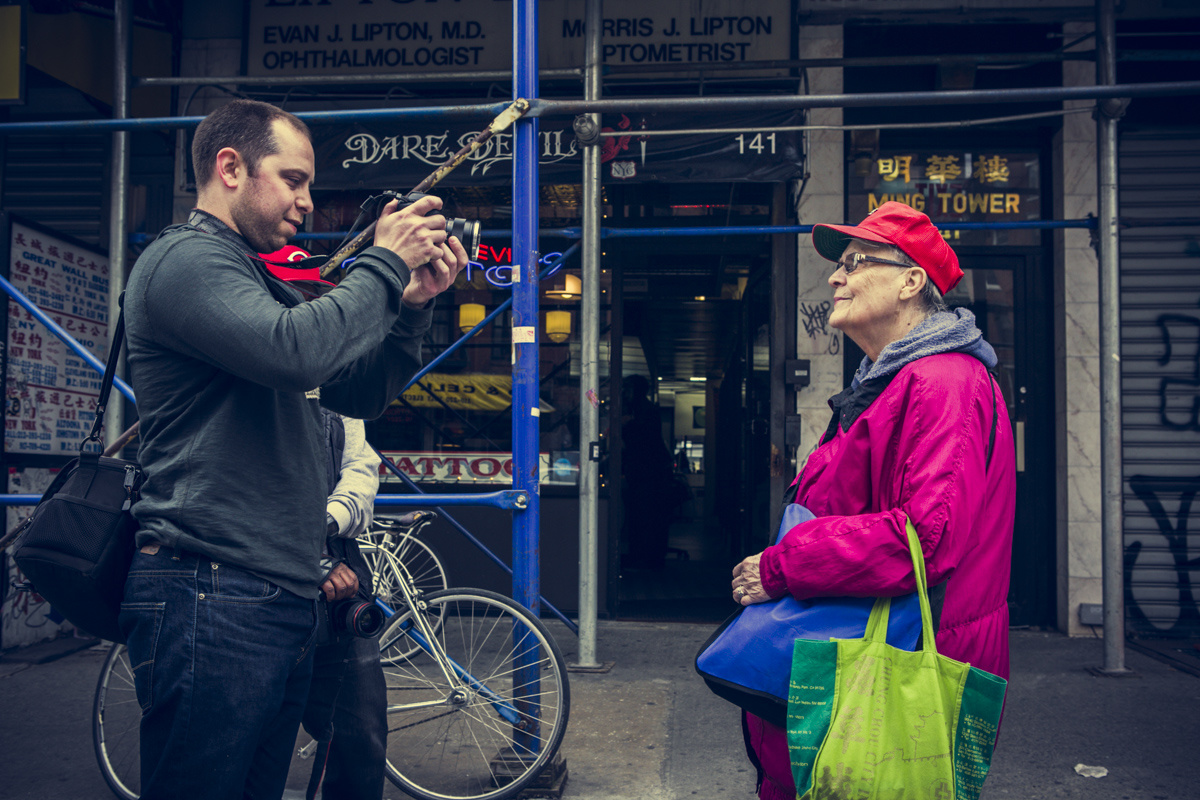
Helen was a character. She'd lived in the neighborhood for more than 50 years. She had a story or two!

Andrew shares his shots of Helen with her as Dennis steps in to shoot
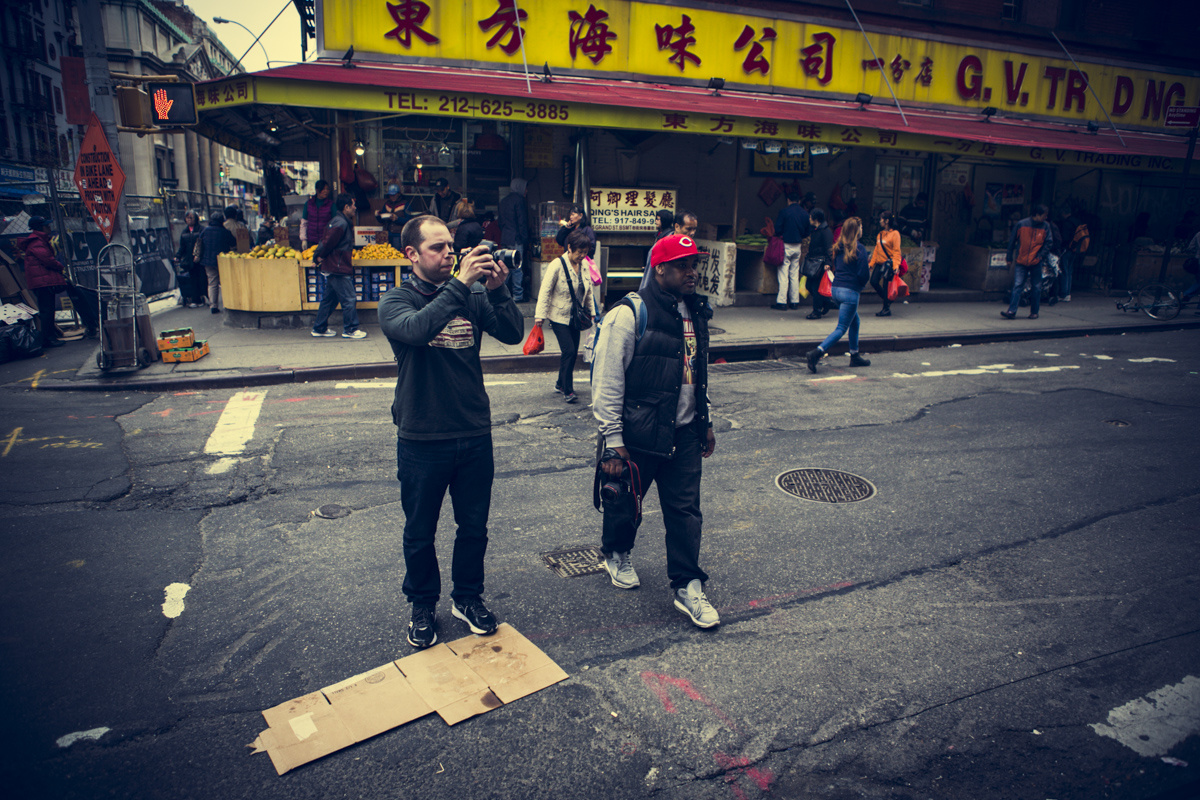
Chinatown, where our challenge ended
As Dennis notes it’s way more than just picking an interesting subject. “It’s not just the person but the environment too. You sometimes have to study a person’s movements for a while before you take a shot. A good starting point is definitely knowing how to frame a shot”.
Andrew shared a similar view point. I asked him about the challenges of shooting like this. “Giving the viewer an interesting point of view is important as well. Composing an interesting shot can be difficult on the street. You hope your subjects fall in to place and sometimes they don't. It's out of your control but maybe that's part of the fun when it all comes together.
Some of Dennis’s shots from the day:
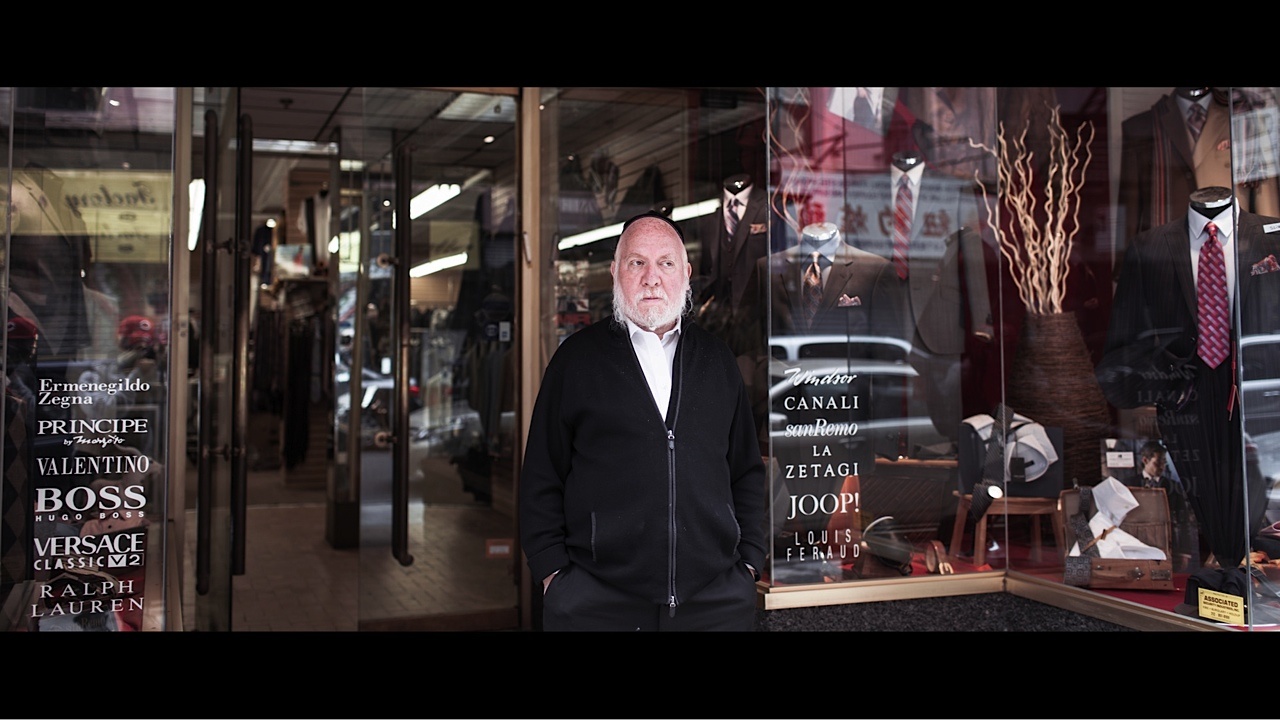
Sam poses while trying to sell us about 3 suits a piece.

Helen captured while talking about how the neighborhood used to be back in the day

And a few shots from Andrew:


Helen poses for Andrew

Andrew grabs portraits of Sam while he scans the street to see if there is anyone he might be able to sell a suit or three to

Did the guys tell a cohesive story? You can decide. Regardless of how successful or not this challenge was, it definitely brought three strangers together and allowed us to have fun and bond over photography for a few hours.
The Benefits To Client Work
Interestingly this look to his images had really helped both their client work too. Andrew explained:
“I have met some of my favorite photographers from around the world who have come to visit me in NYC. Got to be a part of ad campaigns for the gear I shoot with (Canon - Asia), (Carl Zeiss Lenses - Germany). Iv'e done commercial work for major hotels and businesses across NYC. Currently I'm working with Dj Premier on a video series called "Bars in the booth".
Dennis has also used this cinematic look in his client work:
“This style has helped me land a few paid gigs. I just was asked to do an engagement shoot which was different from most traditional engagement shoots.”
How To Achieve The Cinematic Look
I asked both Dennis and Andrew how they approached achieving this look. While they both agreed there is no one magic formula for every shot, as each shot has it’s nuances, there was a general approach.
Andrew explained his approach as follows:
I start in DPP (Digital Photo Professional) this is where I process the RAW file. I correct tones and I play with the curves then I import to Lightroom. When in Lightroom I do more coloring and correct the perspective and crop. Off to Photoshop where I do some final touches and polishing, that's where I add the letterbox.
Dennis prefers to use Lightroom for his color and grading work, then like Andrew, uses a few simple steps to apply the widescreen look and details his way of achieving his look through these steps, making global adjustments to the image:
Step 1 – Take the RAW image and import to Lightroom

Step 2 – Play with split toning to achieve the start of a color look (see example where the warmth adds to the feel of Fall)

Step 3 – Adjust color saturation and luminace to suit
Step 4 – Adjust blacks, color temperature, shadows and saturation
Step 5 – Add a slight vignette and grain, to make it more “film-like”, less digital and clean
Step 6 – Export out to PS. Click the padlock to Unlock (Option (Mac) or Alt (Windows) on the padlock.
Step 7 – Add a black solid layer underneath the background layer

Step 8 – Use the Marquee tool to choose a fixed ratio for width and height. Enter 16 for width and 9 for height to geneate a 16:9 widescreen image. Drag the marquee to cover the 16:9 crop area. The go to Image > Crop in the menu
Step 9– This time select a fixed ration of 2.35:1 for an anamorphic fee. Don’t crop – rather, add an Adjustment Layer and click the small "link" symbol between the image and the adjustment layer to Unlink them from one another
Step 10 – Back to Layers panel. Right click on mask and select Apply Layer Mask to apply the mask to the image
Step 11 – To align the image perfectly inside the black letterboxes, hit Cmd (Ctrl in Windows) and A to select the entire document, then right click on the Adjustment Layer and Apply Layer Mask to apply mask the image.
Step 12 - Select the entire document, then Go to Layers menu and select Align Layers to Selection and then select Vertical Centers to align the layer vertically
More details and a full walk through for the cropping can be seen in this video courtesy of Brodie Butler:
Final Thoughts
Hopefully this article has been useful for you to see how you could apply another look to your images. I find it fascinating look to have still photographs look like they could have been taken from a film. As the worlds of ultra HD and cameras that can shoot at ever higher frame rates continue unabated, I’m sure we’ll be seeing more of this sort of look on other projects in the future.
This exercise was also testament to this website and the community. Whether you’re a reader or a writer, all of us have the power to connect with one another in new ways, I can highly recommend it, we had a great time and all made some new friends. If we all take some small step to reach out and bring other members of our community together, we’ll all be a lot better off for it.
Special Thanks to Both Andrew and Dennis. More of their work in the links below:
Andrew:

Dennis:
If you're passionate about taking your photography to the next level but aren't sure where to dive in, check out the Well-Rounded Photographer tutorial where you can learn eight different genres of photography in one place. If you purchase it now, or any of our other tutorials, you can save a 15% by using "ARTICLE" at checkout.


Glad my tutorial came in handy guys! Thanks for the mention.
Thanks Brodie, was really useful :)
Yes thats where I found the process for cropping and want to personally thank you for it.
thanks for the article, the cinematic look really is a style that appeals to me :)
You're welcome Mujtaba, let's see some shots now :)
Excellent
Glad you liked, Lex!
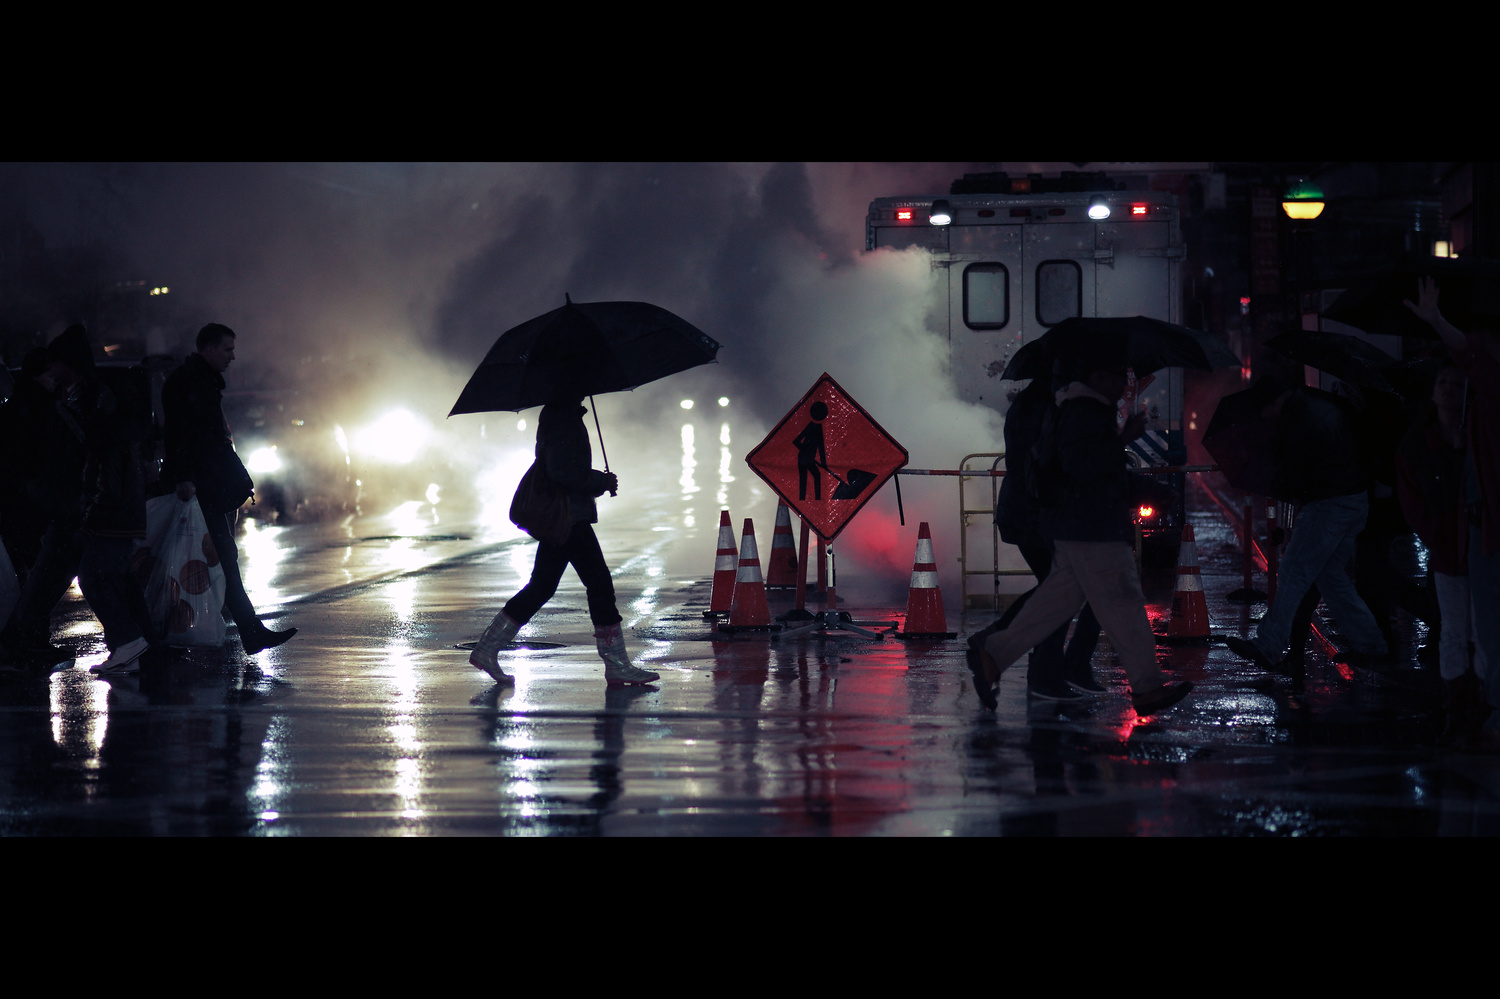
Those shots at the top of the article are gorgeous.
Those are some of Andrew's shots i believe :)
would not be easier to shoot film for achieving the "film" look?
There are some great movie film negatives out there, like the CineStill 800, the Lomo Cine200 and of course some excellent classic ones like Portra, Ektar, Tri-X, etc.
I love digital, but I'm aware of the medium limitations. For dynamic and tonal range and for skin colours, Film is still the king.
Hi Edgard, the point of this cinematic look is not to make digital look like film as in, analogue, it's to make a still image look like it came from a film (or movie/motion picture, if you prefer the American terms :)
Hi David. Yes, I understand, but the classic movies/films looks are mostly analog and most of all digital movies try to emulate the analog film look, but choose digital for reducing production costs.
Thank you for the article. Although the tutorial mentioned the steps taken to achieving the film look, I wish it was a little bit more detailed. For example, should the picture generally be saturated or desaturated? Should the blacks be crushed (high contrast) or should we maintain details in shadows? Nonetheless, thumbs up! and thanks again :)
Thanks for the all the positive comments! Denny I think the "cinematic look" is generally desaturated. With that being said there are many different tonal pallets used in various movies. I get a lot of emails asking how I color my images, it's almost an impossible question to answer. I just push each individual shot in the direction I feel it should go. When I do come up with a good recipe in Lightroom I do save the preset. That way later on I can try applying it to future pictures, sometimes that could be a good starting point.
That's awesome! Thank you for sharing Andrew!
Thanks Denny. For me I tend to desaturate and go into HSL at times and adjust certain colors that I want to pop in certain images. I try to maintain details in shadow and I usually keep contrast at 0 or lower.
Got it! I will try these tips out. Have been trying to get the "look" for a while and bam Fstoppers covered it. Thanks for sharing Dennis!
Hi Danny, thanks, glad you enjoyed it. I should have elaborated on your point in the article, as it was also the starting point for my discussion with the guys - where do you start in the coloring process!
As Andrew mentioned, and as Dennis also told me, they might start with some kind of preset but that's just a starting point from another image. From where our discussion went, there is no "one size fits all" and each image has a different color palette and tonal range that fits. But desat is a good starting point as Andrew mentioned. It's basically about experimenting until you get somewhere close to where you want to be and then fine tuning. Also, reading up on how colorists color movies is a great point of reference.
Definitely going to have to give this a try and see how it looks on my work, if not just for kicks and experimenting.
Awesome article thanks :D
Thanks Elliott, glad you enjoyed and be sure to post your images on Fstoppers for us to check out!
Very interesting article! Looks like I've got a few more peoples work to follow now! Great stuff. Also, Brodie, great tutorial. Thanks for sharing.
Thanks Matthew, glad you enjoyed and got some inspiration from it :)
Great article as always Dave. This will give me some good weekend inspiration. I've been looking to switch up my style.
Thanks Manny, when are we shooting again!?
Great article Dave!
Thanks Sid, glad you enjoyed!
I'm surprised you guys didn't mention Jeff Krol, his cinematic stuff is amazing!
Hi Dan, yep his stuff is really nice, i agree! I specifically focused on New York-based photographers working the cinematic look, as this project was about also trying to bring a couple of photographers together to see if we could work together and create something.
I actually registered for this article. Thank you for posting this, and thank you for being so detailed. I've been fan of both these guy's works on flickr for some years now. The end results are fascinating to me as apparently I'm a big fan of this style. Now is my turn to go back and try something similar although I still can't figure out their thought process during PP work. In addition to these photographers, I would also add severalseconds to the list (https://www.flickr.com/photos/severalseconds). His work also in similar style.
Edit: also onesevenone - https://www.flickr.com/photos/onesevenone
Both are amazing photographers whom i've been following for a long time and even had the pleasure of shooting with Stefan awhile ago.
thanks Daniil and welcome to the site! Glad you liked the article, and thanks for referencing a few other great sources of inspiration for the community.
what i was looking for... thanks guys.!
Thanks Michael, glad it hit the spot!
That is a very well written tutorial!
Thanks guys!
Thanks Christian, you're welcome!
Definitely achieved the "could be a still from a movie camera" vibe. Nice to see street photography with a nice black level. Besides the focal length and aspect ratio, I think it's the black levels that are most indicative of the cinematic look. Especially since so many photographers on instagram and other social media are obsessed with the murky lifted black levels these days.
nice work.
For others like me, who don't have photoshop, I think I came up with a way to do it with just Lightroom + any program (I used microsoft paint). I could be wrong, but I think this keeps the cropping of your image down to a minimum. If there's any shortcomings or ways to tweak this even more, please feel free to share...
1) Open your Raw file in Lightroom, and tweak it how you see fit.
2) Choose Crop Overlay.
3) Go to Aspect, open the dropdown menu and choose "Enter Custom", and enter in 2.35 x 1.
4) Now drag your selection to your preferred framing, and click Done to complete the step.
5) Export the photo under a different name (for my example, I chose "Swordfight").
6) Now choose Reset to go back to the original Raw image you started with.
7) Like before, choose Crop Overlay, then go to the aspect dropdown menu, but this time choose "16 x 9", and then click Done (framing won't matter, since youre using this just to get the image dimensions for later).
8) Now export this photo, and save it as "SwordfightFrame16x9".
9) Find where you saved this framed version, right click it, and write down the properties (for my example, it was: 6,000 pixels x 3,375 pixels). Once you have that info, you can delete this photo from your computer whenever you want. It's no longer needed.
10) Open Microsoft Paint and create a new image with the same width and height (must be by pixel properties).
11) Bucketfill this image all black.
12) Choose the paste drop down menu, then choose Paste From, and find your 2.35 x 1 image you saved earlier. This will paste your 2.35 x 1 over your 16x9 frame.
13) drag the pasted image into place (you'll need to eyeball it until it's just right).
14) Save as a new image "SwordfightCinematic", and you are done.
By the way, I took this photo at the Brooklyn Botanic Garden, during their Cherry Blossom festival, just in case anyone was interested. :)
edited: kept saying Lightworks, meant Lightroom. ALWAYS get the 2 mixed up, ha!
That's great Daniel... Thanks for sharing, it's part of the fun coming up with these different ways of processing shots. There are many ways you can go about achieving the look you want. The crop is essential to making it feel like a cinematic frame. Yet its the tones of the image and applying the right "look" which really conveys the mood. I would love if more people would like to share their cinematic photos with us!
One more example, using the same steps. This time with a shot I got during a candlelight vigil for a missing autistic boy who's body was found shortly after this took place.
I'm kind of lucky, working as a truck op for a news station. I get access to allot of places in nyc where we are sent, yet have enough downtime in my job where I can take photos like these.
For the grain, I went with a 50/40/30 amount, size, roughness. Would you suggest an different approach?
Nice shot of a sad story. Lots of emotion in this single image, well done Daniel.
Interesting how he shoots with live view all the time - and not with the view finder - just my 2c :) Very cool and thnx for the article
Thanks Tobias, glad you liked the article.
He actually mixes it up - if you look at his video interview, you'll see he doesn't always shoot live view, but he does seem to prefer it.
In the article he said that his weapon of choice was a manual Zeiss-lens and looking at the clip, it seems that his camera is a Canon 5D Mk something, is anyone else here a fan of that kind of setup? I just can't seem to get the focus right with that sort of setup. The screen is way too small to judge if the focus is spot on and zooming into the picture ruins the rest of the composition for me, so I'm sticking to AF for the time being.
Does anyone have any pointers about how to shoot a manual lens with a modern Canon-body? I know I must be missing something, or the Otus (among other brilliant manual lenses) would just not make sense.
1) Not shooting wide open and understanding hyperfocal of particular lens can help a lot.
2) Instead of "looking for sharpness" you can learn estimating distance from your subject matter and learning where your focus ring should be in this situatuon
3) With points #1 and #2 in mind mastering manual lenses in dynamic environment is all about practice. It might take few hundred or even thousand poorly focused pictures. But after some time muscle memory kicks in and your will start to nail it. :) When I first started shooting with manual lens I was absolutely sure that it is impossible to learn but it really is.
Keep practicing!
And always remember the godfather of street photography:
"Your first 10000 photographs are your worst."
Henri Cartier-Bresson
Forgot to add. I also like a combination of 5D Mark III with 50mm Zeiss lens.
Thanks for the pointers, perhaps I'm just too impatient and I should just calm down and learn one lens at a time, but I really feel like I've missed more shots than it's worth so far.
In your opinion, what is the advantage of shooting manual?
When you master manual focus it actually can be faster and less accidental then autofocus. Also there are situations in which autofucus gets lost and block you from taking the picture, with manual focus it might by slightly blurry but you will get the decisive moment you were looking for :)
I aim to shoot wide open for the most part and the best part about the Zeiss glass is how sharp it is!
Hey David,
I do own some Canon L glass as well and its serves it's purpose for certain shoots. Personally I just love the rendering of the Zeiss glass. I guess after 2+ years of chasing around my young son and manually focusing with Zeiss lenses I'm prepared for anything! Generally I compose the frame in Live View than zoom in +5 to pinpoint where I want to set my focus and quickly snap! You could say it's not the traditional way to compose a frame but when done properly it can't be beat...
Sounds like I have some practise ahead of me =)
Thanks for the tips, I'll definitely give it another shot.