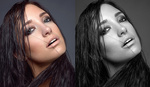
When you're shooting portraiture, particularly outside without artificial lighting, you'll often need to brighten your subject a bit in post. This can create a few issues, but this helpful video will show you how to obviate those potential problems and create a higher-quality result.
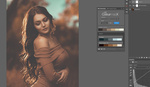
Coming to you from Aaron Nace of Phlearn, this helpful video shows you how to handle a situation you'll likely run into quite a bit if you're shooting natural light portraits: fixing an underexposed subject that's a consequence of protecting the highlights elsewhere in the image. The problem is that shadow areas often hold less color and have a somewhat different different color temperature than the highlights, which can lead to an undesirable look if you simply brighten your subject. As such, you'll need to adjust the hue and saturation on your subject a bit to achieve a more natural result, which Nace guides you through in the video above. A quick tip: make sure you split the Blend-if sliders as he shows. This feathers the transition into the adjustment layer instead of creating a hard edge, which ensures that you get a natural result. It's a great technique for portrait and wedding photographers to have in their bag of tricks.


Didn't even know that adjustment layer was an option, ha.
Nice tips!!
Thank you, another very helpful easy to understand tip to share with fellow photographers who are not familiar with Photoshop.