Photographers, are you looking for ways to increase your print sales? I have a few super simple but often overlooked concepts that are not only easy but successful. Jump in and let’s explore how you can make panoramic prints profitable.
Let’s discuss your market. Who buys your prints now and who do you want to buy them? Whether you sell through a gallery, your own website, an Etsy shop, or other art-focused platforms, you will find that buyers look for and purchase art for a reason. For landscape photographers buyers are often situational such as customers who have been to a location and want to commemorate that, clients or interior designers who want to decorate a space, or professional entities like a doctor’s office or hospital that display artwork. Unraveling what appeals to them all can help you create art that you can sell to each market, therefore covering all bases and increasing your profits. This is where panoramic prints shine.
Selling to the Average Client
In conversations with non-photographers the overwhelming consensus is that panoramic photographs look unique, show more of the scenery, and make a big statement as a wall print. As the photographer, I understand the root of this. When most travelers visit a location they use their cell phones to capture memories and the beautiful views. Nowadays cell phones take great photographs. However, while the images are good many users just photograph in standard mode, a snapshot if you will. Although most cell phone camera apps do have a panoramic mode, not many people are aware of it or use it. Therefore when presented with a panoramic image it appears that much more special. In the cell phone day and age when almost everyone has a camera in their pocket you are creating and offering something different beyond the average snapshot.
Capture the Hearts of Your Potential Clients
It is also about the experience. When viewing a scene as a human we look around taking in the view at a vista, beach, forest, really anywhere. A panoramic, being wide, replicates the human experience of how we see a location. To prospective print buyers, this wide all-encompassing photograph visually brings them into the scene. For buyers who have been to a location, it brings them back to standing there taking in the views. They often purchase a print of somewhere they have been for nostalgia and to be able to gaze upon a fond place and memory. This is often called an emotional purchase due to the heartstrings calling your customer to the photograph. Many times you aren't just selling a print but a story, a place, a special moment. The print becomes a more valuable piece due to its significance.


The Wow Factor
For buyers viewing a scene for the first time, the panoramic experience simply due to the format draws the eye from side to side. In a way, it takes longer to look at and process visually therefore drawing more attention to the details of the scenery. These types of prints are powerful pieces. When utilized for a stunning location this wow factor combined with a format that draws attention makes art that people enjoy as a big statement print.
Selling by Decor
For clients of any type, the format of a panoramic print can “fit” in many types of spaces. You can in your marketing or sales conversations reference how perfectly they fit above a fireplace, couch, counter, table, etc. A panoramic print can fill a space like an empty hallway or reception area. This greatly appeals to clients like interior designers or businesses.
Where to Start
The first step is building a set of marketable panoramic images. If you don’t already have any panoramic prints in your portfolio it is easy to start. There are probably a million tutorials online but here is how I make them. In the field, I create panos in these typical scenarios:
- The location lends itself to the format due to being a wide scene with beauty all around
- I can't back up enough to fit the scene in one or just a few frames, so I need to create a big pano to fulfill the desired composition
- I see an amazing composition but I want it to be super high definition so I create a pano just to have high detail and quality
While panoramic images are often only thought of for landscape vistas they work well for city street scenes, skylines, town squares, tall buildings, bridges, farm scenes, forests, and even small macro scenes or abstract textures. I have even seen portrait photographers create hero-style images with family portraits or a single person standing in a big scene. Whatever your genre is, it is likely that you can create some amazing wide, highly detailed images that are print-worthy.
What Gear Do You Need to Create Panoramic Photos?
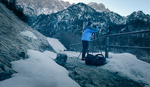
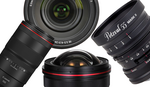
As far as gear goes you can create panos with the most minimal setups. As you may expect the bare minimum is a camera and a wide-angle lens. A sharp lens with clarity and detail is key. For my recent autumn color photoshoots I created beautiful panoramic photos using a loaner from our sponsor, the Tamron 17-50mm f/4 lens for Sony E mount. I find this focal length to be perfect for me. The 17mm side is super wide and I can fill the frame. Then I can go into 50mm if I need a tighter look. I really like compositions that feel vast lately, so I end up at 17mm most of the time. With such a sharp and wide lens I can create exactly the kind of compositions that are my muse and make breathtaking prints.

Most importantly for panoramic images, the Tamron 17-50mm f/4 has an internal zoom and internal focus design. This means that the lens doesn't extend its length as you zoom or focus, instead, it stays stationary. Your external lens filters and relative settings can remain stable as you navigate the puzzle pieces required to create panoramic compositions.
Another special feature of the Tamron 17-50mm f/4 lens for Sony E mount is that it has a minimum focusing distance of 7.5" on the wide end. With these specs, I can combine focus stacking with my panoramics when the foreground elements are right up to the edge of my frame. The results are photographs that immerse the viewer in the scene as if they could step out into nature. I am enjoying playing around with the possibilities a lens like this opens up for me, a photographer who loves layered compositions.

I am working on a full review of the newly released Tamron 17-50mm f/4 to share more details. It is a great light, sharp and affordable lens. I love any gear that is so solid and effortless to use that I can just focus on creating.
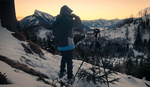
Next, while you can create raw handheld panoramic images, ideally you will want a few accessories to help you out: a circular polarizing filter, tripod, and cable release. The filter will improve the light and colors of your images. If you haven't tried a CP filter before I have a previous article to help you learn all about them. For tripods the choices are vast. Your tripod needs to fully and solidly support your gear so that your photos are stable and not affected by capture blur when you move or press the shutter. To help keep your photos sharp, combining the tripod with a cable release or at least using the self-timer function will keep your photos clear and crisp. With this basic set up you are ready to start creating panoramic images.


The Pieces of a Pano Puzzle
While there are panoramic tripod heads and formulas for creating panoramic images, I prefer a simpler approach. This is because post-processing software nowadays is so very forgiving. So, in the spirit of keeping it simple, when at a location that I can imagine as a pano, I just take a series of images from one side to the other. I keep my tripod stationary and swivel the camera on the ball head. I use the horizon or something noticeable as a reference point to keep things from going crooked. If I start at the left I swivel enough that 1/3 of the image overlaps in each frame. You are creating a puzzle collage. It is not like taping a piece of paper edge to edge, instead, you want that 1/3 overlap so that your software can stitch the pieces together. To create an easy pano in Lightroom or Photoshop this overlapping is key as the software will be doing all of the hard work. Your final set should be a row of photographs each overlapping the other by at least 1/3. Sometimes I get fancy and do multiple rows for really big scenes. How long your row is and how many frames are is up to you. I let the scene dictate this for me but usually, I end up with at least 4-6 frames in a row.


Start Local
A good beginner exercise for starting with panoramic prints is to make a series of them at places near you. Whatever your area is known for: a quaint downtown, city skyline, beautiful vista, or historic landmark. You don’t have to go somewhere exotic. Prints of local scenery by local artists are highly desirable! Places like gift shops, cafes, visitor centers, libraries, doctors' offices, banks, city halls, and other government buildings, and of course your local art galleries are all places that often celebrate local art.
One note worth mentioning is that some places that you want to photograph may have restrictions or copyright on their architecture so you’ll want to double-check that for landmarks to be sure. Just a quick search online can save you a headache later on. It's uncommon but depending on where in the world you are, doesn’t hurt to double-check.
The Package Deal
My recommendation for panoramic prints is to offer three sizes and two display types. Then to increase your sales create packages with them as print sets. The smallest size print can be your silver package, medium is gold, largest is platinum. Then have paper prints matted and framed as your standard display type. You can offer a premium option such as acrylic face mounts (or canvas or metal, pick only one though) as an upgrade option to any package. Keeping a simple format like this will reduce buyer hesitation due to too many options. The easier the decision, the more likely that they will make it in your favor.
For high-end print sales offering a certificate of authenticity helps elevate the buyer experience. This can be a simple postcard or parchment paper with the story of the photo or a behind-the-scenes memory of you creating it, along with your signature, and a number assigned to that specific image. In the art world, this would be known as an artist proof which you can take a step further. You can choose to have an open edition where you can print as much as you want or a limited edition where there are a finite number of prints that will be made. In a limited edition run you choose the amount and label the print so, such as 1/500 to mean that it is number one in a line of only 500 prints to be made. With exclusive limited edition prints, price higher accordingly.


From the Digital Darkroom to the Wall
As to the printing itself, if you cannot produce the prints in-house, there are so many great options of places to print online. Many of them also have a “pro” login version of their services. This will often give you a huge discount and more customization options. I like to print on lustre paper, so not high gloss that shows reflections, but not matte that will look flat.
With framed prints, I like a white mat and a black low profile frame to keep the focus on the photo rather than the image. In some cases however I have sourced vintage frames, upcycled them, or even made my own frames from scratch for an extra talking point. A great example of this is using reclaimed wood from local torn-down barns as the frame for a huge wide panoramic photograph of a sprawling farm scene. Even if you aren't able to make them yourself, searching flea markets or thrift stores for vintage frames can help add a high-end and unique touch to your prints.
A very useful pro service option is called white label shipping and it’s often the same price or only slightly more expensive. You can use this option to have your prints sent directly to the client without an invoice or price inside. It will be a bland package, often without even the printing house's name on it. As a little tip, you can ship a white-label order to yourself for the finishing touches. Check and sign the print if you want to do so, include a custom card or receipt, and then ship it to the client in that nice white-label packaging. For prints that you want to sell locally the white label shipping box and interior wrapping are a great way to store and safely deliver prints to your local clients. Either way you can also brand the plain white label boxes yourself with printed labels of your logo, custom stickers, or even a custom stamp or other embellishment that fits your branding and vision.
Selling Like a Pro
Once you have a mini portfolio of panoramic photographs you can start to market them. If you aren’t already marketing to designers and businesses but want to, this can be your push to start. Look up a list of local interior design firms and send them a friendly introduction email. You can share how you are a local photographer, you’ve just completed your brand new series of panoramic prints, explain how great the panoramic format fits client walls as described earlier, and offer them a volume discount. If you start a working relationship with designers and they get a perk they are more likely to use you, and by offering locally created art they also appeal to their clients. It is a win-win. A few might say no, or not reply, but try others. It all starts with one yes.
Another way to get your prints marketed is to offer a newsletter on your website. Then make a social media blast to all of your accounts sharing your sign-up page, or post a reminder that it exists. With the next newsletter that you put out announce your latest print set, and explain a little about how, or why you created it. Then link back to the purchase page for the set on your site or wherever it can be purchased. A special coupon just for newsletter recipients can help. Some artists prefer to never discount their work and others like to create these exclusive moments where discounts incentive purchase. Whichever you decide, you can still use the newsletter as a way to advertise and connect with your audience.


Inventory Woes
Now back to working with interior designers, local businesses as well as online platforms. These types of clients will also help you with one of the great downfalls of print sales whether they are panoramic or standard – having to stock inventory. If you sell by setting up a tent at art festivals, hanging your work in a gallery, or attempting consignment you have to foot the bill of creating all of these prints up front hoping that they sell, and then storing the leftovers afterward. One option is to create a few "floor" samples and then have a catalog book to order from. Either way, the upfront costs are there for your floor samples. By working directly with clients instead you are creating your art on spec just for them. You can still choose to have a few samples to show off if you would like but it's nothing like having to stock whole galleries.
Another note for art on spec is to have a simple buyer/seller contract and require at least a percentage up front to begin work. Make sure that the percentage covers your material costs in the off chance that the buyer flakes out on you. Then require payment due upon (or before especially when shipping) receipt of goods. Whether shipping or hand-delivering your work have the buyer sign for the package. Then give them a receipt and if you like include a handwritten thank you card. Good practices like this give a professional experience and help you should any issues arise later on.
May Your Prints Be as Big as Your Dreams
Hopefully, this article gave you some inspiration into ways that you can level up your print sales. Whether it be through the panoramic format or just the oomph to reach out to new clients, try new sales formats, and get your art on more walls; Sharing tips and tricks together can help us all learn and grow as photographers. From gear like the awesome new Tamron 17-50mm f/4 lens for Sony E mount or ideas like using limited edition prints in custom frames, there are so many ways to create a better experience both for you creating and your customers in enjoying your beautiful art. Do you have any tips or tricks that you would like to share about selling prints? Post your favorites in the comment section below.