Ever find your distant objects such as mountains appearing much smaller than they should in your landscape photos? Perspective blending is a great solution that is actually quite easy to do.
In the Field

Shot at 20mm. Notice the size of the mountains.
Most of the time, you find objects appearing a lot smaller than they should when you're capturing a foreground that's very close to you while filling the rest of the frame with objects in the distance. Notice in the above photo how large the flowers appear compared to the mountains in the distance. We all know that objects closer to us will appear larger than objects at a distance, but this photo exacerbates that discrepancy to the point of making the mountains look minuscule. This is what we'll be solving quite easily using perspective blending.
The easiest way to accomplish a perspective blend in the field is to separate your foreground and background objects with a straight horizon line and as few objects between the two as possible. You can perspective blend more complicated scenes, which I'll talk about later in the article, but for simplicity and to make your life easier finding compositions, whenever you can separate the foreground and background with a horizon line, it will make this very easy.


The first thing you'll want to do is set up your composition focusing on the foreground object; in this case, it's the flowers in the foreground. Making sure none of the flowers cross your horizon line, which will make the blend more difficult but is certainly something you can accomplish with more practice. Focus and expose for your foreground. One hidden benefit of perspective blending is that you are inherently going to exposure blend the foreground and background photos.
After you've got your foreground captured, simply zoom into your background object. Be careful how much you zoom in, as you don't want your mountains looking unbelievably big. In my example, my foreground is taken at 20mm and the background at 35mm. This might require you to switch lenses as well depending on what you are using. Expose and focus on your background object, making sure no objects cross your horizon line and take your photo. That's it for capturing the images in the field!
The Edit
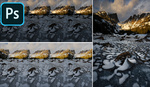
The first thing you'll want to do is a little housekeeping on each photo. You don't want to do your full edits before combining both images, but you'll want to get your white balances set, exposures managed, and small changes to help with your blend. For example, if your foreground exposure is a lot brighter than your background, it might be beneficial to darken your foreground image and brighten your background image slightly.

Tip: Crop out the part of the image you aren't editing!
Another trick I do is to crop out the part of the image I won't be using so I get an accurate histogram and visualization of the object I'm editing. This means for the foreground object, I'll temporarily crop out the top of the image because I don't care what it looks like in the edit. I could warm up the entire image for the plants and make the mountains look too warm, but it doesn't matter, because we will be blending those out!
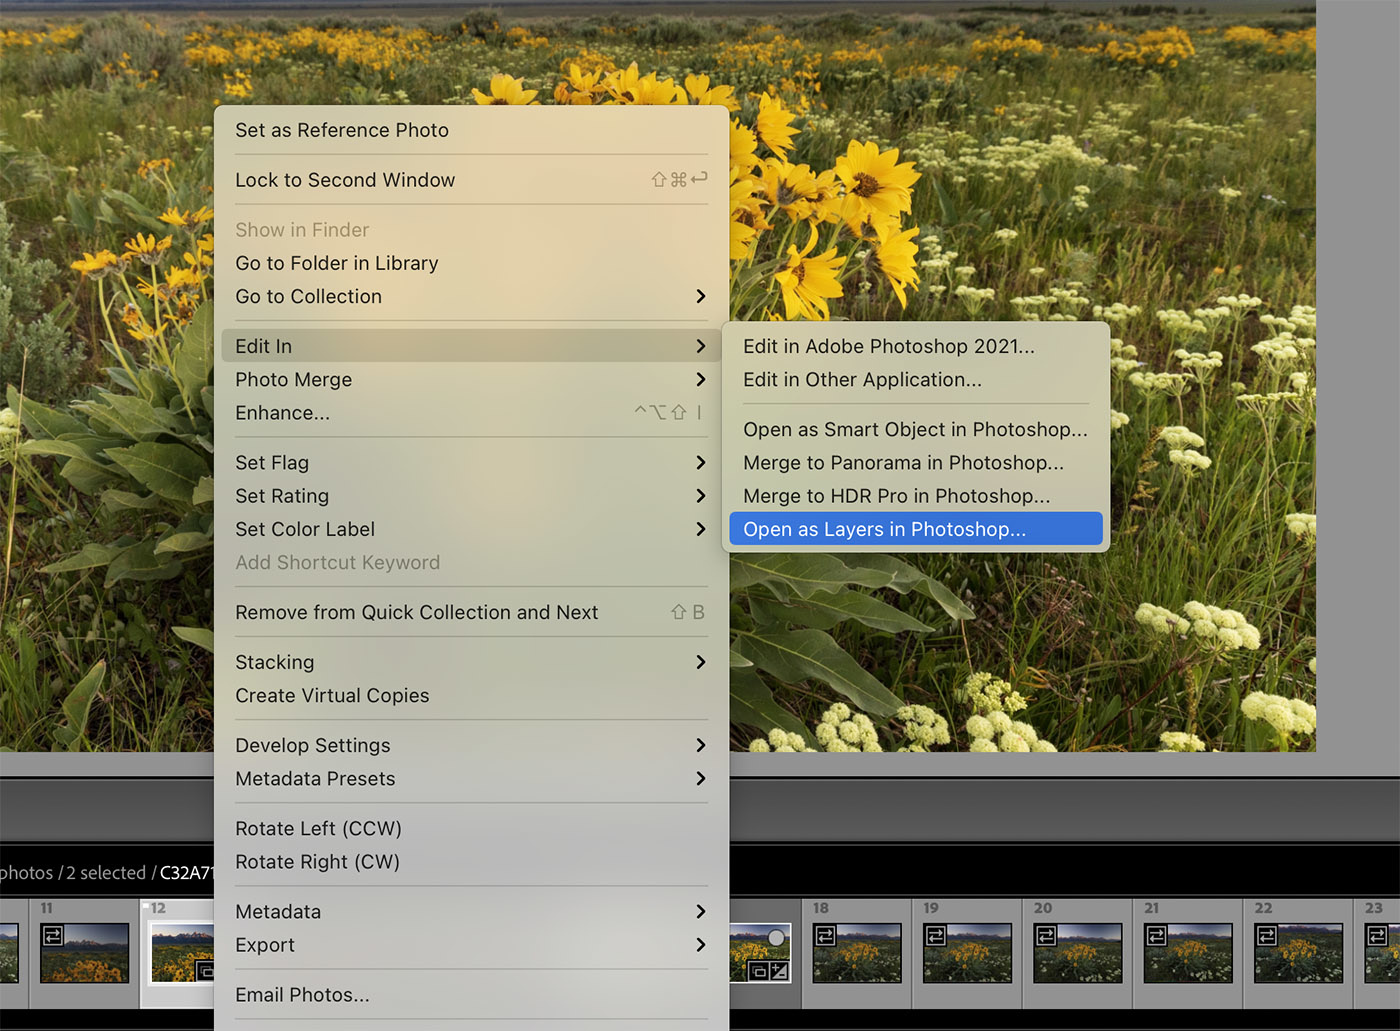
Select images > right click > Edit in > Open as layers in Photoshop
Once you have your images balanced, then it's time to take them into Photoshop. Select your images by holding control (command on mac) > right-click > Edit in > Open as layers in Photoshop.

Open the crop tool by pressing "C"
Make sure the top image in your layer panel is your foreground object. Then, open up the crop tool ("C" on your keyboard) and expand the image upwards; this doesn't have to be exact.

Add a layer mask
Next, you'll add a layer mask to your foreground image.

With the mask selected, select the rectangular marquee tool ("M" on your keyboard) and draw a selection from the top of the frame to the horizon line. This doesn't have to be perfect.

Edit > Fill > Black (or foreground color)
Fill your selection with black.

You should see your background object show through. Let's get it aligned how we want it in our image. To do this, select your top layer and change its blending mode to overlay.

Move around your background layer
Now, zoom into your composition and select your background layer to move it around, aligning where that horizon line should be. Once it is lined up, reset your foreground layer's blending mode back to normal.
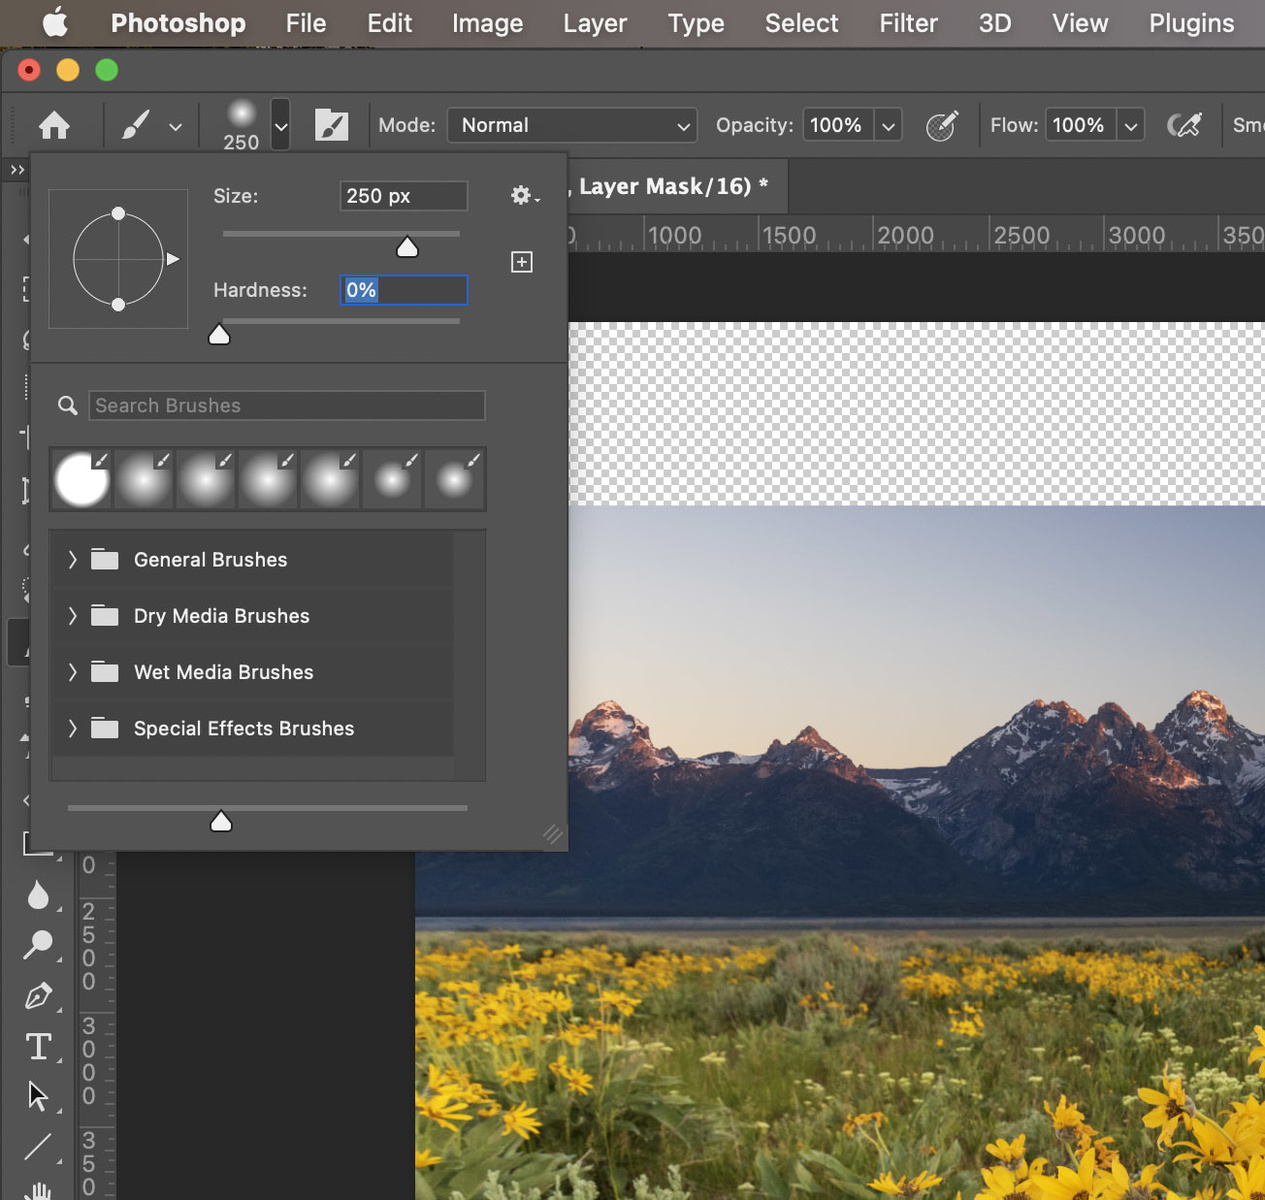
Brush Settings
Now, let's clean up that horizon line. Zoom out, select the layer mask that's attached to your foreground layer, and select the brush tool ("B" on your keyboard). Make sure your brush is set to 0% hardness, 100% opacity, and 100% flow. The size will depend on your composition, so you might need to try a few different sizes. Simply undo (control/command + "Z" on your keyboard) if the size doesn't work for you. Now, with your brush selected, making sure your layer mask is also selected, just paint a straight line from one side to another.

Paint in and out your horizon line to clean it up
The last step is to zoom in and clean up your blend on the horizon line using the same brush. You might want to decrease the size of your brush for this step but not by much. If this is your first time masking in Photoshop, all you'll need to do to is switch back and forth between black/white by using "X" on your keyboard. This will swap your paintbrush color, which will cause you to paint or remove parts of the horizon line. You also might want to decrease your opacity to 33-50%, simply painting in areas more when they need more of a blend. Do this throughout the horizon line, zooming out to check how it looks occasionally, and you've blended your first photo.
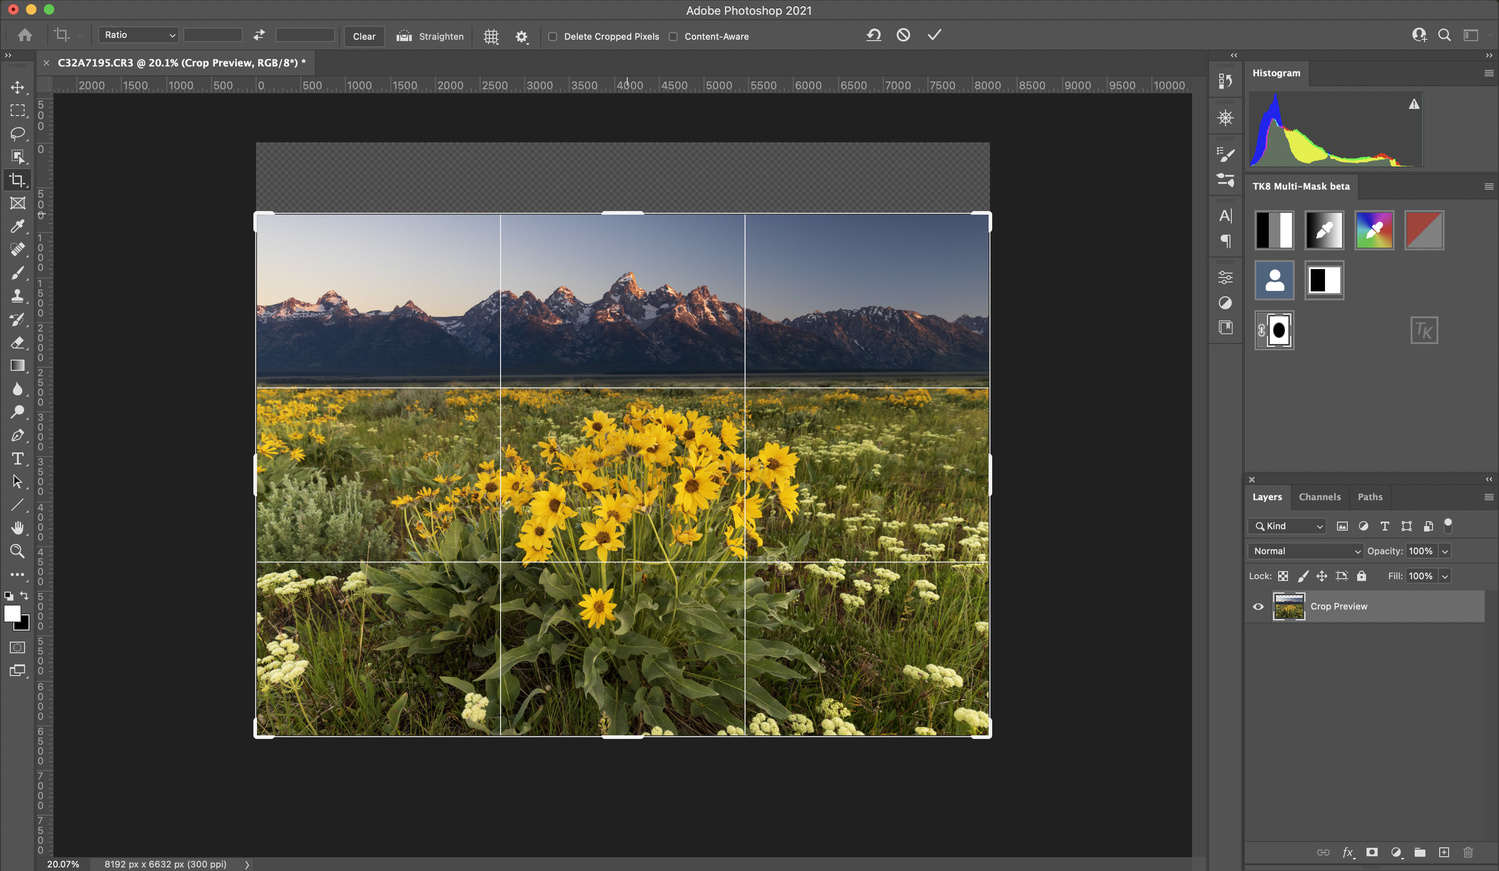
Fix your final crop
The last step is to crop the image ("C" on your keyboard) down to get rid of any empty pixels and hit save. Your blend is done, and now, you can finish editing the photo however you're comfortable.
Advanced Techniques and Conclusion

The first thing that will improve the quality of your blends is to also incorporate a focus stack. You'll see in my example I didn't do this, so the blend between background and foreground isn't perfect because of the out-of-focus area between the two images. I've covered focus stacking in this article or this video. This will require you to take more photos in the field and be a bit more comfortable in Photoshop. I wanted to keep this as simple as possible and get your feet wet if blending isn't something you've done before. Even though the final image isn't perfectly sharp, I think it still looks better, with more accurate proportions for those mountains to match what it looked like in real life.


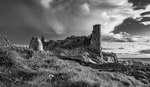
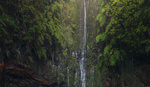
Eventually, you might want to perspective blend a scene where there isn't a straight horizon line. I did this exact technique in the image above, and it follows the same principles. The blend just gets more complicated and is something you'll learn in time with more practice. Something special to note about this example is I didn't actually use a second focal length for the blend. I just increased the size of the mountain by stretching it in Photoshop and blending it to look more accurate to real life. This is totally something you can do right now if you have any images you want to try it on.
I know many out there see this technique as a composite that removes the purity of a photograph. Personally, I think this technique provides a more accurate representation of the scene. I would love to know what you think and any feedback you might have in the comments. As always, thanks for reading or watching!


I too like faking my way to Instagram fame... Sorry to be so blunt, but nature is quite dramatic without all the photoshop wizardry. If the composition doesn't work out, come back another day and try again. to each their own, but I find all this cutting and pasting to be rather lazy.
I actually returned to this spot roughly 4 times but sadly the mountains just never got bigger no matter the conditions :(
Alex, why don't you give the original photo the same look as the edited one? I am not sure after all, if the final proportions do really work that much better.
I disagree. The mountains are too tiny on the original.
Well i might agree that the use of "dramatic" this and that in photography is definitely tired language and off putting to me personally.
However the irony here though is that wide angle lenses do indeed distort what we might actually see, and often that means overly shrunken mountains in the distance (or enlarged foreground elements, but photographers probably won't complain about that if its in their favor :) ).
Anyways, so is the problem to you really using photoshop to make something look the way you seen and experienced it? or to alter your SOCC file, which is already a distortion of what is real anyway? or are you meeting your personal troll quota for the day.
No, not at all! This is the reason why I no longer look at landscape photos. This is not photography. I am with Rory here.
Nice edits, they are tastefully done compared to many of this type I have seen. My only comment is that images like these should be noted as "digital art" or that they have been heavily manipulated.
Composite images and manipulations have been around for a long time in photography, but it is only fair to note it as such. Otherwise in my opinion you are entering the realm of "false advertising".
I mean, why going through the hassle of traveling to a location and take photos, let's just render the whole scene on a PC...
I spent 40 years taking crime scene photos. If you want to get picky, no one should be using anything other than a 50ish mm lens on film, as digital always introduces some interpretation.
I love these two shots. I have been in this position and feel like restoring the background to a more accurately perceived size is completely justified. And in the end, it’s NOT a crime scene photo.
"... After you've got your foreground captured, simply zoom into your background object ..."
That's NOT "perspective", that's magnification.
This is a crop-and-stitch and enlargement-magnification technique.
This can be done
- in-camera, with 2 images from different focal lengths taken from the same position,
- in post-capture processing, with one image bifurcated and each part enlarged-magnified differently.
Either way, both parts are from the same perspective, taken from the same position.
Why are we so verbal-accuracy-compromised in photography, erroneously using words as meaninglessly and confusingly as possible?
Please, people, don't use words wrong.
If we cannot use words accurately, just avoid them altogether.
We're photographers, we're image makers, perhaps verbal is not our strength.
So let's SHOW RIGHT rather than TELL WRONG.
Just say, "... look, I did this ... then I did this ... then I did this ...".
Let's not put the wrong words all over our otherwise useful presentations.
Thanks.
.