While many have tips for keeping travel expenses low regionally, what happens when you start flying to landscape photography destinations? Things that work with regional travel don’t scale when limited on what you can bring. I have several tips for keeping travel costs low when flying to your destination.
When I travel regionally, I have several strategies to help keep travel costs down. My 4Runner is set up for sleeping, and I have everything I need for a home away from home with it. For many locations, I know the best places to stay that offer a hot shower, comfortable bed, and are inexpensive. This allows me to travel more frequently than I might otherwise be able to by being frugal.

What about flying to locations for landscape photography? Flying becomes the only option to make the most of my time when I need to travel longer distances quickly due to time constraints.
Flying has its challenges—I no longer know inexpensive motels. Even if I know of an affordable place to stay, spending every night of a long weekend in a motel can make trips cost more. Never mind that often the motels aren’t close to where you want to photograph sunrises and sunsets, adding to drive times and early wake-ups.
Flying and camping, or sleeping in the car, comes with its own challenges. After a series of trips over the past six months, I have figured out a system that helps facilitate inexpensive travel, even when flying, enabling you to take more trips for your landscape photography.

The Three-Bag Strategy
I aim for a three-bag strategy for these trips, which I detail below. This allows me to easily move my bags from parking at the airport to the airport terminal and then to the rental car location when I land. In addition, this helps keep baggage fees, when applicable, to a reasonable amount—though I prefer airlines that allow at least one carry-on bag at no cost.
Let’s look at the three bags I take on these landscape photography trips.
Camera Bag
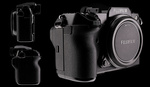
For travel, I carry all of my camera gear in a Shimoda Designs Explore 35L v2. This bag is the near-perfect size to accommodate my still photography cameras and video and audio gear for producing my YouTube content. My goal is for this to make it to the overhead bins on the airplane, as the bag is just a little too big to slide under the seat. I have a past article on flying with camera gear that covers my best tips for making it an easy experience.
The standard gear I carry in this bag is a Nikon Z7 II, a Nikon Z6 II, a Nikon 14-30mm f/4 lens, a Nikon 24-120mm f/4 lens, and a Nikon 100-400mm f/4.5-5.6 lens, which covers my still photography needs. I also carry a DJI Pocket 3, a DJI Action 4, and DJI Wireless Mics, plus a spare Rode Videomic as a backup for my video and audio needs. And finally, I carry the various lens filters, cleaning accessories, spare batteries, memory cards, and card readers.

Carry-On Bag
I also bring a normal-sized backpack to keep under the seat in front of me. I have tried different backpacks but have been using a North Face Surge for the past few trips, which seems to be just the right size.
In this backpack, I keep in-flight snacks and entertainment. It can also act as an overflow if I am trying to keep the camera bag a little smaller or lighter. I can put some camera accessories in this bag in a tech pouch. Depending on the trip, there is room to put a change of clothes in a compression packing cube.
Recently, I have been trying to travel only with my iPad Pro, and that has been working out fairly well. I can make backups of my photos and videos on the road with the iPad, and it also doubles as a way to watch movies I’ve downloaded beforehand—either on the plane or in the evening between sunset photography and going to sleep.
Finally, I carry two Anker 20,000mAh power banks that I will use during the trip to help keep my camera batteries and iPad charged. Per airline regulations, these can’t be in checked luggage. Often, I stay at places without electricity, so I keep these charging while driving through the car power outlets or via a portable solar panel that I put in my checked bag.
Checked Bag
I have been experimenting with what works best for this bag. I used to use a traditional big suitcase, which certainly had plenty of room. But the wheels on many suitcases were problematic when the suitcase was heavy and took up a lot of space even when they weren’t packed fully. So, I have now switched to a rolling duffel bag.
There are several on the market, including ones made by North Face and Patagonia, but I’ve settled on an REI Big Haul 30”. This meets domestic US airline requirements for checked bag size, the wheels are sturdy and roll smoothly even on uneven surfaces, and with the compression straps that are inside the bag and outside, the bag can be packed full or not and be compressed down to take up the least amount of space possible.
What’s in the (Checked) Bag?

Beyond keeping my bag strategy minimal, what goes in the checked bag is key. It allows me to skip motels, fly, and camp, saving significant money and keeping me close to what I want to photograph. On recent trips, I have alternated between tent camping or planning to sleep in the vehicle I rent (I always rent a standard SUV to help increase the odds that sleeping in the vehicle will work).
There is a significant overlap between the gear needed to sleep in a tent or a vehicle. About a quarter of my checked bag is filled with camping gear, while clothing fills the rest.

For the gear needed for camping or sleeping in the car, I use a Klymit inflatable sleeping pad and pillow and a Cumulus 450 sleeping quilt. These items work whether I sleep in a tent or in the car.
I bring a tent along, even if my main goal is sleeping in the vehicle. Sometimes, a vehicle isn’t comfortable, or you don’t want to spend the money on the SUV rental and go with a standard car instead. Campgrounds sometimes don’t want you to sleep in a car, so the tent can double as a decoy. I just use a small, lightweight NatureHike Cloud 2P tent. It is lightweight, packs down small, and is easily set up.
Finally, I have to have my coffee in the morning, so I also bring a tiny stove called a BRS 3000 and a 550ml Titanium Toaks pot for boiling water, which is also handy for dehydrated meals. You can’t fly with the camp stove fuel, but I always do a supply run after landing for food and supplies, so I pick up a fuel canister during this supply run.

The layering approach, similar to what I described in my past Staying Warm for Landscape Photography in the Winter article, also applies to most of my clothing strategy when traveling. I just might not bring my heavier insulating layers.
Does the Strategy Work?
I have used this travel strategy for several of my recent cross-country landscape photography trips. I have been feeling good about the choices of gear I have been bringing along, from the photography gear to the clothing to the camping gear. This approach has allowed me to save significant money on places to stay and let me stay closer to the places I want to photograph, resulting in me being able to travel more with the money saved.
What works for you? Do you have a favorite approach for traveling for landscape photography on a budget?


Jeffrey,
Thanks for a solid article about a practical topic.
I specialize in wildlife, but wildlife and landscape photography are quite similar inasmuch as the travel and logistics are concerned.
I find that being able to travel for less cost is a huge factor in how many satisfying photos I get in the course of a year. I mean it actually is a bigger factor than what camera or lenses I use. Time spent afield pursuing opportunities is the biggest factor in how many quality photos I get, and cost is the limiting factor, so if we can find ways to make cost less limiting, then we get more top-level pics. Direct correlation.
You asked,
"What works for you? Do you have a favorite approach for traveling for landscape photography on a budget?"
Yes, I do.
I get on Craigslist and post an ad, "Wildlife Photographer Seeks Room for Two Weeks in July". Or some version thereof.
I write a long, detailed description of myself and of the accommodations I seek. I include my Instagram username, website address, and FB/Messenger username. That way folks can look me up and see that I am legit. I say how much I am willing to pay, usually $40/night, $200/week, or $700/month, depending, of course, on the length of my intended stay.
I have gotten so many good responses from legitimate people. Usually, I have 3 or 4 offers that all meet my needs, and I pick whichever person I feel most comfortable with. Yes, of course there are long talks on the phone so that we can feel each other out and build rapport.
I have always gotten a room in the area I specify for the duration I specify and at the price I specify. I have followed through on these arrangements in Duluth, MN, Cotton, MN, Phoenix, AZ, Denver, CO, and Aurora, CO, and never have I had a bad experience. In fact, I still keep in touch with the people I have stayed with in years past, and we have become long-term friends. I have returned to most of these places and stayed with the same people again. I get the comfort and convenience of a real home, full use of a kitchen for preparing meals, and the security of parking in a driveway in a decent neighborhood. And I get all this for about 1/2 or 1/3 the cost of a motel stay.
Oh wow! That way to find a room for cheap sounds great! I would have never thought to try that, but I can see how it would totally work. Sounds like you've had good success with that approach and a great way to keep the cost down and end up with something more comfortable than a car to sleep in!
And I agree, being able to travel for less creates opportunities for more quality photos, much more so than constant gear upgrades.
Love your tip for travel! Now to decide if I am brave enough to try that one day!
Great video. I thought not many would roll that hobo style I do, but it is indeed quite similar to what I go for. One small thing which might be worth to mention as a trick is to buy perfume-less baby wipes to clean stuff. They are dirt cheap, and perfect for cleaning dust or mud from the gear after a rough day.
Here I had to use all I had after a great midnight in Iceland, where I was hit by a sandstorm at Mælifell (actual photo in my gallery).
Awesome picture!
I sort of enjoy the hobo style for short durations of time! Besides the savings in expenses, it really lets you typically be closer to things you want to photograph, another added perk.
Good tip on the perfume-less baby wipes. I actually take "combat wipes," pretty much exactly what you described, to help freshen up after a few days in the dirt. Definitely helps one feel a little cleaner when away from showers!
One of the best advice editorials so far! Covers all the basics. A few questions..
1. The Tripod- I've seen some locations prohibit tripods without a permit. Have you experienced that? 2. Similarly with pro camera gear and permits? 3. What is the farthest you've driven solo? I'm contemplating a long trek. Possibly taking my bike along. 4. Security for your vehicle? Thanks.!!
Glad you liked the article! I felt like it was a topic that often gets skipped with all the focus on camera gear, technique, etc - but still an important topic for people wanting to travel with gear and/or interested in controlling costs.
I have not encountered not being able to have a tripod so far. I know they exist, I think usually where there might be more boardwalk/overlooks and lots of people to avoid trip hazards. In those situations, I'd either stash the tripod in the car or not setup and then use a shutter speed that let me handhold, increasing ISO if I needed to.
Most of the permits that I am aware of are centered on portrait photographers who might be using the park to conduct portrait sessions, or setting up flash units, or in terms of video filming scenes of movie. This is a US-centric answer though, so Internationally there might be additional considerations.
As for as driving solo, well, young me traveled for about 4 months solo and did silly things like drive 20 hours straight. Older, wiser me has done more like 6 to 8 nights comfortably like this (could do more, mainly a time constraint) and try to keep my daily hours driven closer to 10 hours or less.
Security is a good question. My camera bag goes with me everywhere. For example, when I do my supply run, I take my camera bag into the store with me. It is the most valuable thing, so I try not to leave it in the car. I also try to "hide" the smaller backpack because it looks like it could have a computer in it, so I try to hide it under a black jacket, down low in the car so it isn't obvious (and I hide the iPad that I put in it elsewhere in the car). A friend suggested taking a black fleece blanket or something just to cover the duffel and smaller backpack, as it makes it less obvious walking by the car. The towel I take could be used for that purpose and I might try that in the future.
Hope that helps!