
Are dull, flat skies ruining your photographs? Learn how to capture real clouds and dramatic skies in camera, no sky replacement or Photoshop needed.
Love it or hate it, sky replacement is a new software advancement that is having a huge impact on outdoor photography. The purists say that altered photographs are now digital art rather than a photograph. Regardless of your stance, what if you could get amazing skies that were real, over and over again? Let me teach you the secret to epic, gorgeous skies in your photographs all captured in camera.

"Blue Ice, Black Sand II," an all-natural photograph that I created in Iceland using these techniques.
Become a Weather Geek
The weather is the first and most important step to having an interesting sky. Rather than relying on luck or post-processing, I will explain the tricks for knowing when a sky will look amazing. It is all about understanding the weather forecast. To start, I look up the local 10-day forecast for the locations where I want to do some landscape photography. While the forecast may change or not be completely accurate (this is nature, after all), it is the key to success. The important thing is to notice the cloud cover. In most apps, cloud cover is listed as a percentage, with 100% being a sky that is completely full of clouds and less interesting. A sky of 0% has no clouds and is equally plain. As a general guideline, I aim for the 50-75% cloud cover times.
The best time for light to get the epic color in your skies is sunrise and sunset. So, combine that knowledge with the forecast to select a day with a sunrise or sunset session when you have 50-75% cloud cover.

The very edge of a summer storm at sunset.
To take this concept to the next level, look at a weather radar projection. The edges of storm systems create the best and most dramatic cloud shapes. I will often put a location on the back burner until the perfect conditions, keeping an eye on the weather. I watch for a big storm and go at the beginning or end of it, whichever matches up with the golden hour. By waiting for a storm, I can create photographs of that location that are completely unique, as no two skies are exactly the same.

A thunderstorm with hail at Mammoth Hot Springs in Yellowstone.
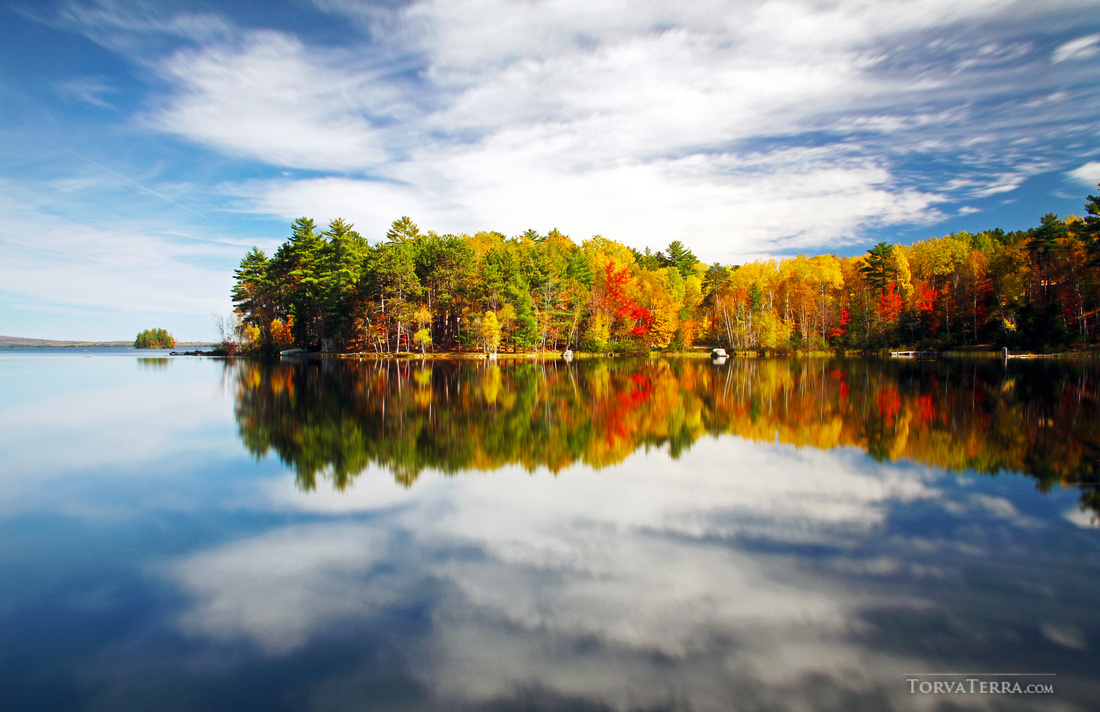
You can really get deep into using the weather to your advantage in photographs. Sometimes, a storm that is fast-moving, like summer thunderstorms, will have great skies all the way through. If you are lucky, you can capture lightning (from a safe spot) or a rainbow afterward, so I always keep an eye on summer storms nearby. There are also different types of clouds and storms, so you can really get into this concept of weather-planning. For example, in autumn, cold nights and warmer mornings often create fog at sunrise in low-lying areas. Lakes, valleys, waterfalls, and meadows are my favorite for foggy sky photography in autumn. By understanding the weather, I can literally plan and create fall foliage photographs with beautiful, moody fog. With a bit of nature knowledge, you can really get deep into using the weather to your advantage in photographs.

Fog, clouds, fall foliage, and a lake reflection that were all planned out for a perfect autumn morning.
Your Secret Weapons: Lens Filters
Lens filters are vital to properly balancing the sky and foreground in your landscape photographs. A basic kit of just a few filters can turn bland photographs into showstoppers. My must-have filters for epic skies are a graduated neutral density filter (GND), circular polarizer (CP), and reverse graduated neutral density filter (RGND). These glass or resin filters act as sunglasses for your camera, filtering the light and creating natural effects to boost your images.
The GND filters are tinted dark on the top edge and fade to clear at the bottom. By placing the tinted side over the sky, you darken what the camera sees in that specific area. This helps the camera balance the bright sky and dark foreground. This is especially important when your camera is pointed at a sunrise or sunset and the sky is blazing in the sun.

The sky and foreground of the Canadian Rockies balanced by the use of an RGND filter.
However, it is important to realize that at sunrise and sunset, the sun is very low in the sky. That is where RGND filters come in. These are special filters where the darkest part of the filter is the center. You want the darkest part of the filter to cover the brightest part of the sky, which during sunrise and sunset is at the horizon. So, that is when you should choose a RGND over a regular GND. I swap my RGND and GND based on the time of day; it is all about sun position.
A GND filter and CP filter combined to bring this autumn lake to life in my photograph.
The last filter is a simple circular polarizer. When I am photographing outdoors, I only take this bad boy off my lens for nighttime images. A CP filter is a secret weapon. This tool filters the light coming into your camera in a different way than the GND filters. A CP filter cuts glare, which sounds mundane, but the effect is unmatchable. The glare that you don’t even realize that you are seeing is on everything from water to foliage, buildings, glass, and yes, even the sky. The effect of a CP filter dramatically boosts the contrast and colors in your photos. Clouds will pop more, water will be clearer, plants will look lush, and the sky colors will be saturated with vibrancy. It is my favorite filter for nature photography.

A circular polarizer filter cutting the water's glare in Grand Teton National Park to reveal the colorful lake stones.


Some beginner stuff but otherwise one of the better articles I've read in a while. Don't hesitate to share some of the apps or websites you use. Thanks for this!
You're very welcome! I appreciate your feedback. Thank you for taking the time to send some kind words that you enjoyed my article. As readers may be of various skill levels I try to include techniques that are simple but can be built upon. For example, looking at the forecast might be a simple idea but knowing what specific conditions mean fog or that the edges of storm systems are the best can for some folks be a new concept. I tried to include tips to help everyone and perhaps inspire folks to get outdoors on days that they may discount as stormy when the storms are what I look for!
I use two websites for weather forecasts, https://www.wunderground.com for 10-day forecast with cloud chart and https://www.weather.gov/forecastmaps for the radar projections. The Weather Underground App is not as good as the actual site though. It doesn't display the data as well, has a lot of ads, and is missing the cloud graph. The app is more for the average user, so I stick with the actual site. There are so many good apps and sites though; some local news stations have great local weather so if I am on a trip I will cross reference the local news weather with the sites that I listed.
Thanks for the reply!
Patience, repetition, luck. :)
I try for education/knowledge, patience, coffee and lot of planning. I wish that I had the luck part, still working on that. XD
About the Article. It is a Great Read. About the Secret, sincerely, it was never a secret. It is was of the most classic technique of Photography.
It's secret to those who already wanted the easy and artificial solutions.
Thank you for writing. I think that the Secret, or techniques to creating genuine photos are classic to some but very new to others as everyone is at a different level in their photography. Also, there are a lot of amateur photographers who learn bad habits and aren't aware of what lens filters do and how powerful they are.
While this article may be basic to some I do hope that it helps at least reinforce the foundational basics if not introduce them to folks who are starting out or never learned the right way the first time around.
Well written and it's good to reiterate the basics of photography often.
Thank you for your kind words. Yes, hopefully this is a reminder (for advanced folks) or introduction (for the new photogs) to remember the basics of outdoor photography. Planning and using the right tools in the field are just as if not more important than what happens in the digital darkroom.
Thanks for this article!
I'm one of those "amateur enthusiasts" that appreciate articles like this, especially because I'm really new to the "post processing" stuff that is so prevalent these days. As I struggle leaning the finer points of darktable and GIMP (not to mention the advanced stuff!), I would prefer that most of my pictures look good "out of camera" with minimal post processing (if needed).
I'm already a bit of a "weather geek", with several weather/radar apps on my phone and sites bookmarked on my laptop (and a watch with a barometer!).
Thank you for commenting. You are absolutely starting off strong by trying to get your photographs right in camera rather than rely on post processing as a crutch. I know how to do crazy things in Photoshop, but my images are often very minimally processed. Every once in a while I will do a crazy edit, especially for night sky photos, but usually I just prefer real nature as I saw it.
By having this strong foundation you will surely continue to grow and learn as a photographer rather than only progressing with each software update. :p
Thank you so much for your reply!
Yes, I always prefer to get my pics right "in camera" with minimal post processing (if needed). As a hobbyist, I'm trying to learn the basics darktable and GIMP, as I do post processing so infrequently I can't justify the cost of PS/LR. Even though I try to have my pics come out well "out of camera", I will occasionally have a few that would benefit from a little "tweaking".
Your advise on the filters is especially appreciated!
https://sunsetwx.com/ - This site has served me well for finding good skies
Thank you for your article. I'm a beginner to photography especially liking landscape and macro. The points you make about checking the weather and cloud cover seem obvious, but I hadn't thought about doing this till reading your article! Also I wasn't aware of the RGND filter, so will definitely be buying one. Using a polariser for water shots with landscapes is something I hadn't thought of either. Thank you for your insights... always learning. :-)
You are very welcome! I am glad to have been of help to you starting out on your photography journey. Lens filters are so underrated. Once you get that circular polarizer you will see the difference. I have a few more articles on landscape and wildlife photography coming up. I hope to see you back here soon. :)