One of the most important traits of a good waterfall photo is some of that creamy water flow in your images, and the key to unlocking that is your shutter speed. You’ve got to slow down your shutter speed just enough to stop freezing the motion of the water and let it flow in your exposure. Depending on the speed of the water, you might want a shutter speed ranging anywhere from 1/10th of a second to a full two seconds. That’s over four stops of difference.

While we can adjust our aperture and ISO to get the shutter speed we need, typically, it’s far too bright to accomplish those long shutter speeds, and to solve that issue, you'll need a neutral density (ND) filter or set of filters.
Neutral Density Filters

ND filters are simple: they just darken the light that enters your lens, typically in increments of 3 stops, 6 stops, and 10 stops, giving you the ability to manipulate the exposure triangle with another variable. While they do come in many different variations, shapes, and sizes, these are the stop values you’ll encounter most often.
My preferred system of choice are these circular magnetic ND filters made by Maven. I have also used multiple sets of square drop-in filters that accomplish the same task with varying benefits and hindrances. Personally, nothing beats the accessibility and convenience of use of this magnetic filter kit. Not only can you fit the entire kit in this 3D-printed case, but they are also color-coordinated so you know exactly what you’re using, which comes in handy when you might be stacking multiple filters for a shot. You can find my long-term review here.

NiSi 10 Stop Square Filter
While some of the items in this article aren't as necessary as others, this isn’t an item you can go without if you want dreamy waterfall photos. You don’t necessarily need an entire kit of ND filters and can likely get away with just a 3-stop ND at a minimum. A 3-stop filter is what I find myself using most often, but flexibility for any given situation is important, and for that, I’d recommend having at least a 3-stop and 6-stop ND filter.
Polarizer

Next up might be even more important than ND filters, which is a polarizer, something so important that I made an entire article on why you must have one for waterfall photography, along with numerous tips, tricks, and examples of images that wouldn’t be possible without one.
Without repeating myself too much from that article, a polarizer will help you control the reflections on surfaces, foliage, and water. It’s an indispensable tool that cannot be replicated in post-processing, and without exaggeration, it will enable you to take images you couldn’t before. If you're unfamiliar with using one, especially for waterfall photography, be sure to read that article.
Getting Into the Water

A way to set yourself apart while also giving you the freedom to get creative in your compositions is to get into the water. In many cases, that might just be taking your shoes off and dipping your toes in. While that works in a pinch, it can be really useful to have proper footwear to get into the water. For me, that’s a pair of Chacos that won’t go floating away for warmer water. I also have a pair of waders, but those are only used in colder or deeper situations.


Getting in the water can open up much more interesting compositions and perspectives. You just need to be careful in whatever situation you find yourself in. Some areas don’t allow people to be in the river beds. Sometimes, the current is far too strong to risk getting into, and I don't recommend getting into super-cold water for very long unless you have proper protection.
Many compositions come to life with just a few steps into the water like this one while also giving you a leg up, or in this case, a leg in, for more unique shots of some areas.
Accessories and Apps
The most important accessory you'll need is a lens cloth, preferably microfiber, to wipe away any moisture you might get on the front of your lens. I’d suggest a couple, depending on the type of waterfall you might be photographing. There have been times that I've left a waterfall with multiple soaked lens cloths.
Lighting for waterfalls isn't as straightforward as it is for many landscape locations. Both The Photographers Ephemeris (TPE) and Photo Pills do a great job at predicting this. You can use these apps to predict when the sun will show up for any particular waterfall you might be trying to shoot. This is crucial because many falls are located in valleys, gorges, or river beds, and the light doesn't align very intuitively.
Lastly, your phone is a great tool to check out compositions before going through the motions of taking your camera out of the bag and setting up. I do this constantly, no matter what I’m photographing, but especially in waterfall scenes where I use the wide angle lens to see how a waterfall might layer itself in an image. I also use the telephoto lens on my phone to see if I might want to switch between lenses or not.
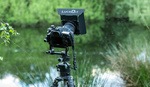
Tripods

Okay, while I did save something quite important to last, it’s for a good reason. Because we are trying to utilize those longer shutter speeds and get dreamy water flow, we need our camera to be stable during that time. A few tips when using a tripod for waterfalls are as follows:
- First, before you even break out the tripod, find your shot! Save yourself a lot of time and faffing about by choosing the exact shot you want and then adjusting your tripod according to that.
- Next, always extend your bottom tripod legs out first. Even if you’re trying to keep the tripod small, you’ll want these out just a little. This makes it so the sand, mud, or dirt doesn’t get into the important parts of your tripod legs.
- Once you’ve got your legs set, before putting your camera over the water, give your tripod a little (or big) push into the ground. This will confirm your legs are locked while also checking the foundation of where your tripod is sitting.
- Anytime I’m over the water, I try to chaperone my camera very closely, even when I’ve checked its stability. Yes, I do have insurance through PPA in case something catastrophic does happen, but I’d prefer not to go through that. Furthermore, if you ever leave your tripod in the event you need something or maybe you’re just waiting for the light, take your camera with you and don’t leave it out there, just in case.
- The final piece of advice here is even though you’re using a tripod, you’ll still want to use a two-second timer (or shutter release) when taking your photos. This will prevent any small movement in your images.
Bonus!
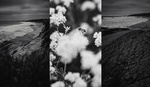
A bonus tip for those experienced readers out there is to not use a tripod at all! But this comes with a big caveat. I found myself taking successful long exposure images, up to almost half a second, handheld. However, this is only made possible by the absolutely insane stabilization in my lens (Canon RF 14-35mm f/4) and camera (Canon R5).

On top of that, I also have to take multiple exposures of every shot to give me a higher success rate, and even then, I still get blurry images. That being said, doing this has enabled me to take compositions that just aren’t possible with a tripod, like holding the camera above my head, over a ledge, or in the above image, right up against a tree that was way too far out and high up for a tripod. Alternatively, if you have a really tall tripod, you could add a decent amount of reliability to this using it as a monopod. I don’t suggest this to anyone who doesn’t have a combination of high-end modern camera and wide angle lens, as it’s just not possible with tech from even only a few years ago.
As always, thanks for reading, and I'd love to hear some of the tips you've found when photographing waterfalls. Did I miss anything? What are your favorite items for photographing falls? Let me know down below!


Cool tips, thanks. As for hand held - I am able to do 2s sharp photos with olympus gear, where using LiveND brings amazing results :)
Thank you!
Thanks a lot. I'll try some of your tips where I am right now in Iceland.
Many thanks for the tutorial. Living at the edge of the Appalachian Mountains, there are scores of waterfall opportunities. Your detailed instructions are most helpful. BTW, some states say that the river or creek bottom is private property. You can float the water but don't touch bottom or dry land which is private property. The state or provincial wildlife and fisheries agency would have that information.
Most of the shots in here are the east coast :)
Ownership of the water, creek/stream bottoms, etc. are a concern nationwide in the US. Several fishing organizations are working to gain access to public waters. Landowners are locking out people who have a rightful access to public waters.
I use an unfashionably old Nikon D800E so I use a tripod. I also weight the tripod, use a 2 sec delay, and a remote shutter release. I really would not be happy about taking a chance of screwing up photos of waterfalls after hiking a few miles to a waterfall.