For beautiful salivating food photography, you don't need a lot of lighting equipment. To create a shot that will make your viewer's stomach start to rumble you only need one diffused light source. Using only one light source creates a natural look with one set of shadows. By changing the direction and intensity of these shadows, you can create countless lighting scenarios that will leave your viewers hungry. Let me show you how one light can provide many options.
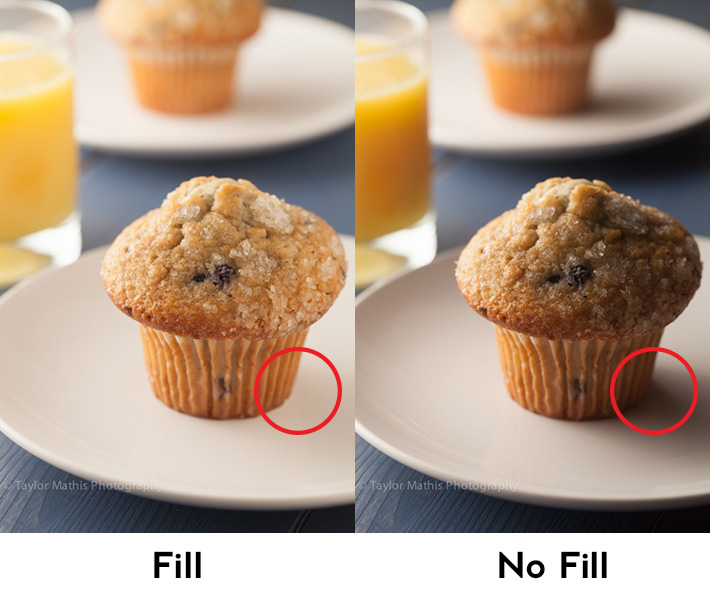
When using one light source, you will only have one set of shadows. This shadow will fall on the opposite side of the light source. For example, if you have your light source on the left side of the subject, the shadow will fall on the right. Above is an example of a muffin with two very different looks. On the left is a set that has been filled. On the right is a set without any fill. Which do you prefer?
I tend to find shadows without any fill to be too harsh for the look that I am trying to achieve. Filling in your shadows involves placing a piece of white foam board on the opposite side of the light source. Below is how the filled in muffin shot was taken. Notice how the light source is on the left and the foam board fill card is on the right.

Filling in the shadows is a way to control the contrast in your one light food photography. Changing the direction of your light source will change where those shadows fall on your set. Here is an example of a plate of chicken wings lit from four different directions. Notice how the shadows changes direction in each image.

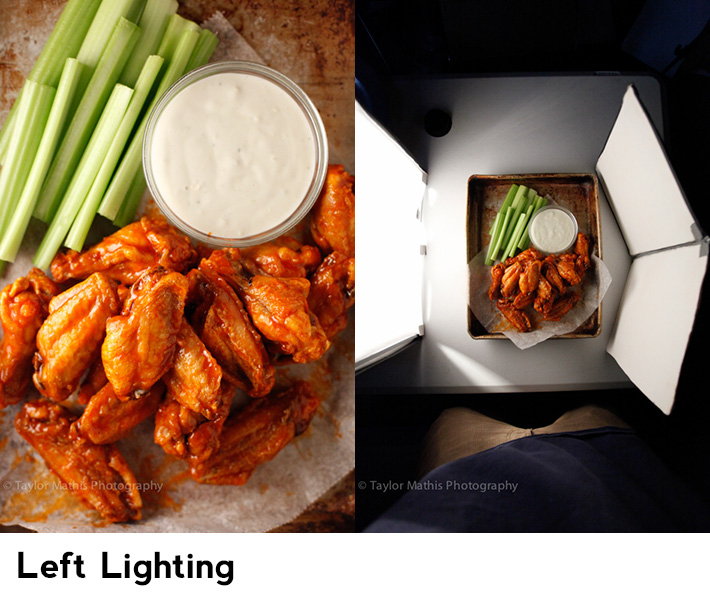
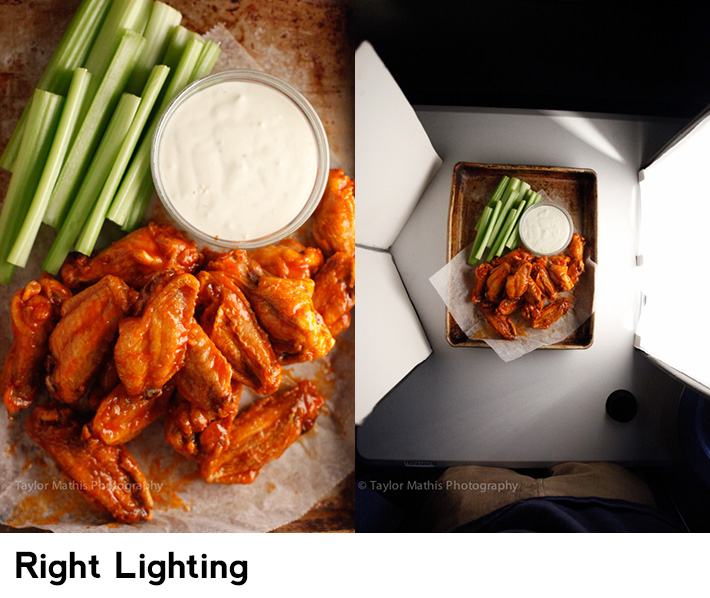

Is there one direction you prefer over the other? (Back lighting is my favorite, Here is another example from a few weeks ago). Can you tell a difference in where the shadows fall? Every food that you shoot will be different, so play around with your light's direction and choose the one that best complements your dish. You aren't limited to these four directions. You could place the light in between right and back to create a look that is in-between the two.
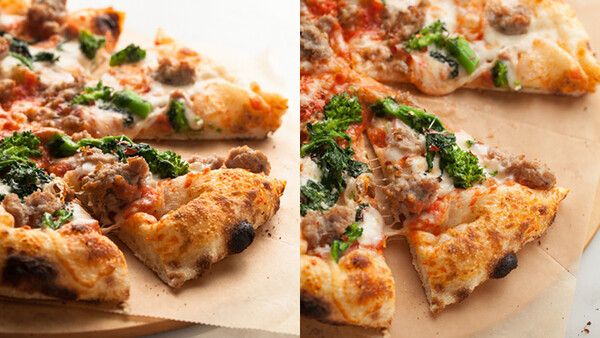
Below is an example form a recent shoot I did at a pizza restaurant. Both images were taken with the same light source and foam board reflector. Can you tell where the light was placed?
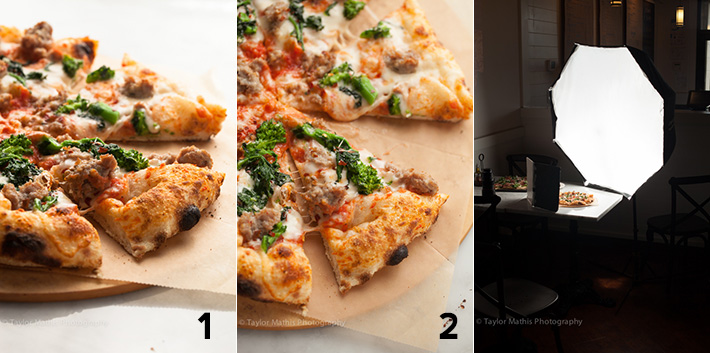
In both these images, the light source was in the same position. What changed was my camera angle. When shooting keep in mind how your camera position will change the shadows that are visible and how they will look. If you move your camera, it can have the same effect as moving the light source. The key to this one light approach to food photography is experimenting and finding a lighting direction and amount of fill that fits your dish and your style!
Want to learn more about food photography? Check out the tips, tutorials, and techniques found in issues 1-8 of photographing FOOD.

Join the Fstoppers community for free
-
Post comments and join in the discussions
-
Browse the site ad-free
-
Share your work and get featured in the community
-
Compete in the photo contests for fun and prizes
26 Comments
The pizza and filled-in muffin shots are mouth-watering. I have a shoot planned for cupcakes and this has given me some ideas. Thank you.
What sort of light (brand/model) is used for this tutorial?
The brand and model does not matter. Take the CONCEPT of lighting and use any type of light to make it happen.
It matters to me because I'm not happy with the light I currently have. Thanks though!
I'm curious if he is using tungsten or florescent. I was thinking of trying out some florescent when i don't have natural sun light on my side.
Hey Mary, In the muffin shot it is a Lowel Tota with a large diffusion panel. In the Pizza it is a 580 EXII inside of a Wescott Apollo 43" Orb. Both are great options to shoot with!
Thanks for the info, Taylor! Awesome article!
Is there a difference when using a white foam board to a collapsible reflector?
The main difference would be that the foam board can be free-standing as in this tutorial. You can also use a white pillow or binder if you don't want to spend money.
But the final result between the two is basically the same, right?
Yes, white is white. You get the same result. The only difference is how you setup the bounce light so it keeps standing upright. I even use a roll of paper towels and a clamp when in a pinch.
Thanks Trent. Thought that was the case but wanted to ask.
white is not always white, some fabrics have a slight tinge of blue to make us think we are seeing white. The nice thing about using foam core is you can make a reflector in any size that you may need.
You're right, David. I probably shouldn't of worded it that way. But in his case using a collapsible reflector will still give him the same, if not similar results (White balance). Shooting in RAW would also help with the white balance.
I'm hungry now...
I agree with you Mary, I am interested in the lights. In the shot with the garage door background [cupcake] he is using a light with nothing around it. It might be a speelight, but I can't really tell because it appears wider than most speedlights. In the wing shot he is using a rectangular softbox and in the pizza he is using an octagonal. I am a commercial full time food photographer in New Orleans and I have looked at a collapsible octagonal for location shoots so I figure that is what he is using, but I am interested in the first light.
He is shooting through some diffusion fabric like a scrim or something on the muffin shot. Looks like for the wings too.
Looks like a Lowell Tota video light. Not bad priced and lightweight.
kenyee is correct. It is a Lowel Tota
Bem bacana! essa ideia de esfumaçar em "V" foi ótima! e deu fome! kkk
Great article. Simple and to the point. I'm thinking of doing a set of shots for training purposes and reference photos for how certain meals/sandwiches should consistently look. I agree that in my opinion backlighting looks best in most cases.
That pizza looks gorgeous :))
Hi Taylor, great article. I especially like the pizza shot. What kind of reflector are you using for it? It looks like a combination of black and white foam board. What's the purpose of the black foam board on the sides?
Hi Taylor! great article. Lovely work. I have a shoot planned for this pizza joint and you've really helped me out here. Thank you.
hi, I got a question. I bought the limo foto studio( 2 lamps 450 watt each and a tent, in reality the food looks realy great , but when I make the fotos all get a yellow stain. I dont know whats wrong
Singapore Food Signage is a Image supplier. Their assignment will be to provide F&B Start ups with the finest photographs, vectors, pictures and video from thousands of subscribers around the world www.SingaporeFoodSignage.com