Photoshop's Generative Fill feature is one of the program's most powerful capabilities to come along in quite some time, offering the ability to create entirely new editing paradigms and make established procedures far more efficient. Just like any other tool, though, there are some best practices it pays to be aware of. This helpful video tutorial features an experienced Photoshop pro sharing some useful advice that will show you how to get more out of the program's Generative Fill feature.
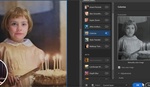
Coming to you from Anthony Morganti, this great video tutorial will show you how to get better results from Photoshop's Generative Fill feature. If you still have not tried out Generative Fill yet, it is definitely worth taking an hour or so to get familiar with the tool. While a lot of buzz has been generated about its ability to create entirely new edits, I have found it especially useful for simply speeding up otherwise tedious procedures. For example, I recently needed to extend a subject's checkered shirt, which meant convincingly cloning and adjusting the lighting on a pattern that was distorted by the subject's body, which can be a bit of a nightmare and would normally take me at least 15 minutes. Generative Fill took care of it almost perfectly in about five seconds, and all I had to do was make a slight brightness and saturation adjustment on the new layer. Check out the video above for the full rundown from Morganti.