I always take a tripod with me in addition to my camera when I'm out on a hiking or scouting trip because there can always be an unexpected photo opportunity. And since I apply focus stacking to nearly all of my photos to ensure optimal sharpness, photographing handheld is not an option. Or is it? In this article, I show you how to use the automatic focus bracketing feature of modern cameras to perform handheld focus stacking.
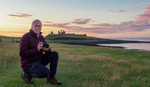
Just recently, on a trip to Praia do Castelejo in Portugal, I broke my rule to always bring a tripod. It was around noon, the light was harsh, and I just wanted to have a quick look around on the beach to assess its potential for a sunset shoot in the coming days. I brought my Canon EOS R5 with the Canon RF 15-35mm lens, though, because I never leave it in the hotel or car.
Just as I was about to return to the car, I noticed some fascinating rock formations near the cliffs on the side of the beach. This area was still in shade, and the orange colors of the rocks made for an interesting color contrast with the blueish tint, which was caused by the reflected light from the sky. I went closer to photograph those details.

Automatic Focus Bracketing
Canon calls this feature focus bracketing, and it can be found in the main camera menu under tab number five. With it active, the camera will automatically take a sequence of photos while shifting the focus in between. The sequence starts a bit in front of the point that was previously focused on. It then continues in small focus increments until focus reaches infinity. The size of those increments can be configured. The camera will then take this configuration plus the set aperture of the lens into account while performing the sequence.

I get the best results for my wide angle photos by setting the focus increment to its smallest value. For a typical landscape scene, which I shoot in the range of 15 to 20mm, the camera then usually takes between four and eight photos. Most of the time, I don't need all of them for focus stacking in Photoshop, but it's better to have too many than to miss a photo in the end.
To ensure that the camera does not stop taking photos before reaching infinity, there's another important setting. The number of shots has to be set to a high enough value to allow for the completion of the sequence. When you shoot with a long lens or take macro photos, you will need a much higher value here than for landscapes. But even for landscapes, it doesn't hurt to set it to a value of 30 or 40. The camera will usually stop taking pictures before hitting that mark because infinity will be reached earlier.
For best results, focus bracketing should be combined with image stabilization. Especially on my Canon R5, this works pretty well, as I'm able to combine in-body stabilization with lens stabilization. Minor misalignments between the individual photos can later be remedied in Photoshop.
Focus Stacking in Photoshop
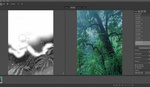
In the video above, I show you how you can prepare the sequence of photos in Lightroom, synchronize the settings, and then load the photos into layers in Photoshop. In Photoshop, there is an option to perform automatic focus stacking. First, the photos should be auto-aligned, though. Even with image stabilization active, there is usually some shift between the different photos that should be fixed.


How successful does photoshop auto stack for you? Mine always come out terrible.
For me too most of the time. 90% of the time I do manual. In the video you see that for such a pattern scene it does quite well, but sure for some undefinable reason it also messes up in the lower part of the image. But that's then easily corrected.
Helicon would have done great on this one. Check out my little thing here and look at the photo I was trying to stack lol - https://youtu.be/SHJzyG1xo_0?t=854
Great article, but honestly if you want the best results you need to use Helicon Focus instead of Photoshop. Photoshop for some strange reason just isn't up to the job of focus stacking. It isn't even that great at Aligning images using Auto Align
I agree. I don't have Helicon though, I usually do it manually in Photoshop. Only for such pattern shots Photoshop does ok, which is why I showed it here as an option
Second the helicon focus suggestion!
I will check if they have a demo and give it a try soon.
If you do enough focus stacking. Just buy it. It's worth it
Thanks for this. The focus bracketing menu options in my Canon R5 always confused me, the manual isn't very clear on what those different options mean and I really struggled with the feature. I'll give this a try!