

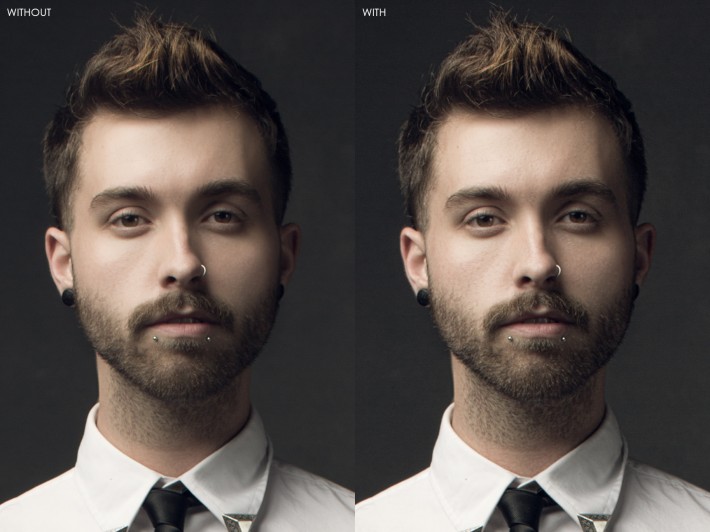
Sharpening is a mystery to many, some do it well and others don't. There are quite a few methods to sharpen an image including the use of a High Pass Filter, Unsharp Mask, Smart Sharpen and Camera Shake Removal in Adobe Photoshop CC. However, it’s similar to hearing nails on a chalkboard when I see an image that is over sharpened. I'm no saint, I'm certainly guilty of cranking Unsharp Mask, I just never found the right solution. Until now.
Sometime last year I stumbled upon this sharpening technique from CalvinHollywood. Granted, the tutorial is a bit much, but I took away knowledge that pushed my post production further onto a professional league. Over time, I learned to simplify the technique and find a good balance that worked for my imagery. Since then, I've presented this method at workshops and seminars and I'm constantly asked to explain the technique in detail. It’s not the easiest execution to understand, but it certainly works...
- Merge the layers into one layer. Select the top layer and hold Ctrl-Alt-Shift-E or Command-Option-Shift-E. This will merge all of the layers into one new layer and insert it at the top of the layers stack. It also doesn't affect the layers below so you can still reference those if need be later.
- Copy layer. Press Ctrl-J or Command-J. This will copy the selected layer.
- Create a group. Click the small folder icon at the bottom of the layers pallet, this will create a Group Folder. Then, drag the two layers into the folder. Rename the folder to “Sharpen” or something thereof in case you need to reference this image later.
- Change the blending modes. Select the “Sharpen” folder, then drop down the blending mode menu and select “Overlay.” Then, select the top layer in the group and drop down the blending mode menu, select “Vivid Light.”
- Invert the layer. Select the top layer in the group and invert the layer by tapping Ctrl-I or Command-I. The image will return to its original look before you changed the blending modes.
- Sharpen with Surface Blur. With the top layer in the group highlighted select Filter > Blur > Surface Blur. Keep it subtle and the numbers small, Radius: 10 Threshold: 8
Occasionally, I’ll add a touch of Unsharp Mask along with this technique for some added punch. Honestly, I can’t tell you how it works or the design behind “Sharpening With Blur.” I can only share what I know and this is the best method I’ve found to bringing back that detail and texture.


Join the Fstoppers community for free
-
Post comments and join in the discussions
-
Browse the site ad-free
-
Share your work and get featured in the community
-
Compete in the photo contests for fun and prizes
47 Comments
"youtube user calvin hollywood"..... lol.
everyone knows calvin hollywood but who are you?
and there is a better method then this he teaches in one of his later tutorial DVD´s.
I'm just a guy trying to pay some knowledge forward, that's all. Thanks for reading and thanks for the feedback!
You're such a jerk for sharing this kind of stuff for free Clay. For shame ;)
4334LUMPUT - Clay clearly pointed out in the article and provided a link to Calvin Hollywood. So basically, what you're saying is not anything new either. It is, however, new information to some of us (e.g. myself) that weren't aware of this process. And that is the whole point of the article... to share information. Sorry you missed that. The only point of your comment seems to be to shoot down somebody else and point out that you have, what you consider to be, superior processes. That's great. Why don't you write article about it?
Thank you, Clay and the Fstoppers crew for continuing to share useful information.
Love the way some people say thank you for free info around here. No one forced you to read or try this. Move on to the next post if you have nothing nice to say.
Wow, what a response! Knowledge makes the world go round, and it doesn't always have to cost, so it is out of reach of some! Thanks for sharing Clay!!!
Clay excelent post ! I love that and I am sure there are a lot of people like that also. I would love to say some bad words here, but follow your exemplo, I will not. Although sometime a person deserves it !
Anyway Just like to thank you a lot !
Thanks for checking it out Elvio! :)
Never heard of Calvin Hollywood...
I ran across this and have seen an insane amount of ways to sharpen over the years, so I read your article. I then had to try it just to see what results I could get with it. My resulting image seemed to have a local contrast effect with your layers. I may be a cheater, but software is software...I'll probably stick to Topaz for my sharpening and NR.
Your technique does work though!
I might suggest a mask for certain usages. It seemed to negatively affect my bokeh and I would expect it to work much better on a gritty image. My fault I suppose for choosing the image I did and not paying too much attention to your style of posted images.
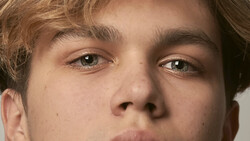
calvin holywood calls this "freaky amazing detail techniqe" it gives image an HDR/gritty look when higher numbers are used.
That makes sense then. I try not to get to caught up in other's techniques as it seems to dilute my creativity and output. Always something to learn.
Absolutely, great idea. Thanks for the feedback Marshall!
Haahaa, what are the odds that we both post videos on different ways to use Surface Blur to sharpen an image on the same day?
Crazy! I can't wait to watch yours!
I tried out your method and it's great.
The nice thing is that they both give different results :)
Mine works best on texture and finer details.
They're both different but both the same in that they both use surface blur to bring local contrast and not muck with the edges too much.
Thoroughly enjoyed both these videos on FStoppers....this is what quality content is all about.
Hey Clay, thank you very much for the video and certainly another great tool to add to our toolboxes. I would love to know how to achieve a similar color tone that you have with your images. i really like the mood in combination with the lighting you use. Any plans to release a video going through some basic steps on how you achieve your post production color toned look?
Thanks Shawn, really appreciate that! I'll definitely consider that for a future post! I can tell you that the color came from a combination of Curves and Levels. The majority of my editing, color and highlighting, comes from Curves. Removing red, adding most blues and greens and de-saturating the entire image. Hope this helps man!
Nice job Clay!. Any chance of sharing what your lighting technique was for this photo and the rest of your Oliphant series?
Thanks so much! The light setup for the entire Oliphant Series was easy. One single light. Perhaps I'll share the lighting technique in a future post!
One Profoto D1 (Half Power)
Photek Softlighter II
Boomed, 45 Degrees Camera R/L
Hope this helps!
Hey Clay! I'm seconding the request for a post on this lighting technique along with some post processing guidance! I've been after this look for awhile, and can't... quite... get there.
I always take not of those with impressive portfolios. I've been having success with small amounts of the new shake-sharpen with neutral 50% gray on a mask in areas I don't want to exagerate. Will happily give this a try also.
Hey, on the photo with the camera on the chair, is there another small light introduced just to highlight the chair and lens? Great work btw, really loving those tones.
Thanks for checking it out! As far as the Joey Goldsmith image, there is a small silver reflector that bounced some light!
Cool technique. Also your example pictures are truly looking awesome !! great mood, great processing
Thank you so much Valenten!
Good article Clay! You can check too the High pass way
• Open your image
• Duplicate & change blend mode to overlay, on top layer
• Use High pass filter on top image
Thanks ;)
Would you recommend this method for both prints and web? Cheers for your help!
Hey Katy! I have used this with prints and it would great! Thanks for reading!
Hey Katy! I have used this technique with prints, many many times and it looks great! Thanks for reading!
Should it ALWAYS work? I gave it a try with an unretouched flower image, red against fairly dark background, and got some patches where dark green was replaced with bright blue. I was able to mask that out, but it could have been problematic.
The beauty of this technique is that you can always pull it back AND mask it out. It works better on some images more so than others. But it always brings back texture and detail. Thanks for checking it out Mike!
Oops. I changed the bottom layer to Overlay. Should have changed the Group Folder from Pass Through to Overlay. Now it works as described.
Great one Clay, I am a pretty light editor and usually crank out almost all my shots in Lightroom but use PS for the heavier stuff. This is a great way to keep control of the sharpen and mask as needed.
Thanks Andrew! Cheers!
Clay, thanks for sharing this. Everything we learn is good for us and sharing various techniques only helps all of us in the long run. I'm glad people still realize the value of collaboration.
Thanks for reading Glen! Really appreciate the kind words!
Clay what brand of backdrop are you using for this image. Great work by the way.
Thanks Jason! It's a hand painted canvas from Sarah Oliphant of Oliphant Studios! Thanks again for reading!
Nice vid, I see you did a global to it which most of the time is fine. I liked the overall idea for the technique my personal preference would be to add a mask to that and mask the areas that need the sharpening because there are often other areas that don't warrant it (backdrops etc). I lately i've used gaussian blur for sharpening after applying highpass on a layer, I think I will try a modified version of your idea. Thanks for the tips!
This method (which I've used for years now) has a few more elements to it than described here for this amount of detail and overall look that can be obtained.
One could say say I'm being a tad extreme here.. But in following quite a few Ps 'experts' and teachers over the last 5 years. I would venture to say that Calvin has one of the most unique and impressive approaches to using this product I've encountered. If you are not currently a follower of his work, you should be. But I would caution you that over 90% of his content is German based language and if you have to ask "Sprechen Sie deutsch?".. you're probably out of luck.
Too bad he's stopped his PSW appearances and stays in Germany and the surrounding now. I've learned more from this guy than ANY other.. Including Corey Barker.
[ . ]
Oh my goodness! Thanks for sharing! I actually saw Gunnar's portrait on his fb site and wondered who was the magnificent artist that created that image! Love it.
Michael Woloszyynicz, as much as he is expert in like matters,
Mr. Cook, would it be possible to know how you made the identifications on the images above? They resemble those one finds in mugshots such as these (http://goo.gl/GriyDg), and I like them a lot...
Thanks for sharing and making me (and some of us) aware of this sharpening technique! Excellent post! 😉