
If you’re like me and live somewhere with out-of-control housing costs, finding somewhere with enough space to shoot in can be difficult, to say the least. Having built out a home studio in a major city, here’s why I did it, but also how.
The Journey to a Home Studio
This was something I had wanted to do for a while. Between headshots, creative shoots, editorials, product shoots, and more, I would often be renting studios often enough for it to be a large portion of my monthly expenses, but renting a dedicated studio space didn’t quite make sense. Enter the idea of a home studio: somewhere with enough space for most shoots, and if I had a larger studio campaign, then I would rent something. My previous apartment was too tight to do most types of shoots in, so when I moved, that was definitely a must-have. After all, the amount I would be saving in studio rentals every month would actually make up for the difference in rent, so the math quickly added up.
Main Considerations for the Studio
My main considerations for building out this sort of space were:
- Enough open space to have a backdrop either hanging or on stands.
- Ideally, not have to move furniture to utilize the space.
- High ceilings for shooting tall models.
- Room for equipment storage/ability to have stands and lights set up when not in use.
After going through many places, many would have been workable, even if not ideal. Rather than trying to make it work for the space, I went into my search with this front of mind, so creating the environment would be rather seamless. Pun intended.

After going through many places, many would have been workable, even if not ideal. Rather than trying to make it work for the space, I went into my search with this front of mind, so creating the environment would be rather seamless. Pun intended.
Finding the Perfect Space
I was open to either an extra bedroom that was big enough (in a major city, this is uncommon) or a living area big enough that it could function as both studio and living space at the same time. Enter where I am now, with 11-foot high ceilings, perfect for photographing models and for me being taller than average as well. The living area is a large open concept floorplan that allows for a resting 6ft backdrop to be up at all times. If needed for specific shoots, I can move some furniture and fit a full 10 ft backdrop as well. There is an abundance of natural light, even though I normally shoot with strobe. There is enough space for a small studio cart, as well as some lights and stands to be left out. It may not be an interior designer’s dream, but it works wonderfully and is something I aimed at for some time. A director’s chair off in the corner is a nice touch to the space, and it helps for whenever makeup artists are over for a project.
Lighting and Equipment
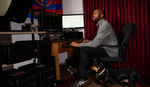
I will jump between strobe and constant light, using Godox AD600’s as my main lights, then going to the Generay Portabrights (similar to a 120D) for when I’m shooting motion or creating content. As I also model and my partner acts, this is a great spot to record self-tape auditions as well and therefore omits the need for a studio for that purpose too.
With power outlets seemingly everywhere, yes, even in the floor, it makes power control a breeze whether powering lights, computers while tethering, steamers for clothes, etc. I also find it unobtrusive when not in use too; it sort of works with the natural vibe of an artist’s home. Even though it’s not a standalone studio, there is something about having a space that is for creativity, for working, that gets me fired up. Plus, having that space only makes me more inclined to shoot in it as there’s no budget concerns of looking for a studio, especially if it’s for a personal project. The simple added benefit, even of not having to load everything in a car, is a game changer. Trust me, if you’re considering making your own home studio, your back will thank you. No more lugging sandbags, stands, modifiers, etc., in and out of studios. I almost always have time for a pre-light before I start shooting. I will set my camera on a tripod and do a quick self-portrait or photograph an assistant, then get the lighting dialed in before the talent even shows up. Another benefit I’ve learned is living in Canada, many models would rather shoot inside during the winter (who wouldn’t), and having this space makes it so I naturally just end up shooting more because I’m consistently able to year-round without dealing with constant studio rentals in different spaces when you’re not sure what you may be getting.

Space and Environment
Perhaps the one downside is that it’s not the largest space, but quite honestly, it’s very similar to shooting in other medium to small-sized studios I’ve worked in anyway. There’s still enough room for a team to work and chill between shots. I didn’t want that sort of dark basement studio dungeon vibe, so the natural light does help liven it up a lot. I find creating a warm and welcoming environment makes a home studio feel less like a HOME studio and more like a studio that you happen to sleep in the other room of.
Living With Others
Obviously, if you live with others, this can add a level of difficulty, but expectations I find are a good thing to have set out, as well as clear communication whenever you are doing a shoot. My girlfriend and I live together, so to give her her own space, I generally found it beneficial to schedule shoots while she’s out, whether at work or otherwise.
Conclusion
That’s really the long and short of making your own studio, how I did it, why I did it, and some things to keep in mind if you’re curious about making your own. It has amped up my creativity in a lot of ways, and I’m definitely glad that I went for it. But if you’re a photographer on the fence about building out your own, hopefully, this will give you the perspective of someone who has done it and would do it again. If you do make your own, or have your own and are looking for ways to elevate it, I’d love to see your setups.
Links to Studio Gear
Links to some of the gear I used in making my studio:


I'm so glad to see an article like this. I created a studio in my basement and the best thing that I did was to invest in wall plates with baby pins to attach my lights and adjustable crossbars to. That eliminated the need for my c-stands and freed up floor space. I wish I had your ceiling height though, mine is 8ft. Hopefully, there will be more articles like this in the future. Thanks.
Super article, thanks Fynn. Lots of useful information.
Thank you!!
I did this back in 1984. You are getting great, repeatable, results.
Thank you!