
Creating a 360 VR panorama (also referred to as 360x180 degree panorama) has been an interesting side-challenge to take on for photographers, but in the past few years, it has been simplified to the point where phones, such as the Google Pixel series, make taking a VR panorama practically a point-and-shoot affair. But shooting one of the night sky remains a worthy challenge.
On a Google Pixel phone, one has to merely select the “Photo Sphere” option, press the start photo button, and then point the camera at the spots indicated in the display. Once you’ve covered all the indicated spots, the phone computer automatically stitches the image into a 2:1 equirectangular VR panorama. The result is viewable in Google Photos as an interactive photo in which you can pan in any direction (including up and down), and zoom in on details.

While these quick Photo Sphere panoramas are surprisingly good, there are a few limitations. First, stitching may not be accurate if objects are close to the camera. If you’ve taken panoramic shots before (not necessarily a full 360 degrees), you will know that parallax errors occur if the panoramic photos are not taken with the camera rotating around the lens nodal point. This is particularly hard to do with cell phones, especially if you have to be watching and poking at the screen behind the lens.
The second problem is that at night, the exposures need to be many seconds long (at least), during which time the earth’s rotation is causing the stars to appear to move relative to the horizon. While Google’s Pixel cameras include an impressively capable Astrophotography mode for single still images (at several minutes per shot), this isn’t applied to Photo Sphere panoramic shots.
Night Panorama Challenges
Even for modern DSLR or mirrorless cameras, nighttime 360 VR panoramas are a challenge. While a daytime panorama can be done with care by hand, the long exposures needed for night sky panoramas make a tripod mandatory. As with any 360 VR panorama, if foreground objects are part of the scene (certainly if the ground is included), then a special panoramic head is needed.
The second major problem to be dealt with is the movement of the sky. This makes it necessary to take the shots forming the panorama in as short a time as possible. On individual frames, the exposures should be short enough to keep stars from trailing (shorter exposures for longer focal lengths), Between frames, there should be minimal delay to avoid star movement which will cause registration problems if the ground is also visible in the frame.
Lens Selection
Given the challenges mentioned above, the choice of lens (and camera) becomes critical. Though you may see many online night sky scenes shot with medium to long focal lengths, aside from the sky-ground interface, they are not too difficult to stitch in many photo processing programs.
Using a fast ultra-wide or fisheye lens is better for reducing the time needed to take all of the panorama component shots, but these lenses typically have severe aberrations at the edges. Fortunately for us, the edge problems can be sidestepped by overlapping enough to use just the center portions of the frames.
Camera Selection
It should be fairly obvious that the camera itself is an important part of an effective night 360 VR solution. Good noise performance at high ISO is important. A full-frame sensor is better than APS-C or smaller to minimize the number of frames needed to cover the sky.
My Solution
My personal solution for the 360 VR panorama problem is to use a full-frame Nikon D850, Nikon D600, or (modified) Canon RP. In practice, I prefer the D850 for its better noise and higher pixel count.
For a lens, I use a Sigma 15mm f/2.8 fisheye lens. This lens is relatively inexpensive, and manual aperture and focus rings allow it to be used with an adapter on the Canon RP in addition to the Nikon cameras I normally use it with. At f/2.8, lens aberrations at the edges are bad, but proper overlap and stitching can overcome much of the problem.
For a tripod, I use various Bogen/Manfrotto aluminum tripods which are sturdy enough for long exposures. A video head or camera head with horizontal panning capability (i.e. not ball-head) is what I normally use. Any type of head with horizontal panning around the center screw of the camera mount is fine (i.e. not ball head).
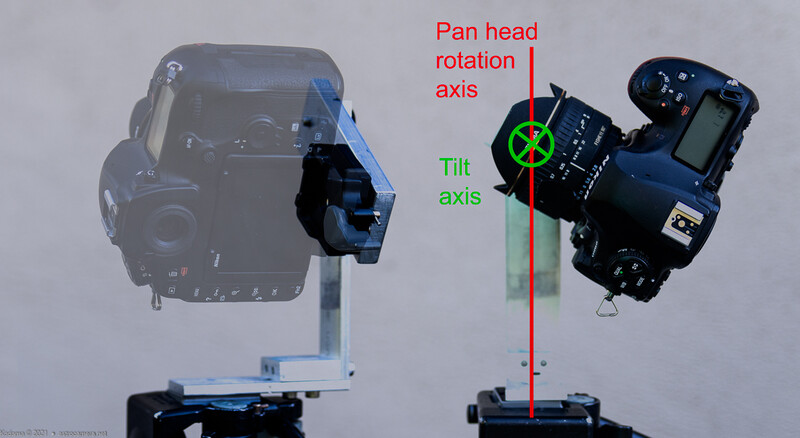
Normally I would have just gone with a commercially available 360 VR pan head, but in my initial stages of experimentation, I threw together a vertical pan head using surplus aluminum. It worked so well for me that I’ve not gotten around to replacing it. This setup holds the camera in portrait orientation with the lens nodal point of rotation at the center of both vertical and horizontal rotation. It also has enough adjustment to accommodate almost any camera body I own.
For quick setup and teardown of an otherwise bulky assembly, I use Manfrotto quick release clamps on the VR pan head, tripod, and cameras.
Shooting Procedure
When setting up, I first make sure the tripod top is level so that the pan head is really panning in a truly horizontal plane. This ensures that post-processing requires as little manual intervention as possible.
Next, I make sure that the 360 VR pan setup is adjusted so that the camera movement axes are aligned with the lens nodal point (near the front of the lens). The camera settings are all on manual so that focus, f-ratio, and exposure time are constant across the entire set of frames. Generally, I use around 15-second exposures at f/2.8, but in some cases going to f/4 or even f/5.6 is desirable as edge aberrations are smaller. In addition, this limits the number of dim stars which are picked up, making it easier to locate constellations in the final sky panorama.
My ideal pre-determined shooting pattern is to shoot 6 frames with the camera pointed about 60 degrees above the horizon, with the first frame about 30 degrees clockwise from the pole and with subsequent frames 60 degrees rotated clockwise from there. This will put the last frame overlapping the polar region with the first shot. Because the first and last shots are the farthest apart in time, misalignment of the stars is the worst case. But since the frames are closest to the pole, misalignment error is minimized.
Next, I adjust the tilt so that the camera is pointing straight up and for good measure, I take two shots, with the second rotated 90 degrees with respect to the first zenith shot. Ideally, the zenith shots should not include any landscape elements. They are used to provide distortion-free frames of the zenith as well as to provide stitching points for the sky in the lower elevation frames. If any landscape elements are captured in the zenith frames, they can be masked out in post-processing.
For all of the individual frames, precision pointing is not necessary. Before starting a sequence of shots, I take note of landmarks to center on for each of the rotated 60-degree shots and use these to rotate the setup, taking as little time as possible between frames. To reduce the possibility of vibration, I use the camera’s 2-second shutter delay when I’m not using a remote shutter release.
If the ground is to be included in the panorama to fill in the “hole” below the horizon, a second set of shots are taken with the camera pointing below the horizon. These should not include stars or use masking to exclude the area above the horizon when stitching the panorama. If foreground objects are important for your panorama, you may also want to refocus before taking the ground frames.
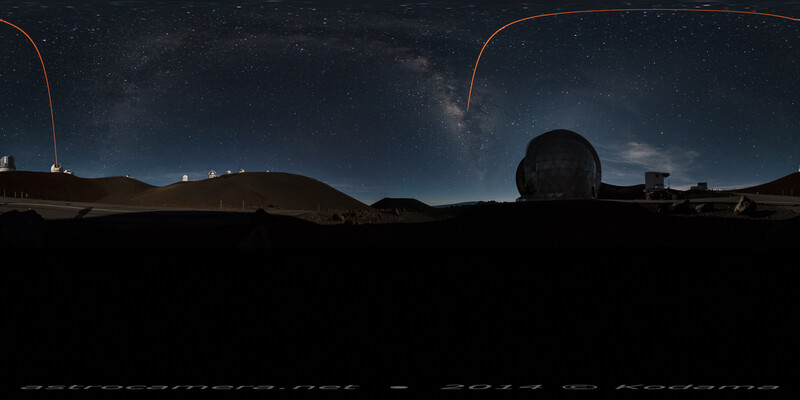
In the panorama above, all of the observatories at the top of Mauna Kea on the island of Hawaii are visible. The sky is blue because the Moon was up. It is positioned behind the nearest observatory building. The orange line is a guide star laser used to cancel atmospheric turbulence. A "glitch" in the laser is visible in this shot because the telescope and laser were tracking the target which moved while the panoramic frames were being shot.
Post Processing
For 360 VR panoramic processing, I start with importing the set of frames into Lightroom. Adjustments such as color balance and exposure can be done here, as long as the same adjustments are applied to the entire set of frames. Airplane trails can be cloned out at this stage too. Lens corrections (distortions and vignetting) should not be applied at this time as the panoramic stitching program which I recommend (PTGUI) takes the lens distortion into account.
Once the set of frames has been adjusted, they can be processed by PTGUI. Within PTGUI, undesirable parts of individual frames (e.g. landscape in zenith shots) can be masked out. If PTGUI has problems automatically finding matching points in the sky, these can be manually added. Familiarity with the sky constellations helps greatly if this step is necessary.
Once the panorama has been stitched, the center of the panorama can be set in PTGUI. If necessary, the horizon line can be straightened out too. For final output, PTGUI can create a web page output, complete with web code to allow interactive viewing in a web browser. Alternatively, PTGUI’s local viewer gives the same experience on your PC.
One of the easiest ways to share the interactive experience is to upload your panorama to Google Photos. To do this, take the 2:1 equirectangular 360x180 JPEG file from PTGUI, downsize it to a maximum of 8,000x4,000 pixels, and upload it to Google Photos. Then use Google Photos to generate a public link to the photo for sharing.
Conclusion
Take the challenge and try your hand at doing a night sky panorama. Immersive, interactive sky panoramas allow you to enjoy the night sky on a cloudy day as well as help you to become familiar with the night sky.
Join the Fstoppers community for free
-
Post comments and join in the discussions
-
Browse the site ad-free
-
Share your work and get featured in the community
-
Compete in the photo contests for fun and prizes
4 Comments
I'd be interested to see how it does under moonlight. Got any example?
Nice! It's amusing to me that you took a shot inside an ice hotel. I did the same inside the ice hotel in Sweden. :) Have you tried uploading your shots to Google Photos where they can be seen as interactive "Photo Spheres?" Please do post a shot if you try it under moonlight.