Removing Bags Under Eyes
Perfect timing on the creation of this group :). I recently did a shoot with a model who needed a lot more retouching than I realized based on her prior work (am I just a horrible picker or is this pretty standard lol). One of the major problems was bags under her eyes, double bags even. I think my MUA didn't help either, I think she went very light overall which lead to lots of retouching in post.
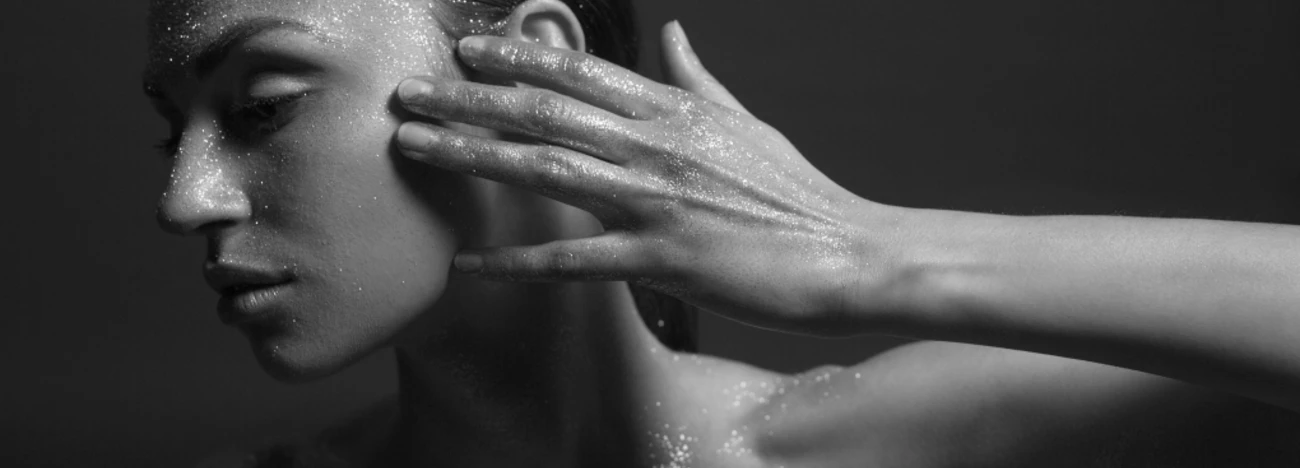
Anyway, what's everyone's preferred method for getting rid of these? Dodging seems to be the least realistic for me, primarily because it very quickly leads to a different color. The healing tool in lightroom seems to work best but I kind of just need to get lucky with it. And also if she's not turned directly towards the camera it's really tough to Heal when working with just the corner of her cheek visible to the corner (but enough to see the bags, of course). The main problem photo is attached, the right eye is a little fixed, left is untouched.
Any insight is appreciated! Feel free to provide insight on either method or anything else you guys do. Thanks


5 Comments
Dodging and burning would be my prefered tool. I use the soft light method. I then put a colour layer on top to deal with the colour shift problem. Sometimes I will put the skin colour on the colour layer before I dodge and burn. That way my results will look natural as I D&B on the affected area. I can always redo the colour layer after the D&B.
Hope that helps.
I only had a couple of minutes to have a quick go at the eyes. As it is low res, I was unable to finesse it as I would on a higher res image. Is this what you were after?
Pretty solid :). What was your method?
I just used a big soft brush at 1% flow on the softlight layer. Then just work the problem area until it matches the surrounding skin. It wouldn't be as bright as the highlight running along the top of the cheek bone. You have to be careful that you don't destroy the skin texture. Then create a new layer and change the blend mode to colour. Then sample a colour from the skin area nearby that you haven't retouched and paint that on the retouched area. Do this multiple times from places either side of the retouched area so that you get a nice colour transition. A brush flow of around 2% allows me to build up the colour gradually. If you go too far the colour will start to look un-natural. This is one of those things that you have to practice a lot to get to the point where you start to feel comfortable. It might take multiple D&B and colour layers to get to the place your are happy with.
Eyes are always difficult areas to work on. I like to keep natural creases under the eye, but I do reduce them if they are particularly dark. Your makeup artist could definitely have done more to help you out with the dark areas here. You will be a lot more aware of it on the next shoot, so you can ask your makeup artist to pay more attention to it if you see it again.
Julia Kuzmenko and Michael Woloszynowicz are amazing retouchers. I learnt a lot from them. They have videos on YouTube that go in to this in a lot more detail. They also have some great articles on here. I prefer D&B rather than a frequency seperation approach, but this is just personal preference.
Good luck.
Neil.
Thanks for the insight! I'm just barely getting into PS now so a lot of this is over my head but I'll save this for later reference :).