
For Northern Hemisphere astrophotographers wanting to try getting into the deep sky (outside our solar system) targets, here are three suggestions to start the Winter season, with the bonus that a stock (unmodified) DSLR or mirrorless camera can be used.
- The Double Cluster (NGC869 and NGC884) in Perseus
- The Pleiades (M44) in Taurus
- The Witch Head Nebula (IC2118) in Eridanus
These are conveniently arrayed across the sky in order of difficulty as astrophotography targets. You can concentrate on each one in order through the winter season, and each will rise at an earlier and earlier hour if you tend not to be an all-night astrophotographer. Or you can be ambitious and shoot some frames of all three throughout a winter night.
To get deep noise-free detail, especially in the latter two targets, you will need to combine multiple exposures (a process referred to as “stacking”), which is similar to HDR frame stacking, except that the exposures are all of the same lengths. The advantage of a modern digital camera is that you can even make it a multi-night project and combine frames for very long effective exposures.

Three winter deep sky targets. Chart created in Stellarium.
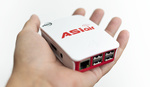
A key point to note is that each of these targets also does not require a specialized astrophotography camera (i.e. modified for extended red sensitivity), as none of these targets feature the deep red color of ionized Hydrogen gas. The image examples below were shot with a standard Nikon D850 full-frame DSLR (no extra filters) coupled to a telescope with a focal length of ~420mm with f/3.9 optics (Borg 107F3.9). A modern mirrorless camera such as a Canon RP can be used instead of a DSLR. Note: When using a DSLR, cover the viewfinder, as this is a potential path for a light leak onto the sensor during long exposures.

Deep sky imaging setup consisting of a Borg 107FL3.9 astrograph and mirrorless camera (Canon RP) mounted. The saddle at top accommodates a small guidescope. A reflex (red dot) pistol sight is used for rough positioning of the scope.
Besides the optics (telescope or camera lens), you will need an intervalometer to allow shooting multiple frames of more than 30 seconds and an astronomical tracking mount, preferably with an auto-guider to ensure precision tracking.
The exact length of exposure per frame you use will depend on your optics and sky conditions. You will want to expose each frame as long as possible without reaching the point of overexposing the frame. Experiment with this before starting your imaging project. Use the histogram review function on shots you’ve taken. The bulk of the dark sky will form a distinct peak in the histogram on the shadow end of the histogram. The histogram background peak should not be hard against the left edge to avoid clipping the dark sky. For my situation, at about 4,000 feet of elevation, halfway between Los Angeles and San Diego, I’m able to shoot as long as five minutes with my telescope setup (camera at ISO 1,600) when pointing close to straight up.
For a payload that includes a telescope or long telephoto lens and DSLR, I do not recommend using a small tracker. If you don’t have an astronomical mount and auto-guider, you will need to take many more frames of shorter length to avoid trailed stars. For this project, we’re in the realm of “getting serious” astrophotography, so for the sake of your sanity, save a lot of frustration and invest in a stable mount and auto-guiding system.
Regarding a mount, although many modern astronomical mounts feature computerized, automatic “go-to” mounts, they are not strictly necessary for astrophotography. The key feature required is tracking motors in both axes. Two of the targets here are visible to the naked eye in a reasonably dark sky, and the third (the Witch Head) is near Rigel, which is a very bright star in Orion.
Without computer-assisted go-to capability, my pointing procedure is to move to the target with as much accuracy as possible using a low-power finder scope or even a non-magnifying reflex (red dot) sight, check the bright stars in the camera’s live-view screen, and then take an exposure of a few seconds with the camera at the highest possible ISO setting (e.g. 10 seconds at ISO 51,200). The field of view of the camera and telescope at this focal length is large enough to easily get the target somewhere into the view of the camera. This gets me an image of the target, which can be used for fine centering and composition of the target, after which the ISO and exposure time can be set and tried at least once for the sequence of frames I plan to combine.
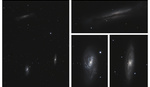
The Double Cluster
First up during the evening is the Double Cluster (NGC869 and NGC884), a pair of open clusters. This is located at the border between Perseus and Cassiopeia and is visible to the naked eye under dark skies as a faint fuzzy spot that looks very nice in binoculars.

Double Cluster (NGC869/NGC8.84), Nikon D850 at ISO 1600, 52 x 2 min.
If you find yourself attracted to star cluster targets, check out the constellation Auriga for more challenging targets.
The Pleiades
Next up during the evening is the Pleiades Star Cluster. This is an area of very bright blue stars illuminating clouds of dust and gas. This is an area rich in fine details in the clouds.

Pleiades (M44), Nikon D850 at ISO 1600, 78 x 5 min.

Short (30 seconds) frames will show the bright stars and a hint of the surrounding nebulosity, but this area is filled with dimly lit gas, so stacking exposures and aggressive curves adjustment in post-processing has the potential for bringing out a huge amount of diaphanous fine detail in the region.
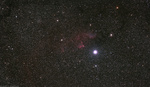
The Witch Head Nebula
The Witch Head Nebula is the most challenging of these three targets as there are no obvious bright parts of this object. In single frames, it may be difficult to verify that you are pointing at the correct area, but use the surrounding stars as a guide to frame the target. It is another area of dust and gas illuminated by a nearby hot blue star (Rigel). Avoid including Rigel in your shot as it will almost certainly cause internal reflections in long-exposure shots.
Because of the dimness of this target, to get a noise-free result, you will almost certainly want to combine exposures from multiple nights. The example shot here is a bit noisy because of insufficient images in the stack, as imaging on the second night was cut short by clouds. But since it is currently rising late in the night, many more shooting opportunities will be available later this season.

Witch Head Nebula (IC2118), Nikon D850 at ISO 1600, 29 x 5 min.


Although I support any efforts to get people interested in astronomy, the photos displayed in this article, and the almost passing reference to an appropriate mount are definitely misleading.
Although a very experienced astrophotographer can get photos like this with a DSLR, the remainder of the equipment required to do so is extensive, expensive, and requires expertise far in excess of what a beginner making the transition from photography to astrophotography might possess.
Although the article isn't directly misleading, it would probably be of service to folks who might be interested in getting to this level of astrophotography to make note of the fact that they'd need a few thousand dollars worth of equipment in addition to their DSLR, combined with a couple of years of direct astrophotography experience (to get photos of the quality in the article), and then they'd have to become proficient on any of a handful of softwares directly aimed at astrophotography processing.
Roger, I'll take your comment about the photos to be a compliment. :) Thanks!
Regarding your comments that the article is misleading.... that was certainly not the intent. Rather it was to highlight some targets that someone getting deeper into astrophotography might want to consider. At least the first two targets are bright enough to see by naked eye. ... and note that I'm not using Hubble images as examples! :)
I shot the targets with an admittedly expensive setup, and perhaps I should have emphasized more that these targets can be shot at shorter focal length, with shorter exposures like 30 seconds, which virtually any camera can do, and on a tracking mount. Here's an example shot that includes the Double Cluster shot with a Canon RP (less than $1000 body), 30 second exposures, 105mm lens, on a tracker (star Adventurer). The only "enhancement" was that the camera was a modified one, which is why it picked up the red nebulosity in the photo: https://astrocamera.net/2021/0811/perseus.htm Except for the tracking mount, almost any photographer would have similar equipment already.
Regarding software, Deep Sky Stacker -- http://deepskystacker.free.fr/english/index.html is free and will do all of the specialized astrophoto image processing needed.
Happy Holidays!