
Flare has become a huge part of modern photography for how it can add both depth and excitement to an image. Many of us have resorted to manually creating lighting effects using Photoshop or by layering pre-made textures above our photos. Red Giant, however, looks to replace and augment this rather tedious process with Knoll Light Factory.
To create the Knoll Light Factory app, Red Giant worked very closely with John Knoll, chief creative officer at Industrial Light And Magic. Knoll has a bucket list worth of awards attached to his name for his visual effects work on projects such as "Avatar," "Pirates of the Caribbean," and "Star Wars." Knoll is, undisputedly, one of the world’s top experts on visual effects.
Note: The Knoll Light Factory plugin is designed to be used in Photoshop, After Effects, and Premiere. This review, however, will focus on using Knoll Light Factory in your photographic workflow.
What Makes Knoll Light Factory Special
Unlike the aforementioned traditional methods of creating flare, Knoll Light Factory creates lighting effects rendered specifically for the image you are creating. This allows you to take advantage of tinting and obscuration (detailed below), as well as ensuring that each effect is unique and not just a clone of the lighting effects that every other user who bought the software created (such as with a plugin that uses texture-based lighting effects).
How To Create A Lighting Effect
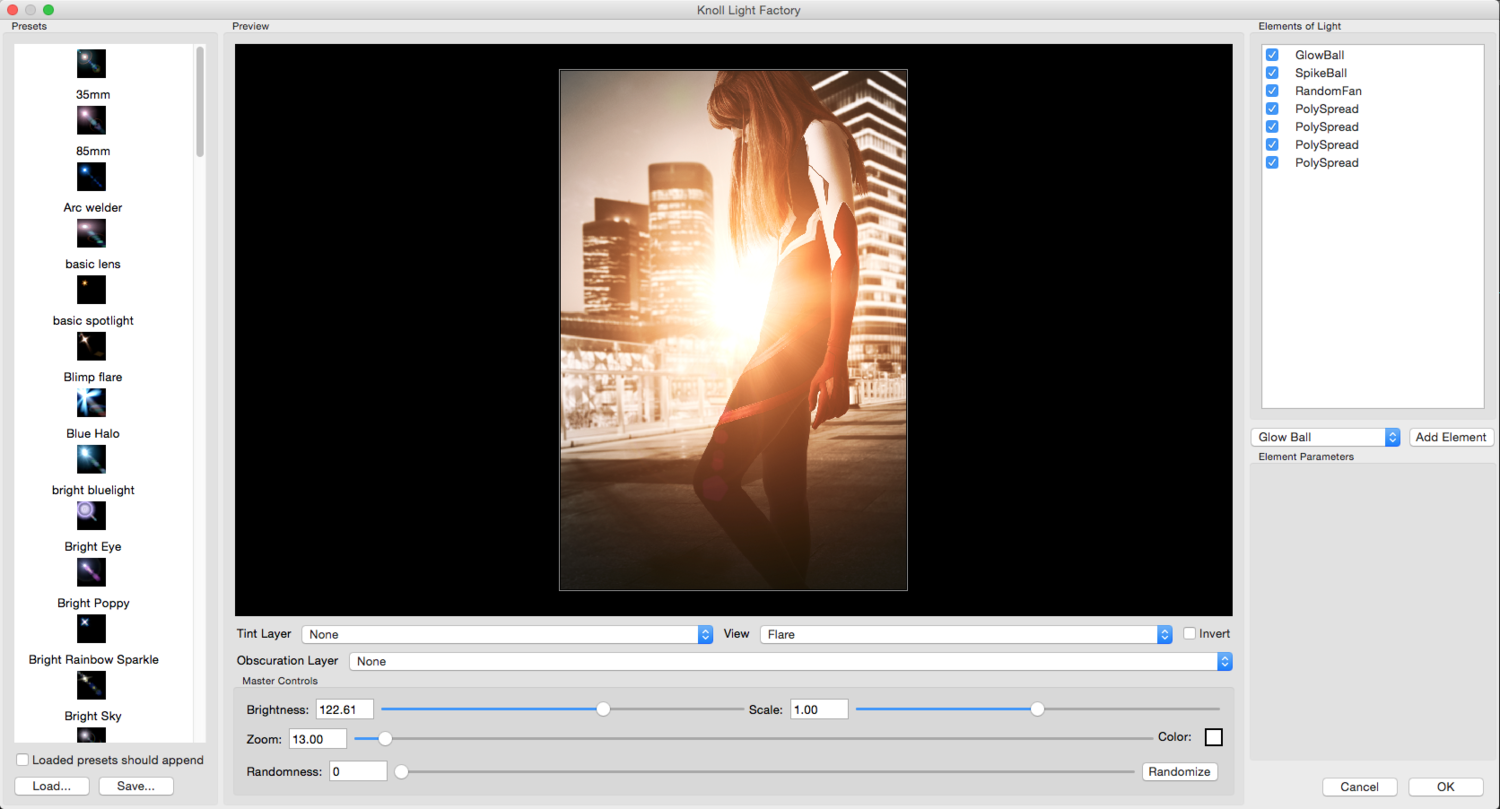
The core concept of effect creation lies in layering what the plugin calls “Elements of Light.” Knoll Light Factory has 19 different element types ranging from simple glowing spheres to complex fans. These elements can then be layered with one another to create a near-infinite range of possible lighting effects.
For those who don’t want to spend a ton of time creating their own lighting effects though, Knoll Light Factory comes with 80 pre-made lighting effects that cover a huge range of possibilities without ever having to invest more than a few seconds.
The Power Of Tinting
One of Knoll Light Factory’s most powerful features is the ability to define a “tint layer.” Once you have selected a tint layer (usually a flattened layer of the image you are adding the lighting effect to), Knoll Light Factory uses the colors of the layer to render your lighting effect by analyzing the color tones directly around the lighting effect and rendering as if those colors were actually emitting light.
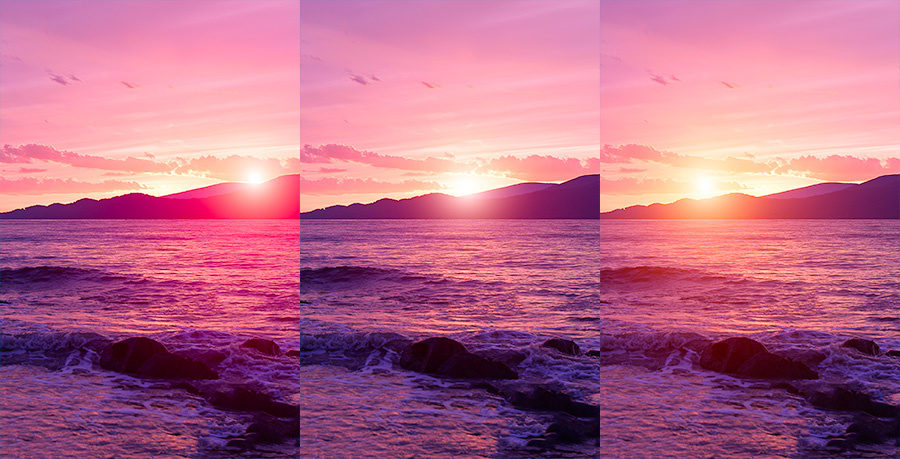
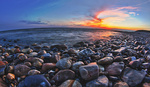
In this image the only change that was made was the position of the flare.
Obscuration Layers
One of the other useful features of Knoll Light Factory is its ability to render lighting effects while taking into account objects that might exist between the light source and the camera which blocks part of the light. Using an obscuration layer you can alter the flow of light as if it is bending around or being blocked by other objects in the frame.
What I Liked
- Exceptional image quality even at extremely high resolution.
- Near infinite configurability.
- Loads of presets.
- Excellent advanced features such as tint and obscuration layers.
- The ability to non-destructively create lighting effects as “smart filters.”
- Easy to learn.
What Could Be Improved
- Somewhat expensive for a plugin ($189).
- Interface can be a bit clunky.
- Would love to see the ability to handle multiple lighting effects from different origins in one render (for example, two spotlights pointing at each other).
- Adding the functionality to render lighting effects onto a transparent layer.
You can download a trial copy of Knoll Light Factory or buy the full version from B&H Photo for $189, or as part of the Red Giant Effect Suite for $474.
Note: The majority of the effects suite is designed for video only and does not support images in Photoshop.


You could just render into a 100% black layer and change the blend mode to "screen". That effectively makes it a transparent layer.
You could, but, unfortunately, you would then be in a situation where you are trying to "place" the flare on a black layer from within the Knoll UI so would struggle with precision.
I use Knoll as well and I share my workflow with you:
1) I create a black layer
2) I convert it into a smart object
3) I put the blend mode in "Screen" mode
4) I apply Knoll (which in my opinion needs a defintive UI overhaul after all these years)
5) in the Knoll UI you find a fold out menu "Background Layer" and you choose they layer that you want the flare to be on (as a preview) -> so you see the layer on the actual layyer you want to apply it on and not the black layer
6) you edit the flare to your liking and you click apply
Now you have a lensflare which you can always edit after it has been applied. Which I do ALWAYS!! I am never happy with my first attempt.
And for steps 1 to 3 I created an action. So the flare layer is created superfast....
For a lot cooler flares export your image to after effects and use VIdeo Copilots Lens Flare. The workflow is a little bit more complicated since you have to use AE. But the flares are way cooler than Knoll and the interface is more refined (and more complicated)...
Great suggestion! Thanks for sharing!
nice workflow Peter! Here's what I use to do before reading your comment (let's call it the lazy-version)
- duplicate your main layer
- apply knoll
- black fill that layer
- reapply knoll (the last filter)
- set layer to screen mode
Knoll has been a stable in my workflow for years. This is a great read for an awesome product!
I use knoll, but I also suggest Optical Flares from Video Copilot. They can be a bit heavy handed, but you can deconstruct them and fully customize them to create realistic elements. It's cheaper too.
I like and have used Knoll for a few years.
My 1 chief complaint is this strange banding that come off of some of the rays. When zoomed in you can see the actual 'rays' themselves and it looks find of phoney. Although I've never tried to do it on a blank layer with a layer blend option to use a 1 or 2 pix blur. I will try this in future uses.