There is no doubt that the telephoto lenses are just as attractive for landscape photography as the wide-angles. In this article, I will give you seven steps to help you make powerful landscape photos with a 70-200mm telephoto lens.
I realize that many of you landscape photographers out there already own a 70-200mm lens, however, these seven steps work just as great for other types of telephoto lenses such as a 70-300mm, 100-400mm, their crop sensor equivalents, and even prime telephoto lenses.
Words like "powerful" and "impactful" are relative terms and kind of overlap, so they are used interchangeably in this article. If you want to see even more examples and in-depth information than what I can present in this article, be sure to check out the video above.
Step 1: What Subject?
The first step is to figure out what to photograph. It is about finding a subject, which can be anything, but there is definitely something to be said about photographing something we humans already interpret as powerful. A big waterfall, a glacier, a mountain, huge trees, a special event, a castle, or use photographic techniques to emphasize the power or impact of a given scene – more on that later. The below photo is a picture I got this summer of Comet Neowise and myself.

Step 2: Holistic Thinking
The second step is to approach the scene with holistic thinking. Holistic thinking basically means that the whole photo is greater than the sum of its parts. You need to see the photo as one whole. The elements present in a given scene ought to work together to make something greater. Just as individual pieces of a puzzle are useless, but combined, they form some, which is greater than the sum of the individual puzzle pieces.

At this location in the Faroe Islands, I combine the background waterfall with the foreground of myself as a tiny human. In itself, the waterfall is cool but nothing special compared to many other waterfalls, and there is definitely nothing interesting about me. However, by combining the waterfall and me in a single frame, the two insignificant elements suddenly become much more impactful and powerful.
Step 3: Seek Out Favorable Weather Conditions
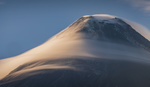
There is no doubt that weather conditions play a significant role for landscape photographers, so photographing your scene during optimal conditions is critical. What optimal conditions are is of course relative to your scene and vision. However, relying too much on specific conditions can also be a problem.
In the below example from the Faroe Islands, I knew that with strong winds, either during a lot of rain or just after, we could capture this fascinating phenomenon where the waterfall would be blown back up the mountains. The waterfall also looks great during other conditions; however, by coming prepared we managed to capture it in the short window where the wind was in the right direction.

Step 4: Composition That Emphasizes Power
Once you are on location it is time to find your composition.
Simplify
Following from holistic thinking the first composition tip is to simplify your scene and only include in it what you find necessary. Luckily, telephoto lenses are great for this as you can really zoom into what it is you want to photograph and leave out all the rest. In this example, I just zoom into the trees. Had the photograph been too wide I would have included a small collection of trees to the left.

Depth
The below scene from California is not as powerful in itself as the huge vistas I show from the Faroe Islands. A phone snap from this location at 24 mm will give you a pretty photo of a tree tunnel, but nothing impactful. However, by changing your perspective by moving back and using the telephoto lens you can accomplish a sense of compression, where you keep the sense of depth from the tunnel effect, yet make it much more powerful.


Scale
As you can see in many of these examples, I add a human to the scene and that is another compositional tool in your tool belt for creating a powerful photo, adding a sense of scale. The easiest way to do this is to use something the viewer can relate to and know the size of. A human, a car, or a house are great examples of elements you can add to your scene to show the size of nature.

Step 5: The Not So Hard Settings
When you have your composition figured out, you just need to dial in the right settings. There are a few factors to be aware of when you photograph with a 70-200mm lens or any other telephoto lens. The depth of your photo, the amount of available light, and whether it is windy or not.
If you have a good depth in your photos, as I had in the tree tunnel photo, you generally want to photograph at a closed down aperture like f/11 or f/16 to get everything in focus. Sometimes even a closed down aperture is not enough to get the entire scene in focus and then you will have to start to focus stacking.
You also need to take the amount of available light and wind into consideration. If you use a tripod and there is no wind, you can photograph with a low ISO and closed down aperture to optimize sharpness and details, and you will only lengthen your shutter speed, which does not affect the sharpness of your photo. However, if there is wind you will need to consider your shutter speed. The stronger the wind, the faster the shutter speed you will need, which means you will have to start compromising your ISO or aperture.
If I can avoid lowering the aperture to a point where I need to focus stack, I personally do not mind increasing my ISO a bit. If you use a full frame camera, which has been released within the past five years or so, the noise penalty for increasing your ISO is usually not too bad.
Step 6: Editing for Power and Impact
The most important editing I can share for emphasizing power and impact is to add contrast. Here I do not mean to just crank the contrast and clarity slider to a 100. There is much more to it, but editing for the sake of impact, it is usually a good idea to have a black point and a white point in your photo. A black point is where a part of your photo is 100% black and likewise is a white point where a point of your photo is 100% white. This ensures you are using the full dynamic range without blowing out large portions of your photos. Now, I cannot emphasize enough how important it is to treat each photo individually and if this tip makes it look weird, try with less contrast.


In the above example, I benefited greatly from a lot of contrast was in this photo. As you can see the straight out of camera photo was rather bland, but after the editing, it really pops and comes alive.
Step 7: Ask for Constructive Feedback
The final step in the process is to get some feedback on your photos. I do one of two things. I share the photo with my trusted photography friends who I ask to pull it apart. This always makes a massive difference to my photos as they always spot something I did not due to my own bias towards it. If you can collect a small group of photographers, you trust to give constructive feedback this comes highly recommended.

What you can also do is compare the photo you are editing with one photo you have already finished. In this way, you can compare tones, saturation levels, and so on, and this makes sure that the “style” or theme for a certain collection of photos stays intact and if you really want to speed up your workflow, you can make your own presets for a certain look.
These were the seven steps for making powerful landscape photos with your 70-200mm telephoto lens. Be sure to check out the video above for much more information, in-depth talk, and examples of the seven steps. I hope you enjoyed and learned from this article. Let me know in the comments below.


I am very happy to hear you enjoyed the tips. Good luck with the photography :)
A good reason to get the long lens out of my bag Mads. Good tips.
Thanks, Ciaran - it is indeed! I hope Ireland is doing better. Are you allowed to get out?
So much to discover with the long lens!
There is indeed, Hans! :D