Thomas Heaton has released his final YouTube video of his trip to Namibia, and it ended on a fantastic note. It shows what landscape photography can be, that for many it's not just creating imagery, but a personal way of learning who they are. The tidbits in the video really are just that extra sprinkle of education on top of some life lessons for those who take their cameras to far off destinations. It’s one reason why I and many others enjoy Heaton’s videos so much.
Some takeaways from Heaton in this final Namibia video are great, though aren’t necessarily obvious nor talked about specifically. First, if you’re shooting landscape imagery, being early is one of the optimal things to do for a composition to come together. We see Heaton driving to an area in the dark, and likewise many times I’ll go to a location several hours before sunrise (ahem, Mesa Arch) to try to make sure I can have the composition I want to create. Other photographers and people may arrive and it’s nice to work with them, to enjoy the landscape together, and come away with an image you are proud of.

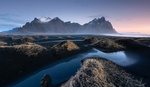
Heaton had been to this area the previous day and knew how the light would interact with his subject in comparison to the background. Doing a bit of scouting or shooting the same place more than once is a great idea. As Heaton alludes to, you now know how the light works in the scene and for him, he is able to have the brightest part of the image centered on the tree with the sand dune being a stop or two darker and becoming a backdrop to the tree in the video. This is a great way to see the concept of using your focal length to choose what the viewer will see as Heaton is using a Canon 100-400mm f/4.5-5.6L lens to choose the background of the subject. It's something that Fstoppers' Patrick Hall talked about recently with regards to shooting portraiture with a 70-200mm lens.

Heaton also tends to do great things for those of us learning how to shoot by showing us the histogram and settings he is using. Though he doesn’t state it here, for balancing depth of field and diffraction you will rarely shoot above f/13 on a full-frame camera and f/10 on an APS-C camera. The reason is as diffraction creeps in above these setting, your image is becoming less sharp within the near and far in-focus areas. In the video, we see Heaton shooing at f/11 which is well within the tolerance of dealing with diffraction and balancing the in focus areas on his Canon 5D Mark IV.
Finally, Heaton closes out his travels in Namibia with some dialogue that really hit home for me, especially the part about getting outside our comfort zones. That particular issue was a lesson I learned several months ago and how not only did I grow from the experience (of dealing with an absurd level of snakes previously), but I created one of my favorite images of 2017 because I didn’t say no to doing what I love: creating and photography. Go explore amazing places near and far this coming year and create some imagery you’ve been wanting to but maybe haven’t had the chance, and maybe get there a little early.
[via Thomas Heaton]


Going back - planning - yes, I couldn't agree more! Thomas, someone in another group said you do not get good photos in your local area - you have to move further afield. I took that as a challenge, and have been exploring the potential of my own pocket-handkerchief patch of suburbia ever since. And you can get "good" shots, by just making sure you always have a camera ready - but the really good ones come from the opportunities that shooting locally provide. Because I CAN study the potential for the shot.
And I've learned something else from this "challenge" - it is not just "remarkable", it's actually astounding, how much the light varies and how much a few minutes can completely change the appearance of a shot. It's proven to be a very educational help in improving "the eye" and my understanding of light. I intended it to be a bit like Monet's series of haystacks, and it is certainly proving to be - we should never "copy" someone else's work, and I'm not doing it for that kind of reason (anyway, I'm not shooting haystacls) - but we can learn so much from studying the work of great masters, and apply it towards improving our photography
So - this year I missed one - by the time I saw the potential, the sun had move further south (as it always does, this side of the equator, for summer) and the shadow line had changed. Now, of course, I have to wait - until the sun heads north, to warm up the northern hemisphere - and the shadow line at last falls where I want it. Or will I have to wait till spring, when I get not only the right shadow line, but also a more appropriate selection of trees, shrubs and flowers in the shot? Well there's no choice - I just have to wait and see. I know the shot I want - I've done trial shots to test it out (with the wrong shadow line) - and all I can do now is let nature take its course and move the lighting into the right position, for me.
Good stuff, I love polorizers, they help a ton