
In my opinion, nothing is sexier than a glossy black surface. And you don't even need a black backdrop sweep to achieve it.
During my time as the lifestyle photographer for JackThreads, I shot many different products in many different ways. Since I was shooting an average of 10 brands per day, I had to work quickly and in a tiny space. Through working in this condition, I developed some cheap and easy lighting scenarios.
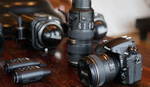
In the top photo, you can see that all I have is a 2’x3’ piece of wood, covered in black fabric and a sheet of glass. For lighting I have one LumoPro LP160 attached to a LP621 mini-boom arm, fired into a silver umbrella. I angled the umbrella slightly and placed it just behind the sunglasses, to keep the light from spilling onto the black board. The great thing about shooting with you products elevated is that you now have the option of placing a reflector or strobe underneath, to further sculpt the light.
I have used this lighting arrangement several different ways. This one-flash method is great, but often I will need to add a second or third light, depending on the color, size and shape of the product I am shooting. Below are several examples of how I have used this setup, as well as a lighting diagram.
And now comes the fun part. I want you guys to try out this method and show me the results. Just post a link in this thread with your image and I will post my three favorites with links to your site in the next lighting post. Happy shooting!
Lessons like this one as well as 25 other lighting diagrams are available in my new e-book, RGLR, The Run & Gun Lighting Resource for $10.
 One light overhead, one light left
 Lighting Diagram

- One light overhead

 One light overhead, one light left, one light right
 One light into reflector to the right.
 One light overhead.


Oh wow! Just stunning work duder. Really well done. Would love to see the post processing along with this if you ever get a chance. You did some unbelievable work over at JackThreads.
Thanks man. I'll definitely do a post on my post work soon.
Nice double reflections. This is the problem with shooting small products on glass. You need something opaque, so you don't get a reflection off the opposite side. Like this...
http://www.facebook.com/photo.php?fbid=500053176704579&set=pb.100000...
Thanks for the informative tutorial Kao :P
Thanks man. I'll definitely do a post on my post work soon.
I will definitely try this out next week
So did you use just a sheet of glass with nothing underneath?
Correct. In some of the example images I used a reflector underneath the glass to fill in the shadows.
How high was the table from the floor? I never knew that glass would create such a vivid image.
Thanks for replying. That is why I keep coming back man. Your awesome!
About three feet. Happy to help!
Very nice, simple and effective. Thanks for sharing Nick.
great and simple!
Clear, informative post, well done. Now to get some glass...
Nick I am a huge fan of your work, your previous posts of your BTS fashion shoots were the sole reason I got into off camera flash work. Another quality post today. Cheers mate
Thanks man
Why ISO800?
Because I shot so fast and so much product that I kept my speedlite at 1/8 power to spare the batteries. Plus the Canon 5DII looks clean at 800.
Really? Why ISO800? Jesus Christ, what is wrong with you? Enjoy what he has been gracious enough to teach you and stop worrying about stupid shit like that. My God.
Hey, tiredofit23, relax. The question was a good one - pure curiosity, and the answer was great - nice and simple.
I've shot many product shows using exactly this technique. I learned to hate dust. lol.
Yup
I tend to use the side of my PC case which has a gun mental finish and diffuses the reflection.
http://www.flickr.com/photos/usuqa/7431505516/in/photostream
A little more subtle reflection. I like it!
These are the tutorials and blogs I come here for! Fantastic post
Very kind of you share your knowledge with us!!
I saw this post and immediately ran down stairs to bodge together a similar setup, what else was i going to do on a really wet day? I used a bed sheet for the back drop and a soft box over head as i don't own a reflective umbrella, and then for the glass i dismantled a picture frame and stole the glass from that.
Here are two shots from today
http://www.flickr.com/photos/slugchild/8424361166/
http://www.flickr.com/photos/slugchild/8423059901/in/photostream/
Nice! That apple is sexy
Thank you , and thank you for sharing this tutorial really enjoyed it and will be using it again!
I took this shot a'lil over 2yrs ago using a similar method. I used 2 strobes, 1 overhead in soft box & 1 bare to the left of the product. The rim lighting on the right side of the product comes from small gold reflector bouncing the light from left strobe. Same as Jason "Fooman" Colledge I also use bed sheet for back drop, The glass was my kitchen table top.
Here is the Photo...
http://www.flickr.com/photos/rennierenwah/5305632014/in/photostream
I keep getting a white from the back edge of the glass. Any suggestions?
For these, I use a black glass table from Ikea. The walls and ceiling are covered with black cloth. http://www.flickr.com/photos/57678152@N00/5024234918/ and http://www.flickr.com/photos/57678152@N00/5023525197/ and, my favorite: http://www.flickr.com/photos/57678152@N00/4961312559/
On the last photo what is in the background? Its like gray stuff hahaha.
I shot these with a Small 2 ft softbox about 2 feet above the glass, camera left I had a 20 degree grid over a strobe at the lowest setting. I shot them using my trusted Canon 70-200MM 2.8L 1/200 AT f22 ISO 100. Set up was $8 piece of glass straddled over two saw horses, and a black piece of poster board in the rear
Great work! Looks super good.
Thanks Nick, I really appreciate the Behind the scenes on this.....love it, thank you.
My thirst continues
I'm going to make it a point to put something together tonight and look forward to sharing a link to it on this thread. Always been a big NF fan so I'm glad to see you are now a part of the FStoppers.com team.
Well...certainly not the most exciting image of my son's toy cars and my glass table seems to not reflect all that nicely but this is something to keep in the back pocket if the opportunity to shoot products ever presents itself.
awesome post Nick!
here's my attempt at something similar.
shot with 5d2, 85L 1/200 f4
lighting setup was just a gridded BD camera right close to the sneakers. i ended up using nothing as the background because i didnt have anything smooth and black. the gridded BD let me control the spill and in an otherwise dark room, the background was black.
my question for you would be how to get the reflections sharper? should i shoot at smaller aperture?
my first attempts were horrendous to say the least, but after a little messing with the setup, i think these came out pretty decent.
PS - dust is my new enemy!
What abut the white background? Does anyone did something like that on a white backgroud?
What abut the white background? Does anyone did something like that on a white backgroud?
funny i just found this hear is my tutorial, shooting a black object on black http://www.naftolig.com/blog/2013/1/how-i-got-the-shot-using-gels-for-cr...
Can you use a miroir also ? I have some car wheel i would like to photograph but i'm pretty sure that a glass like that won't take the weight of the wheel.
A mirror, or glass, will work but depending on the angle you use you will get a double reflection. From both the front and back of the glass.
Thanks Josh! I'm afraid that the glass won't take the weight of the wheel.
It's not ideal anyway. The best thing to use is black plexiglass. You can also use black tile but it's a bit hard to find pure black and it may not come in a big enough size.
I might be late to this party as I tend to read these posts a bit behind the curve in my rss reader, but… I have quite a few shots on black in my book. My site is http://www.joshrosscreative.com and here are some black on black shots with a reflection.
I have kind of double reflection and i think i have to play more with background and lights
on opaque surface
acrylic elevated 1 1/2" above black foam board
drink photography project