
Have you wondered how the landscapes in advertising photographs always seem to be perfect? How on can they possibly get the perfect shot on every assignment with the weather being as unpredictable as it is? Well, while this isn't true for every photographer, most have quite a lot of photoshop trickery at their disposal which allows them to shoot components of a final shot at different times and then assemble them later in post. This post is going to give you a complete walk through of how I shot and combined two elements to create the shot you see here.
This shot below was taken nearly 3 years ago in February of 2010 and then combined with a stock photograph to create the image you see above.

Before we get into any of the details on how the final image was assembled in post, let’s first take a look at how the components were shot.
The base image, that of the rocks, bulkhead and ocean next to it was taken on Folly Beach in February of 2010 using a Nikon D3, a Nikkor 17-35mm f/2.8 Lens and a Genus ND Fader Filter. It’s a 71 second exposure, which ridiculously enough meant I had to hold the shutter down for the full 71 seconds because I had forgotten my shutter release cable. In addition to this, the shot was taken about a minute before a huge fog bank rolled in and ruined the light. So, it was very cold, the light was flat, I didn’t have enough time to get the proper exposure and I had to manually hold down the shutter which ruined several shots due to my overly caffeinated hands blurring the exposure. So, what happened with the final shot?
Well, as you can see above, it’s rough. This was before I learned to clean my sensor so the shot is completely covered in sensor dust, the rocks on the left hand side of the image are underexposed and the sky is completely overexposed. So where do we go from there?
Well to begin with, I’ll admit this was done slightly out of order. I processed the base image almost 3 years ago and I worked straight from the processed image instead of going back and working from the raw file, so while reading this just keep in mind that normally you would combine the two images and then go from there instead of editing half and then blending the two together.
To begin with, I added a Brightness/Contrast adjustment layer to boost the brightness of the rocks on the left hand side and then used a layer mask to make sure that it only applied to the darker parts of the rock. Then I added a touch of contrast and saturation to produce this image.

It’s a little better right? It’s what I considered to be the final image when I first edited this shot.
Now we get into the composite aspect of things. To create the moody sky I use this image:

I personally didn’t shoot this, it’s a stock image that I received when I bought one of Joey L’s very informative instructional DVD’s, but as a general rule when selecting a sky plate to replace a sky in an original image, remember to select an image with the sun in the same place as the image you plan to add the sky too. If you do this, the shadows will line up and give you an all-together more believable image. So, continuing on, I added the sky into the shot, lined up the suns, cropped the image to extend the frame into a nearly 4:3 perspective. Then using a layer mask I blended the images together so that it looked natural. I know that’s easy step to wrap up in a single sentence, but it takes forever and takes a lot of practice to create natural looking edges. I don’t really have any tips on this except for the old adage "practice makes perfect". Good luck though. The resulting image, looked like this:

Now that we have the sky in place, we can begin to massage it into place. I started by correcting the color balance of the sky using an adjustment layer. This will make the sky image appear to have been shot in the same light as the foreground. That leaves us with this:

Now, looking at this image I feel like the water at the horizon line is very bright, whereas the sky at the horizon seems very dark and a little fake, so to do this, I’m going to create a brightness/contrast adjustment layer and bring the entire layer up about 20%. Then using a layer mask and the gradient tool I create a mask that will let the horizon be slightly lighter than the rest of the sky and then perfectly blend back to the original image at the top of the frame.

Now that I had that in place I noticed that the foreground image is much more contrasty than the sky plate, so I’m going to add a curves layer and bring the contrast up just a bit.

For the final touch, the shot seems a little too magenta for my tastes, so I added a Color Balance layer to give it just a touch of warmth to make it look like a sunrise.

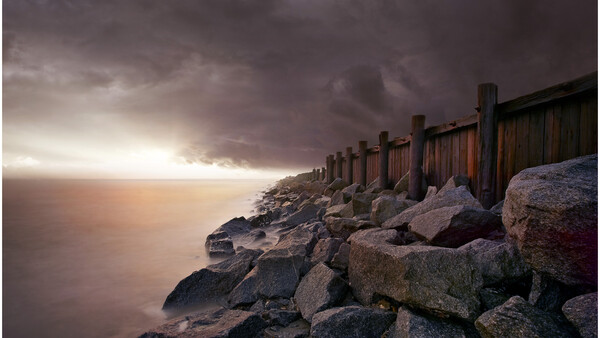
So there we go! Our finished image!
If you like what you see and want to try it yourself, the biggest tip I can give you for shooting composites is to visualize the shot you want before you ever press the shutter for the first time. If you have a solid idea of what you want to achieve before you begin, you'll be able to shoot for an idea, instead of shooting and then trying to force the pieces together later. If you like what you see, definitely let us know because I am currently working on a big project and if you're interested I'd love to walk you all step by step through the process of designing, shooting and then assembling a complex composite.
I really hope that you learned something from reading about how this image was created and I hope that it inspires you to go out and create a composite or two of your own! I have always loved combining several shots together to create a hyperreal environment, it always feels like a big puzzle coming together to make something beautiful so I'm excited to be able to share my process with you.
If you're interested in seeing more of my work, just want to keep up with what I'm doing, or have any questions, feel free to contact me on Facebook HERE, Follow me on 500px HERE or check out my website www.CharlestonsWeddingPhotograper.com.


Join the Fstoppers community for free
-
Post comments and join in the discussions
-
Browse the site ad-free
-
Share your work and get featured in the community
-
Compete in the photo contests for fun and prizes
8 Comments
Great shot and great walkthrough. It's missing a Nazgul though.
I completely forgot to make a LOTR reference, I feel like the post isn't complete now...
Interesting!
Instead of simply showing us your work, you've taken us through step by step and even included your thought process through out the procedure. The results speak for themselves. I would certainly like to see more posts of this kind. Thanks.
Do people call this a photograph?
Some people do, some people don't, it's more a matter of personal preference than anything. I usually stick with photo as a broad term, simply because it's easier than trying to explain what I'm doing if I call it a composite image or something else that might be a touch more accurate.
There's always a fairly lively debate about whether or not this sort of thing is a "Photograph" though.
I think you should throw everyone for a loop and call it "a photographs".
I would call it a photograph. Yes, you introduced something that was not there. But you do the same when you edit the photograph and make adjustments. You introduce color that was not there. Same thing with cloning out planes in skies or thin contrails. If you're doing this, I have a suspicion that you're trying to create dramatic art moreso than you're trying to create a photojournalistic documentation.
Some may argue that this should be called a composite or an image. While I can certainly see that, I don't think it's necessary. As long as people edit their captures from what they originally were, and continue to call them photographs, I believe you should have the same right.