
Learning lighting is often considered the first step toward capturing better photos. When I began my journey, I delved into discovering various techniques and unconventional methods for creating truly unique setups that leave clients in awe. In this article, I will share my five favorite lighting hacks.
I will continuously emphasize the importance of learning how to manipulate light. As a self-taught photographer, mastering light hasn't been easy for me. YouTube tutorials were of little help, as they often presented setups that were either overly complex, involving multiple lights, or simply mundane lighting configurations that everyone had seen before.
Authenticity holds significant value in my work, which is why I strive to create distinctive and unconventional lighting setups. You won't find these setups on YouTube, and to be honest, you'll struggle to find much information about them elsewhere. This uniqueness is a defining element of my personal style. My approach to lighting has transformed from attempting to mimic Annie Leibovitz to becoming one of the first things clients and colleagues notice about my work. Some have even labeled me a "genius of light" – a title I don't believe I truly hold, but one I embrace nonetheless. All of this has motivated me to share some of the tricks I implement in my work with all of you.
Having mentored many photographers and observed their work firsthand, I've come to realize that the popular lighting setups found in classic YouTube tutorials often do more harm than good. Ultimately, you must decide whether you want to stand out and secure high-end assignments or remain stuck photographing the same beauty shots with the same setups. I hope you choose the former, as the latter is unlikely to lead to meaningful work.
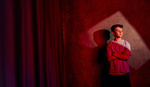
Gel Window
This setup is based on the principle that hard light casts sharp shadows. I drew inspiration for this effect from my visits to various medieval churches, where sunlight passed through stained glass, creating beautiful patterns inside. Stained glass isn't much different from a collection of gels arranged in a pattern. Add the appropriate lighting, and you'll achieve colorful patterns on your subject, background, or any other surface.
Several factors come into play when using this technique. The size of your light source, the size of the gels, and the dimensions of your workspace all matter. As long as you have a hard light source, this technique will work. Soft modifiers attached to your light won't yield the desired results. Moving your light source closer to the gel window creates a softer transition between colors, while moving it further away results in a sharper transition. In a spacious area, you can achieve razor-sharp edges between the gels, evoking an 80s disco vibe.
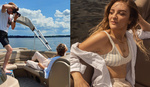
Simulating Sunlight in the Studio
Creating authentic sunlight involves more than just using specialized lighting modifiers like a magnum reflector, hardbox, or barebulb flash. Real sunlight is a combination of direct, harsh sunlight from the sun itself and soft, diffused light bouncing off various surfaces. To simulate this effect in the studio, I use three different lights. Two of them bounce light off the ceiling, and you can optionally add warming gels to them. The third light features a special fresnel attachment. Sunlight creates parallel light beams, which give it a distinctive look. Most lighting modifiers, such as magnum reflectors or hardboxes, disperse these beams, making the light less faithful to real sunlight.

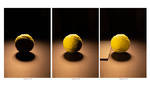
Achieving the Softest Light
Soft light can be achieved in various ways, including bouncing light off the ceiling. However, in smaller spaces, you must maximize your setup's potential. The softest light is achieved by combining bounced light with a softbox. This combination diffuses and bounces light off the walls, creating the ultimate soft lighting setup that produces unparalleled results. Soft light can be used in a variety of settings from shooting passport images to editorials to commercials. It really is one of those looks that is always in style. Depending on the studio you are in, you may opt for a different way of creating soft light, however, if you are like me, and are working in a small space, this is the best way to get the most optimal and natural feeling soft light. 

Foil Reflections
Reflections come in diverse forms, from diffuse reflections off white walls to specular reflections off shiny surfaces. What if your reflective surface were a large piece of foil? Using foil can yield stunning background effects, especially a broken pattern that is challenging to replicate. To achieve this effect, use a hard light source, ideally a fresnel, placed as far away as possible from the foil, with the foil as close as possible to the surface it's reflecting on. For this technique, I use mylar foil, which can be found in gardening stores.

Half-Gelled Light
This technique enables you to use a single light source to create both hard and soft lighting simultaneously. Imagine having the benefits of both hard and soft lighting in one shot. It's possible, and I'm here to show you how. Essentially, you want to combine soft fill light to lift shadows and illuminate the background with hard light on the subject itself. Half-gel your light source so that direct beams of colored light hit the model, while the remaining light fills the room. You can take it a step further by using two gels, with one serving as fill and the other as key light. Keep in mind that the power of your key and fill lights should be equal. For instance, if you use a blue gel as fill and a yellow one as the key, it won't work well since blue absorbs too much light. Reverse the roles, with blue as the key and yellow as the fill, and you're back in business. This technique works best in smaller spaces.

These are just a few of the lighting hacks I have to share at the moment. I'd love to hear about your techniques! Please feel free to share them in the comments below and check out my website to see them in action.


It doesn't take a genius to find multiple videos on YouTube for these techniques including ones from popular channels like Adorama and Lindsay Adler.
Thanks for reading and commenting, Dan! I would love it if you could point me to the specific videos that discuss these techniques.
Nice. The gel "medley" is particularly cool.
Thank you so much!! Comes from looking at how the sun interacts with stained glass :)
Awesome!
Thanks for reading!
Great techniques. Thanks for sharing. I especially like the gel techniques. The 3 light sun mod looks great. A bit over kill in my opinion. Personal I like 1 pro head w/ clear pyrex at an angel shot through 1/4 CTS and Opal Frost. To fill the shadow sometimes I’ll use a 4x4 bounce floppy placed behind the light at 90°
Thanks so much Chris! I understand your point about overkill, and I won't lie I don't always use this setup for sunlight. I tend to also use one light, however given that true sunlight is a mix of bounced and direct light, I feel that this is the closest to it.
I have definitely ragged on you in the past for a lot of articles but this is particularly good one -- Nice work.
I'm glad you liked this article, Marc!
If you really want to know about light and how it works just look outside. Bright sunny day and the light is hard hard hard rendering crisp shadows and high contrast. The light source being far far away. A cloudy day on the other hand with the biggest soft box around…. The whole sky, and the light is soft soft soft. The diffusing effect of the near clouds can, depending upon their thickness can create wonderful variable soft light. I feel that people make lighting out to be far more complex than it really is. Though to be fair the above article is in most parts pretty good and sensible. Though to compare the interior wonder of a medieval stain glass on a bright day with a gel is pretty much beyond the pale as there is no comparison. It’s akin to comparing a fine red wine with grape juice.
Thanks for reading and sharing your thoughts Eric. Indeed, much of the knowledge of light does come from outside, but experimenting with flash indoors helps you fine-tune the realities of working with artificial lighting.
Lighting is quite complex, and there is a lot to explore beyond the sun, although I won't lie I love natural light from north-facing windows.
In principle, stained glass acts like a series of gels, but I completely get your point. The beauty of stained glass is hard to replicate with gels, even if the principles are the same.