Many photographers rely on their 50mm 1.4 and 85mm 1.4 lenses to give that dreamy, narrow depth of field look to their portraits. These two lenses have become a staple for portrait, headshot, wedding, and boudoir photographers who enjoy the soft look that comes with a narrow depth of field and natural lighting. But what happens when you want to create a similar effect in the studio, where your strobes are often too powerful for shooting wide open? Today, I'm going to share with you a fairly unconventional lighting technique that will allow you to shoot your lenses wide open in the studio.
The main problem with shooting wide open in a studio setting is the sheer amount of light that is released from a studio flash. Most mono heads like a Profoto D1, Broncolor Siros, or a Paul C Buff Alien Bee release a ton of power with each pop. These studio flashes release so much light that you are often forced to shoot at f/8 or higher, even at ISO 100. Some of the bigger power pack versions of these lights produce even more power so you can light up huge locations for commercial work. Most of the studio images being created for catalog, fashion, and advertising are in fact shot with super small apertures on DSLRs and slightly wider apertures on medium format cameras; so, it makes sense to use the high intensity studio flash units. But what if you don't want everything in focus and you want to create a more dreamy portrait shot at f/2.8, f/2, or even f/1.4?
Shooting With Your Modeling Lamps
It is no secret that the easiest way to shoot with your lens wide open in the studio is to use lights that are much less powerful than your studio flash. Many photographers, like Peter Hurley, use fluorescent lighting like Kino Flos, while others use similar sized LED panels. These constant lights work great for portraits and headshots because they produce light that is much less powerful than a burst of flash. However, the one major problem with most of these lights is they are nearly impossible to use with your classic light modifiers. If you want the same quality of light found from a bare bulb light, gridded or snooted light, or beauty dish, Kino Flo and LED panels are probably not going to be your choice of constant light. Luckily, there is a very simple constant light source that works well with wide open lenses and you probably already have a bunch of them in your studio!
Modeling lights are the small LED or halogen lights that come built into most professional studio strobes. Since you cannot easily see strobe lights as they fire, these modeling lights are used mainly as a guide to help you visualize what your lighting setup looks like before you actually fire the strobe filament. It might not have crossed your mind, but these low-powered lamps are the perfect alternative to flash if you want to shoot with your aperture wide open in the studio. Another thing that makes these lights so useful is you can maintain all of your creative lighting options by using all the light modifiers you already own.

Example of rim lighting only at f/1.4, ISO 100, 1/60th in the studio.
There is a common saying among photographers that I'm sure you have heard before: Light is light. While this statement can seem a bit ambiguous or overly broad at times, the heart of the matter is true. No matter what type of lighting source you are using, the overall lighting effect will be both predictable and reproducible based on how light behaves. This basically means that regardless of what actual bulb you use, small lights are going to appear harder than large light sources, the inverse square law is still going to behave the same, and all of your modifiers will produce pretty much the same light output if they are used correctly. There are a few nuances that you will have to account for when switching from flash to constant lights, which I will address below, but for the most part, you aren't going to be in some alien territory when you switch between the two types of light.
In the two test images below, one was shot with flash at the lowest possible power level and the other was shot with the modeling lamp. Both images have the same exposure at f/1.4, ISO 200, 1/50th of a second. Can you guess which one was which?
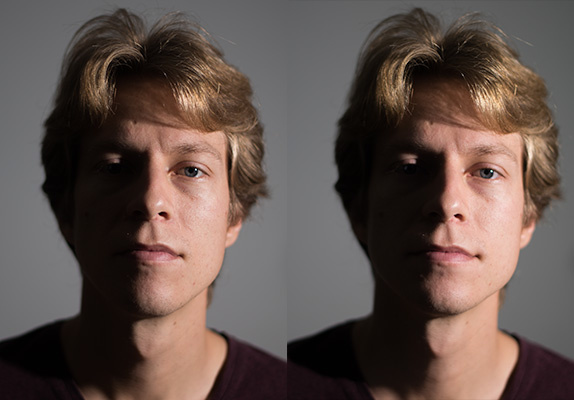
Which image was lit with flash and which was lit with the modeling lamp?
A Few Things to Consider
When you are shooting with hot lights, whether it be your strobe's modeling lamps, LED lights, or common incandescent bulbs, there are a few things that you will need to consider in order to produce the best results. It is important that you do some trial and error testing first, because some of these factors will vary depending on which camera you use, the types of light you use, how many different lights you use, if you mix different lighting sources, etc.
Overall White Balance
The first issue you will need to address deals with color temperature. Every light source you use is going to vary in color temperature because each one of them replicates a slightly different band of frequencies in the light spectrum. You can even observe different colors from the Sun depending on what time of day you are shooting, what time of year it is, changes in the atmosphere, and differences in weather. Since almost all modeling lamps are much warmer in color than your highly calibrated flash tubes, you are going to have to set your white balance much cooler to produce "correct" white tones in your final image. For the two images above, the white balance was set to 5800K for the image on the left (shot with strobe) and 3000K for the image on the right (lit with the modeling lamp). In some cases, you might find that your camera doesn't allow your White Balance to go cool enough to correctly balance the warm color; so, you might have to resort to Lightroom to push the white balance even further towards the blue scale. There have been some extreme situations where even 2000K wasn't cool enough, but that's pretty rare (Adobe, can you expand the WB sliders even more please?).

For correct white balance, shift from the standard 5000K for flash down to 2000K for hot lights.
Color Differences Between Lights
Not only will your color be affected by the warmth of the lights you are using, but the color will often change depending on how much you have dimmed the bulb itself. From my experience, most of the LEDs and incandescent lights in our studio will appear warmer as they are dimmed and the power is squelched. This can also happen with flash tubes, but these flash tubes are not affected nearly as much as lights containing filaments and diodes. So, if you are having to dim any light around your model, be prepared for the color temperature of that light to greatly vary. Usually, this can easily be fixed in post-processing, but it won't be as consistent as an equivalent image shot with flash only.
Less Ability to Freeze Motion
Perhaps the biggest disadvantage to shooting with constant lighting is you will lose your ability to freeze your subject. Since flash will illuminate your subject at 1/1,000th of a second or faster, any movement in your subject will appear frozen (unless it is moving extremely fast). Because constant lighting is much less powerful, your camera's shutter speed will control the amount of sharpness or blur caused by motion of your subject. Unless you have insanely bright modeling lamps (1,000 watts or more), your shutter speed is probably going to be around 1/10th to 1/100th of a second at f/1.4 and ISO 100. This means that your subject is going to have to be relatively motionless if you want sharp images. It also means you might want to place your camera on a tripod to mitigate any movement from the camera.
But Wait, Aren't There Other Alternatives?
If you are already shooting shallow depth of field portraits in super bright conditions, then you know that there are other ways to reproduce this effect besides using hot lights. I believe this method of using your modeling lights is one of the easiest and cheapest ways to incorporate wide-open portraits into your portfolio, but here are a few other ways you can achieve a similar look. I might explore these later in another article, but for now, I'll just briefly mention them.
Neutral Density Filters
The most traditional way to decrease the power of your strobes so that you can shoot wide open is to add a neutral density filter to the front of your lens. Neutral density filters basically reduce all the light passing through the lens so that you can fire your strobes without blowing out your exposure. The main problem with ND filters is that they can make it incredibly difficult to focus because they will affect the image in your viewfinder and your LCD. Since nailing focus is so critical with super shallow depth of field, you may not want to go the neutral density route, especially if you shoot a lot in the studio, where your lighting is already dim. The best ND option for most studio strobes is going to reduce the power of your flash somewhere between 2-4 stops of light. Anything beyond that and your viewfinder is going to be completely black and impossible to focus through.
Another option is to buy large neutral density sheets for your strobes. By using something like a Rosco E-Colour ND filter directly on the front of your flash, you can decrease the flash power from the light source. This method allows you to still see clearly through your camera's viewfinder. It can be a little tricky taping these gels to your strobes, especially when you use certain modifiers like snoots, grids, and barn doors, but the efforts are well worth it if you want to utilize strobes to freeze motion.
Speedlights
If you are on a budget or do not already own studio lights with modeling lamps, one option you can use is speedlights. Speedlights made by Canon, Nikon, Yonguo, and others are much much weaker in power than your traditional studio monoblock. In many cases, setting your speedlight to 1/128th or 1/64th power is actually weak enough to expose an image properly at f/1.4 and ISO 100. The advantage here is that at these super low flash settings, the speedlight's flash duration is extremely short, which will allow you to freeze motion better than any other option mentioned in this post. The downside is that attaching specific light modifiers like grids, beauty dishes, and reflector dishes is much more cumbersome and difficult. If you have a bunch of speedlights in your kit, definitely take some time combining your fast prime lenses with these battery powered strobes for some awesome portraits.
High Speed Sync and Hyper Sync
Another popular way to decrease your powerful strobe flash output is to use what is known as "High Speed Sync." High Speed Sync (HSS) turns your flash from a single pulse of light into a bunch of fast pulses of light, which essentially makes your flash act as a constant light. Because HSS decreases the overall output of your flashes, you can sync well beyond the traditional sync speed barrier of 1/250th. The main advantage of HSS is that you can control your ambient light with your shutter instead of your aperture, which happens after you hit the 1/250th sync barrier. In the studio, this isn't necessarily the best route to go, but if you want to take cinematic headshots in the style of Dylan Patrick, then this method is extremely powerful. Dylan Patrick has a great article titled Demystifying High Speed Sync on Fstoppers if you want to read more about how to use HSS in your own work. Keep in mind: you will need a speedlight like one made by Canon or Nikon to unlock this feature, which makes it much more expensive than the other options above.
Another option you have is what Pocket Wizard calls Hyper Sync. Without getting too technical, Hyper Sync essentially lets you sync at any shutter speed, just like HSS. Instead of changing the way your flash behaves, Hyper Sync forces your flash and camera to sync out of phase ever so slightly so that your camera records the tail end of your flash, which acts more like a constant light than the burst of flash that happens immediately. There are many articles online that teach you how to use Hyper Sync, but it does require a radio trigger like the Profoto Air Remote TTL or Pocket Wizard Flex/Mini and a flash with a slow flash duration (it can be super technical to explain if you have never used this method before).
Conclusion
The great thing about photography is there is no right or wrong way to approach a specific aesthetic. Shooting in the studio is all about experimentation and sometimes, you need to break everything down just to try to build something new and fresh in your work. Just as we tried to prove in our recent iPhone Bikini Shoot, great and interesting photographs do not require the newest and most expensive gear. In fact, if you really want to create something interesting, sometimes the best thing you can do is take a less traditional route and see what you come up with on your own. Hopefully, this short lesson will not only make you consider using your modeling lights on your next portrait session, but will also make you consider approaching your work in a unique way from what every other popular photographer is doing.

Final portrait of Brennan Burt. 50mm, f1.4, ISO 200, 1/100th of a second, Nikon D810, Profoto B1 with modeling lamps


Aaaaaand the new Elichrom Skyport Plus HS. Man I'm looking forward to try that one out, the Pocketwizard system was such a pain to work with.
Really nice work dude. The end result has a really nice stylish and commercial feel but with an edgy and original look too.
Great article, but I really love this quote:
"The great thing about photography is there is no right or wrong way to approach a specific aesthetic. Shooting in the studio is all about experimentation and sometimes, you need to break everything down just to try to build something new and fresh in your work."
OR shoot with lights (strobes) that go low enough. I find a lot of folks buy too much strobe for the studio. Going as low as 3-5 WS (joules) with a mod (softbox, etc) at 100 ISO (or lower) should allow you to shoot wide open
Thank you for this. I can't wait to try this out. I'll need to improvise with the lights, but this is a look I've wanted to shoot for a while. Great article!
My favorite mode is ISO Lo1 on my D810. That's ISO 32! We use this setting for all studio newborn sessions with wide aperture (f/2.8) and a Profoto D1.
I really can't upvote this enough. Instead of offering us insane ISO 2 million that is almost always unusable, they should start pushing the low ISO even more. Maybe the grain and DR doesn't improve at these lower levels but for studio work it really can make a huge difference. It also really helps when trying to balance bright ambient light outside when you hit your ISO 100, 1/250th max and want to start decreasing exposure without touching the aperture.
Agreed - I have FAR FAR FAR more need for a very low ISO than a very high ISO. I'm not photographing bats in a cave. I rarely if ever shoot above ISO 800 even though pictures still look great beyond that.
Great tutorial Patrick, I've done this before on product work using only the modeling lights. Really cool idea for shallow depth of field portraiture. I also like that you used a 50mm, as it was a previous discussion on Fstoppers recently about using or not using 50mm lens for portraits. The subject totally has a walking dead rick grimes look going on, awesome :)
Awesome! And I really liked the color grading in the final portrait.
Using my modeling light from my strobes is one of my favorite setups when using my ringlight(continuous lighting). You could never tell a difference.
https://fstoppers.com/photo/82843
A good article. I have just one little quibble: "The main advantage of HSS is that you can control your ambient light with your shutter instead of your aperture..." When using flash, shutter controls only ambient light. Aperture affects both ambient and flash, yes, but shutter affects only ambient, whether or not you are using HSS. My mantra is shutter to set ambient, aperture to set DoF, and flash power to control the amount of light.
When Using HSS you are in a gray area of weather to call it a strobe or a continuous light.
Set your HSS flash to a middle power setting (8-9 on a B1) and take 2 shots, one at 1/2000 of a second and one at 1/8000 of a second and tell me if your statement is still correct:
"When using flash, shutter controls only ambient light."
Everything about the exposure will change, not just the ambient light.
You almost have it correct Shane. Shutter, ISO, and Aperture always control ambient light. When your shutter is slower than 1/250th, ISO and Aperture will control your flash output but your shutter will not affect flash.
Things change though when you force your flash to act as a continuous light as is the case in HSS and HS. Your shutter will actually control the amount of flash that hits your sensor because all of the flash is not making its way to the sensor as it does when the shutter is less than 1/250th. In HSS the flash pulses to produce the constant light effect while in HS the shutter fires slightly after the main pulse of light. At some point, if you turn your shutter up high enough (like 1/4000 or 1/8000) you may actually not have any light hit the sensor.
So this has me thinking at what point does flash start to freeze motion? Great article Patrick!
Flash will always freeze motion as long as the flash is a couple stops brighter than the ambient light and you don't drag your shutter too long. If you want the most crisp images with flash and fast moving objects, you need to use a strobe with a super quick flash duration which is typical in most speed lights.
I mostly use ND sheets in my light modifier. It works well and allow me to mix it with continious light if needed. This cheap and efficient solution is IMO better than modeling light. Their colors is too far from pure white to save it efficiently in post
The first thing to jump to mind for me with your problem was using a diffusion material or HSS. :)
I do mostly weddings, events, on location shoots ... so I just use a bunch of godox flashes (I own 6 of them ... was 7 but I broke one). When I need extra power I just double or triple up my flashes inside my softbox or behind some umbrellas.
If I did more in studio work, I'd consider buying some packs and heads or monoblocks but I rarely shoot in my home "studio" so the portability is huge for me.
I was excited about the profoto products (battery powered studio strobes? YES PLEASE!) but my business is barely staying a float (considering shutting down) so can't really afford them.
Really Awesome!
PD: What's the name of the song in the bg?
With a mirrorless camera or any DSLR with decent LiveView you can use ND filters and still focus perfectly.
I'm not sure if I understood that in the video correctly... What is the benefit of using a 50mm lens with cropping instead of a 85mm lens?
You can shot at a shallow depth of field without a nd filter, using the Einstein in action mode at a low power.