Ever had an overexposed photo that was destined for the trash? Well, hold up! You may be able to save that thing and turn it into a masterpiece. So before you hit delete, read on for a detailed look at how to save overexposed photographs in Lightroom.
It's far too easy to discount good shots when importing them from your memory card simply because of some technical error. This will happen a lot when you first start image editing because you might not be aware of what the software is capable of. That's especially true of overexposed photos. More often than not it's possible to save a clipped image and turn it into something beautiful. But it all depends on a few things.
First off, you're better editing a raw image file than a JPEG. That's because a raw file contains much more data than a JPEG which is heavily compressed. Even if the camera is flashing up that a shot is overexposed, as long as you're shooting raw you should be able to recover the data through post-processing. If you are trying to save a JPEG then don't despair because there's still a lot you can do, you'll just be a little more limited. So let's take a look at how to save an overexposed photo in Adobe Lightroom Classic.
The Exposure Slider
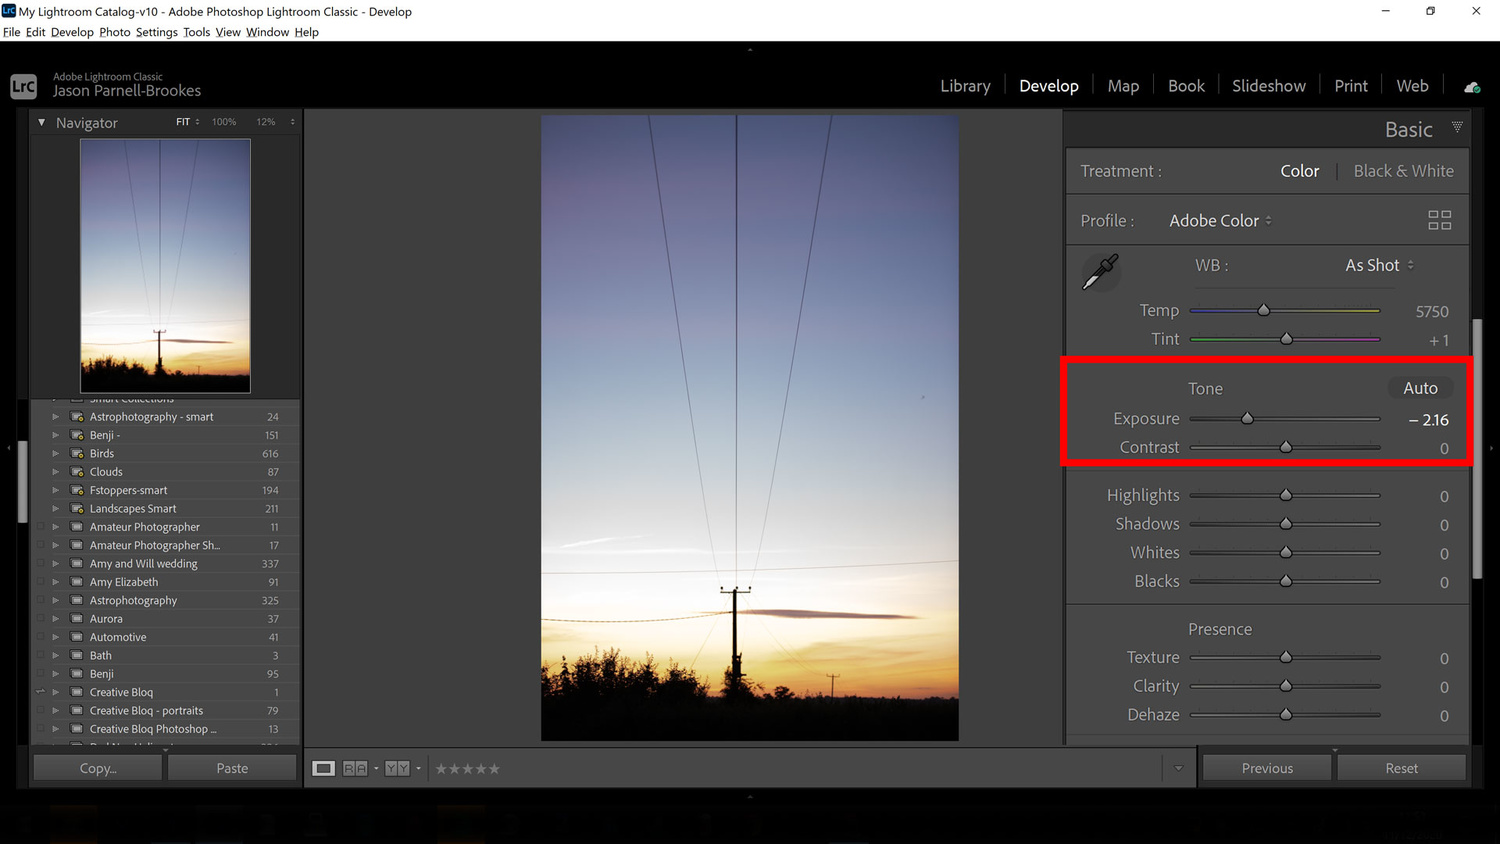
The exposure slider adjusts the overall brightness of an entire photo by /- 5 stops which can save a lot of overexposure issues
The first and most obvious step to take is to reduce the exposure value of the entire image. This can be done in Lightroom Classic via the Exposure slider. Dragging it to the left introduces a negative exposure value, thereby making the entire photo uniformly darker. We can make the image darker by up to 5 stops but in this case we only need around -2 stops to make the overexposed shot dark enough to regain the detail in the sky and clouds.
Reduce the Highlights
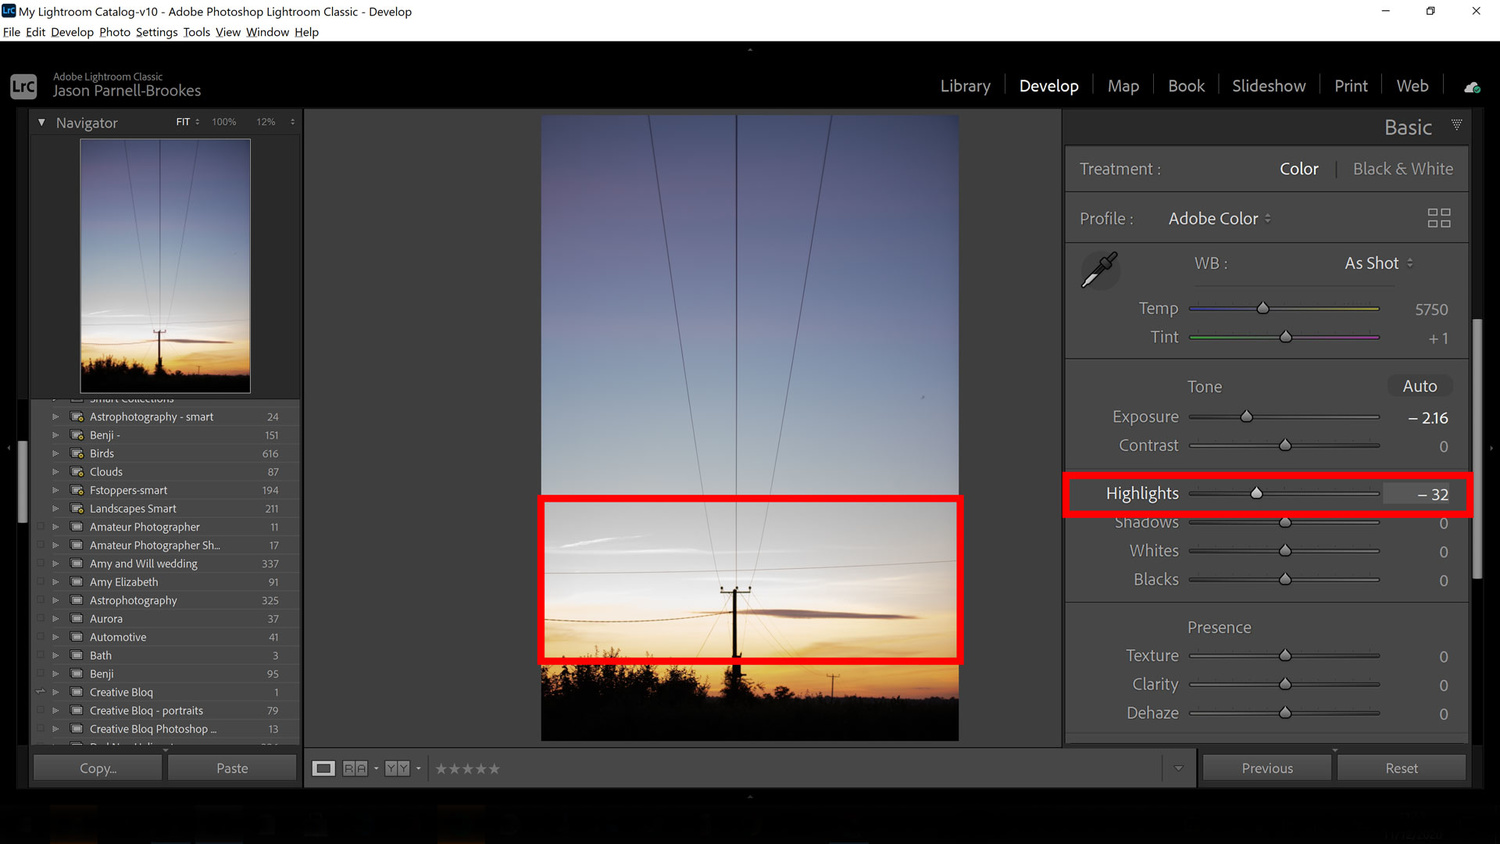
Lowering the highlights slider can help to spot-reduce sections of a frame that are particularly bright. Here we see the brightest section of sky darkening where the rest of the frame remains the same
After making adjustments to the exposure slider you may notice that there are specific sections of the frame that remain overexposed. Instead of lowering the exposure value more and risk underexposing other sections of the frame, you can specifically target these brighter bandwidths by reducing the highlights slider. As you can see above, when reducing the highlights slider affects the brightest section of this photo and helps to retain detail in this area, opening up the sky. The lighter clouds in this photo are now much more visible.
Make Selective Adjustments
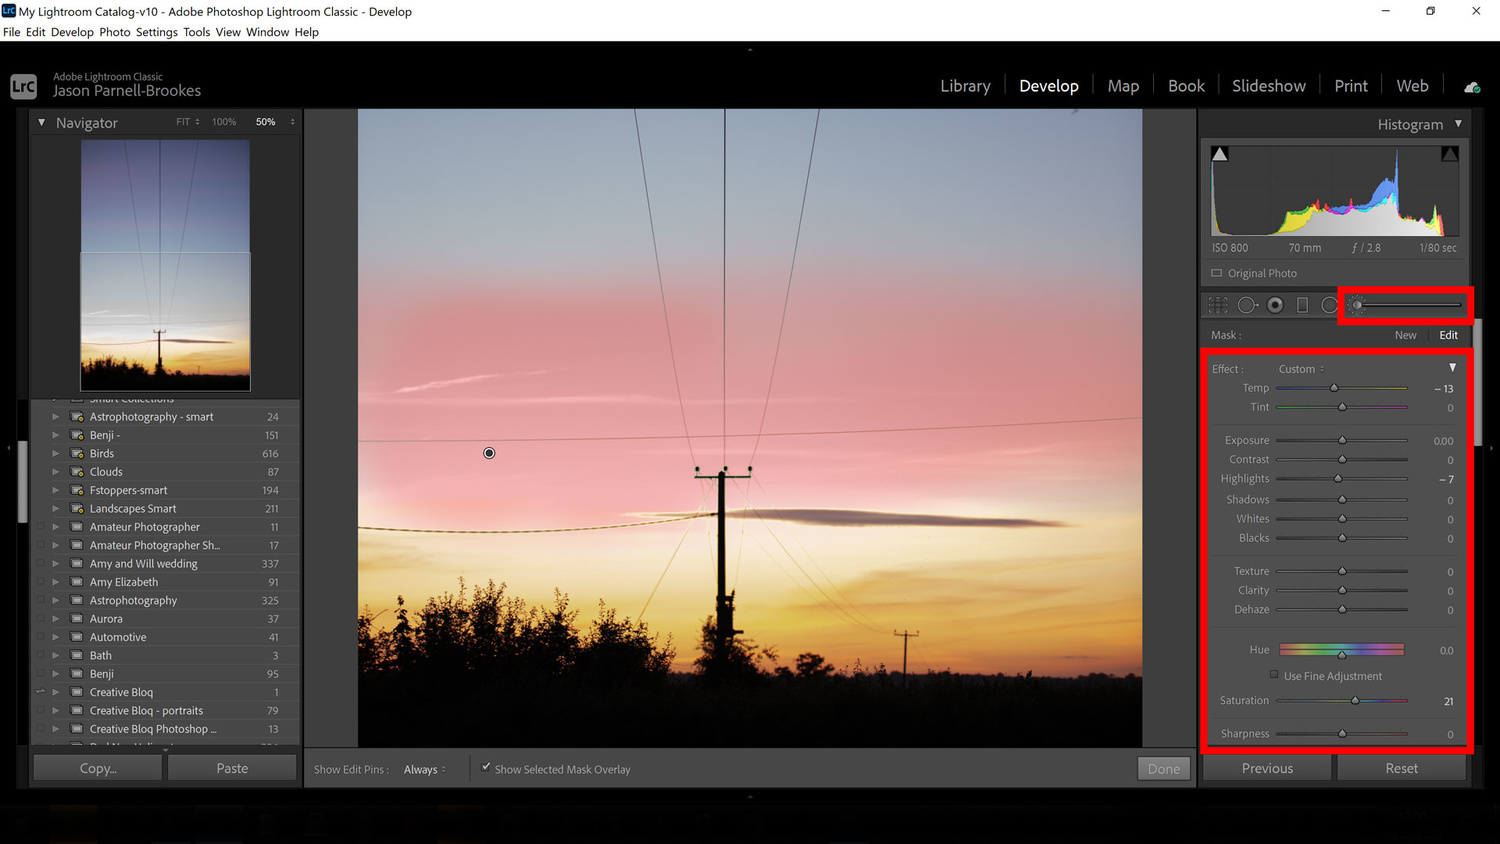
The adjustment brush (keyboard shortcut K) can be used when other more general editing slider don't cut the mustard. With the brush you can paint on edits over specific parts of a photo with precision
If the highlights slider doesn't quite do the job at darkening the highlights then you might want to seek out a more accurate way of working with these areas. The best way to do this is by using the adjustment brush. With the adjustment brush selected reduce the exposure or highlights sliders before painting over the areas you wish you alter. If you're not sure where the brush is making changes simply tick the Show Selected Mask Overlay button at the bottom of the window, or use the keyboard shortcut O to toggle this on and off. By default, you should now see a red overlay mask depicting the affected area.
Darken Skies
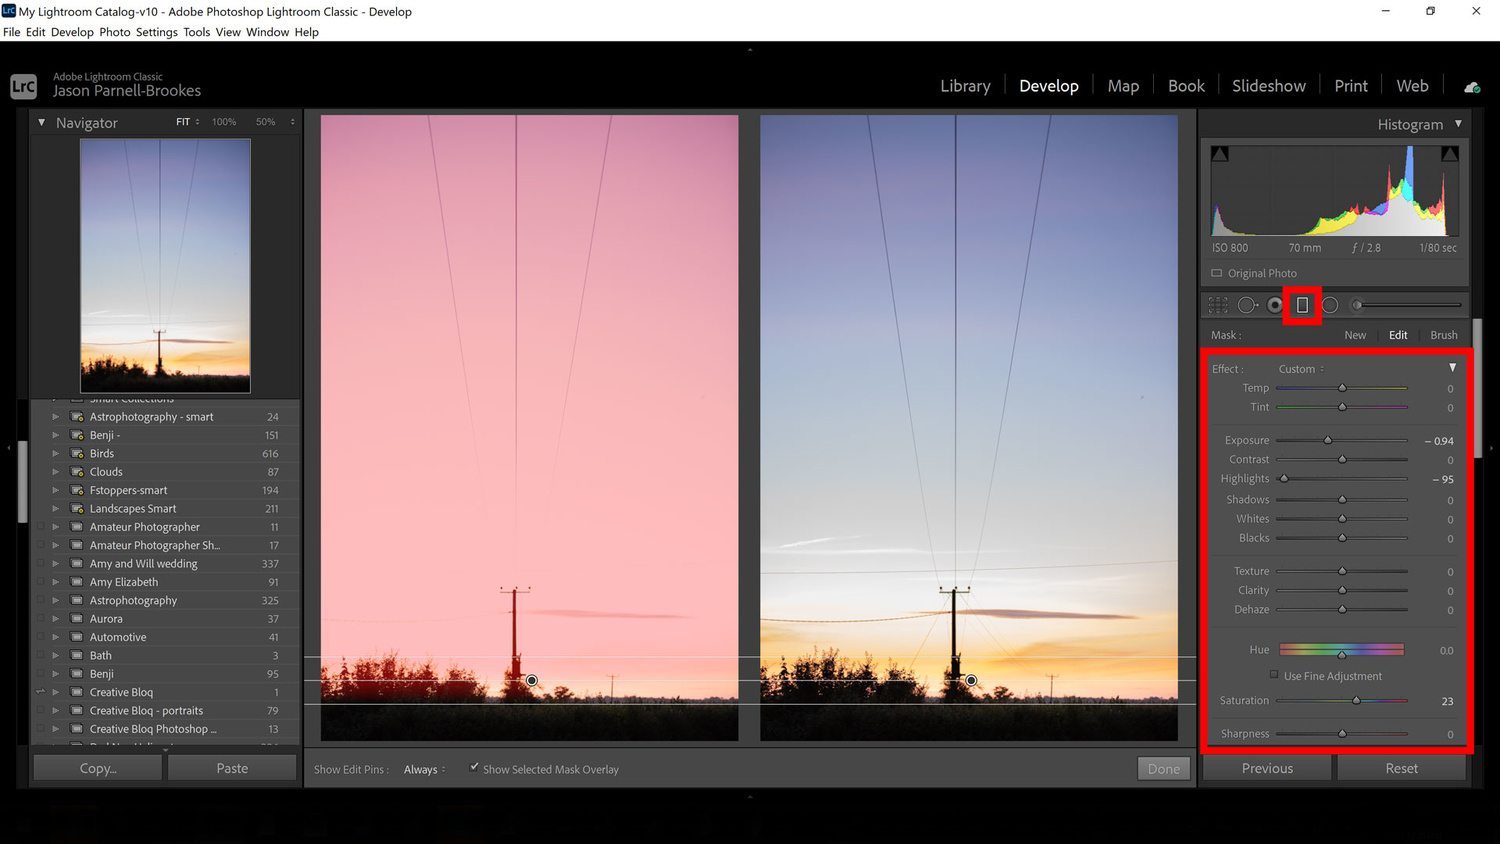
The graduated filter mimics a real-life graduated neutral density filter, but also adds in other editing corrections such as contrast, saturation, and hue
On some occasions, you'll want to darken one side of a photograph more than another. This is where we use the graduated neutral density filter. It's located at the top of the editing panel on the right, next to the adjustment brush, and its mask can too be toggled using the tick box or the shortcut O. Simply click and drag from one part of your photo to another. The length of the drag will determine the amount of fade between the filter and the unfiltered portion of the frame. Much like a real graduated neutral density filter you can determine the harshness or softness of the fade, but unlike a real-world filter, you can make many more adjustments such as exposure, contrast, texture, clarity, hue, saturation, and more. In our photo, we reduced the exposure slider and also dramatically lowered the highlights slider.
Save Blown Colors
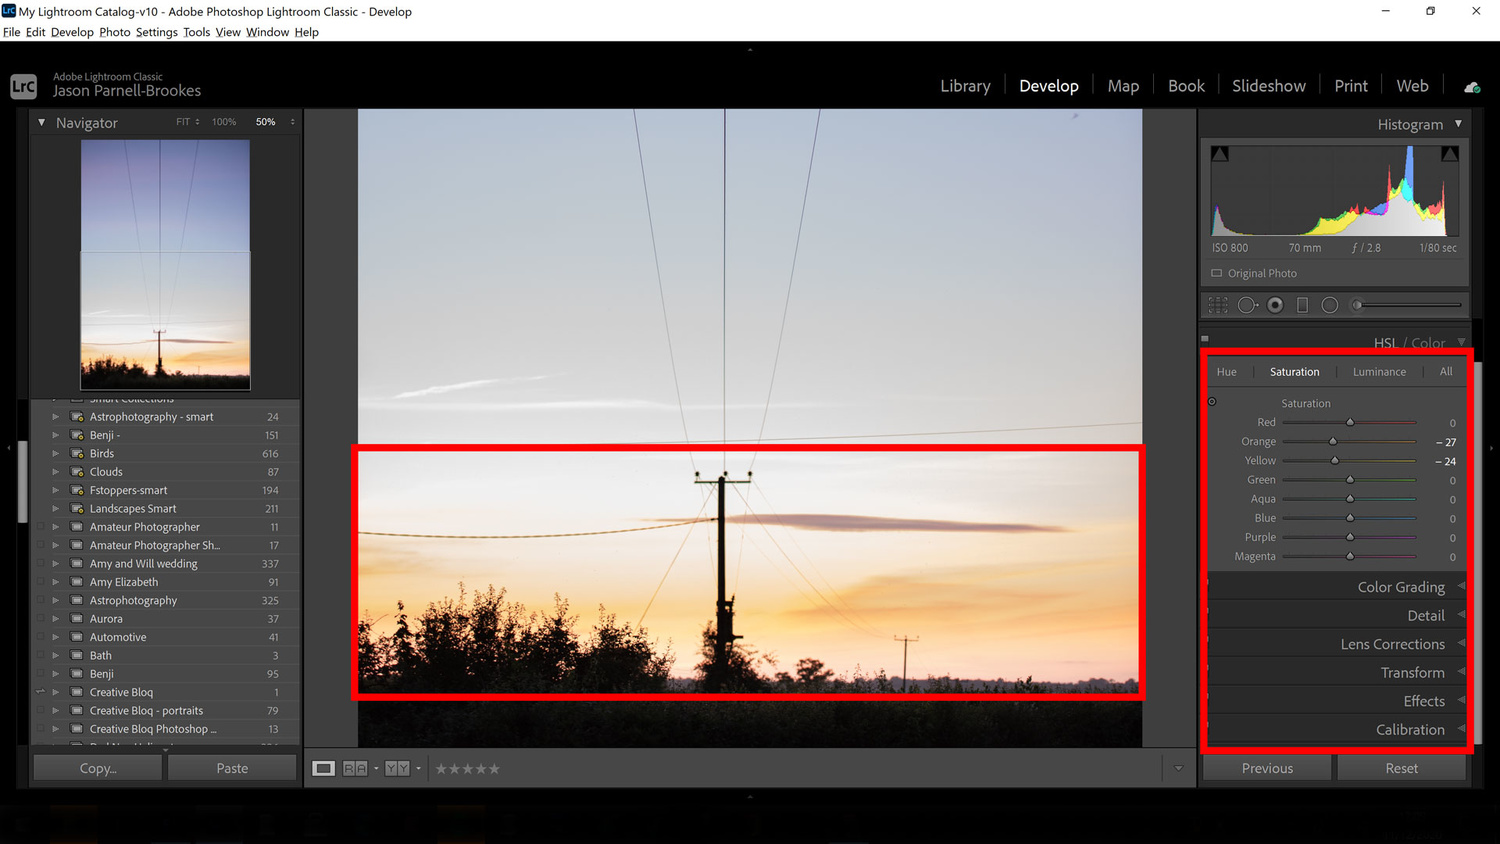
Instead of making large scale adjustments to tone you can be more accurate with taming down those clipped colored sections with the HSL/Color panel in the Develop module
There may be an issue with clipping or overexposure of certain colors in your photo as we can see in our image here. Simply adjusting the exposure values of the shot can sometimes make little difference to this issue because, as in the photo above, one color is less intense than another. So a level of control is required to carve out these colors and change their appearance. That's where the HSL/Color panel comes into play.
In the photo above we've reduced the orange and yellow sliders in the Saturation and Luminance sections in order to tame the bright orange sunset. Now we've done this, the lighter cirrus and stratus clouds can be seen more clearly, refining the otherwise featureless sky into something more dramatic.
Convert to Monochrome
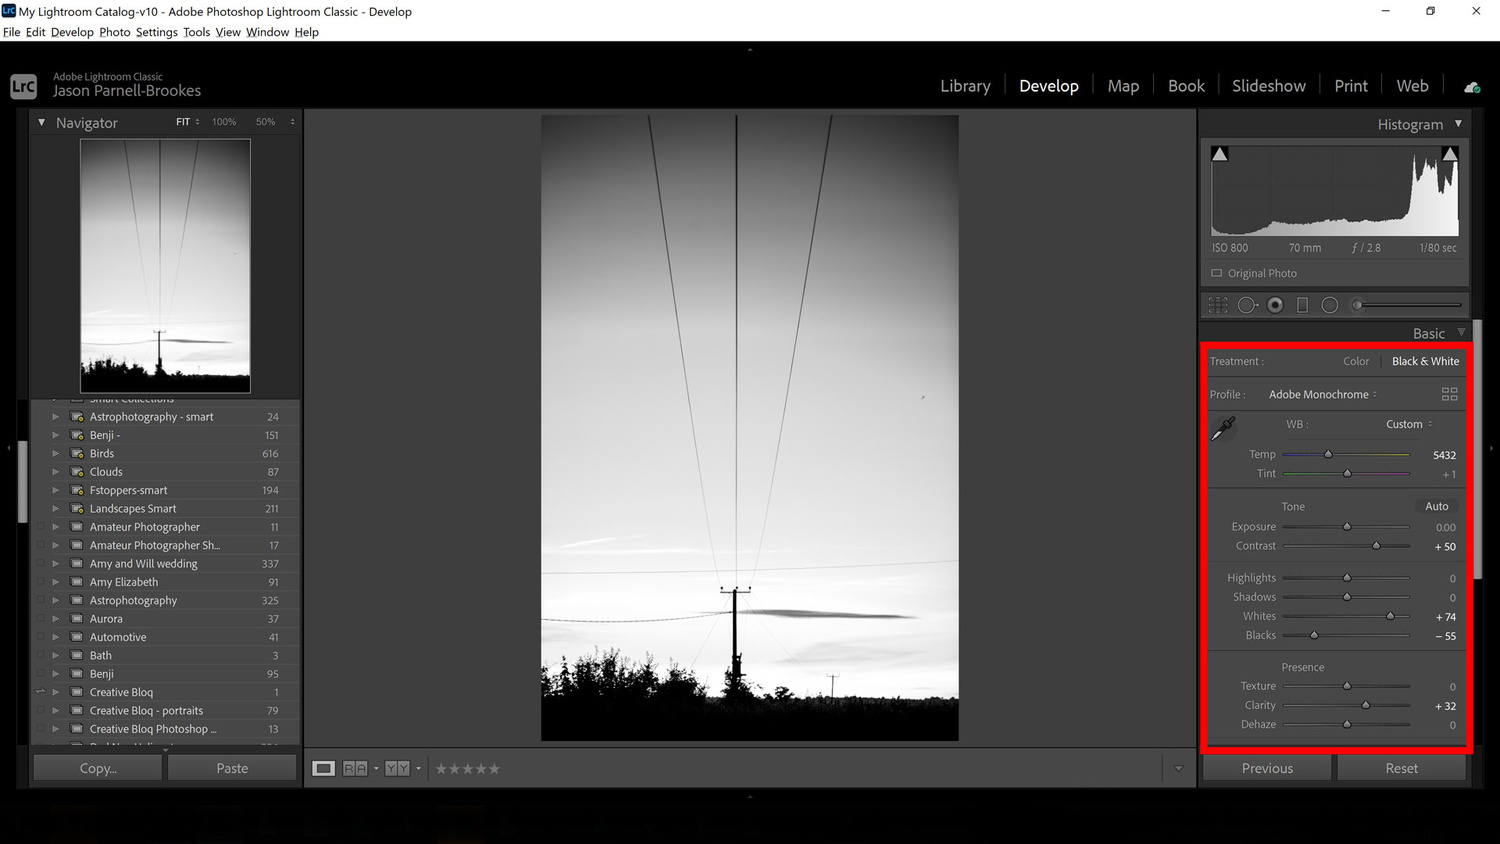
Converting to black and white is as simple as the click of a button in Lightroom Classic, from here you can make all the adjustments as before, but without the color controls
If all else fails, it might be worth converting an image to black and white (or monochrome). This change forces the eye to focus more on light and shadow rather than the tonal fidelity of a color photo, and bright sections when combined with dark sections can look particularly striking. In our photo above we've converted the photo to black and white and boosted the whites slider while attenuating the blacks slider in order to create a wider dynamic range in the shot. The silhouette of the horizon and telegraph pole and lines above now cut through the image and the bright sunset is alluded to not with intense color, but with an extreme white-hot appearance instead.
If in Doubt, Crop It Out
Sometimes no matter how much editing work you do, or how many color conversions you make, there's just no saving an overexposed photograph. That might be because the original image is so overexposed that there's no detail to regain through careful processing, or it may look unreal when you follow the above steps. In this case, the best move to make is to try and crop out the overexposed areas. This will work better with some shots than others. For example, if dealing with an overexposed sky that features only in the top third of the frame, then it might be easy enough to crop this out and this removal of the sky might be something to consider when approaching this type of shot again, where a physical cropping during the photo-taking process would help retain a higher resolution result without the need for post-processing crops later. However, it won't solve the problem if most of your photo consists of the overexposure as in our image above.


If an image is truly "over exposed" there is no recovery possible by moving sliders. If you're able to "recover" it, then it wasn't over exposed. To me, the only part of this image that is truly over exposed is the small area around the top of the pole.
The image basically looks as if it's ETTR.
When shooting raw, an optimally exposed file may very well look like it's too bright.
I'd argue "overexposed" and "clipped" are two different things.
A raw file is overexposed if areas where the photographer wants detail are significantly clipped in one or more raw channels. The best way to tell if a file is overexposed is to look at in in RawDigger or Fast Raw Viewer.
Perhaps it's two different understandings of what "overexposed" actually is. You may be arguing that "overexposed" is a file that's brighter than what you intended. I get that. Or, perhaps it could be a file that has been ETTR'd intentionally? A lot of landscape photographers will do that; exposing to the right as far as possible while not clipping highlights that matter. They then bring back and "recover" in post (except for the highlights that didn't matter).
ETTR is really just a way of getting an optimal exposure; of allowing the sensor to capture as much data as possible to have the most latitude in post.
To me, however, clipping IS overexposure. It may be because I'm generally a people photographer. If an image of a person is over bright but not clipped, I just bring down the Exposure slider. But if there are areas on the forehead, nose or cheek that are clipped, there's no slider in the world that can be adjusted to recover it.
"You may be arguing that "overexposed" is a file that's brighter than what you intended. " Raw files are not bright or dark. They are not in any color space. They are not bright or dark until developed by the raw developer. Maybe you mean that they are brighter than intended when developed with the defaut raw developer settings. I think the premise of the article is flawed. If a raw file (as opposed to the default rendering) is truly overexposed, all the raw developer can do is make up numbers. If only one channel is clipped, that can be done fairly credibly. Two channels is more iffy. Three channels and all bets are off.
Since we're talking vis a vis Lightroom, it seems pretty obvious to me what is meant.
No need for unnecessary pedantics.
I mostly agree, but Lr can do a credible job sometimes if only one or two channels are clipped. It estimates the missing data from the unclipped channel(s).
However, I can see that the small area around the top of the pole was well recovered. Was it impossible?
No, it wasn't. Meaning the area wasn't recovered. Which is okay for this photo.
OMG who cares? This is an article that is essentially saying Lightroom can be used for post processing. Shocking! And we need to add a discussion of overexposed vs, truly overexposed?
Title of article: Use Lightroom to Save an Overexposed Photo
And you're flummoxed about people actually discussing what is or is not "overexposed."
Okay, then.
The point is that LR cannot recover something that is truly overexposed.
Interesting thread this. Yes it does feel as though overexposure is actually rather subjective. I looked up the definition from Cambridge dictionary, Merriam Webster, and Oxford Learner's Dictionary and none of them mention clipping, but then again none of them mention by how much a photo could be overexposed. So it seems as though it's based on the photographer's intentions - i.e. how much she/he intend it to be exposed and then by how much is brighter than the intended exposure. Tricky to find exact numbers so perhaps there's still more study to be done.
Agree with Daniel. By definition, if you can recover, it's not overexposed. If channels are clipped, then it's overexposed.
I typically use the color balance tool to add some slight orange or yellow to overexposed skies, particularly when it's sunset. That kind of blends the sky with the rest of the image. Doesn't fix the problem but makes it less prominent.