Guest writer, Patrick Gensel is a photographer from Northeast PA with a passion for travel and adventure. He sent us this fun inspiration project on abstract macro photography. Hopefully this very thorough demonstration will spark your imagination for your own abstract macro project.
There are many facets of our universe that are right under our nose yet go unnoticed more often than not. This is exactly the reason I decided to do a little exploring of my own. Using my 50mm
prime lens, 24-105 lens and a little help from an EOS extension tube I began my descent into the world of macro photography.
I achieved the macro shots you see here, by using a few simple things your probably have around your home. Here is a list of the stuff I used to set up these shots:
General Items
Glass picture frame
Glass Cleaner
Paper Towel
Rain-x
Spray bottle
Two boxes to elevate glass
Camera Items
Camera Body
Extension tube
Your lens of choice (I used a 50mm 1.8 and a 24-105L)
Tripod
Remote shutter release (optional)
External flash
Preparation
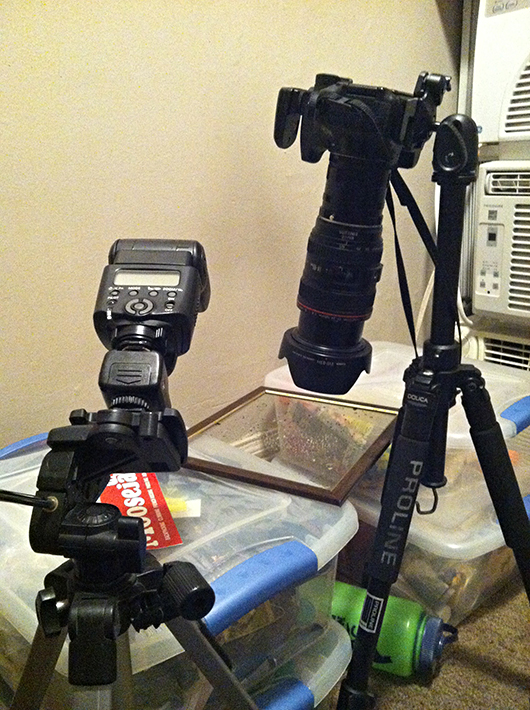
Start by thoroughly cleaning your glass picture frame with glass cleaner and a clean cloth. after you have it squeaky clean, add some Rain-x to a cloth and apply it to the glass as per the directions on the bottle. With your glass is prepared, set up two boxes about 6-10 inches apart so that you can set your glass across them allowing you to put stuff underneath the glass. I had mine on boxes about 8-10 inches tall, which seemed to work pretty well. Once you have your glass set up and elevated, it's time to take your spray bottle and mist down the glass. Give it a few good sprays, then let it sit for a few minutes to get the best effect. While you are waiting for the water to bead up, Take this time to get your tripod, flash and camera set up. For the flash, I've found that the best setup is to put it on a tripod and angle it down at 45 degrees, that way it will light the surface of the glass and water, and the excess light will bounce off at the same angle of entry, and not into your lens. Put your camera on a tripod and attach your lens and extension tube. At this point you will need to do some test focusing to determine if you need to remove any rings from your extension tube and/or adjust the height of your lens in relation to the plate of glass. Keep in mind that the closer to perpendicular with the glass that your front lens element is, the more consistent your focus will be.
Shooting
(**A note about shooting with extension tubes: Using an extension tube pulls the elements of the lens further away from the sensor, allowing you to focus at much closer proximity to your subject. This makes macro photography possible when no macro lens is available. Since there is no electronic connection between the camera and the lens, you will not be able to select camera aperture as your typically would, but fret not there is a work around for this. If you are shooting a Canon camera, and your body has a DOF Preview button, then it is as simple as attaching your lens without the extension tube, selecting the desired aperture (F/11 for example) then, pressing the DOF preview button and removing the lens with the button still pressed. This will "trap" the lens in the current aperture setting so that it will remain that way when you attach it to the extension tube. I'm sure this trick works with other brands as well, but I have not personally tried it. If you know a work around for other brands, please feel free to post them in the comments.)
Now that everything is setup, and you have some water drops on the glass, it's time to shoot! The trick here is experimentation. Since you will be working with an extension tube, focus and zoom are going affect the overall sharpness of your image, so keep that in mind when setting up the shot. When you are ready to begin, choose an aperture you want to start with and adjust your shutter speed and flash power accordingly. Since there is no right or wrong way to experiment with this, I encourage you to experiment with many different camera settings while shooting, but be sure to make note of what aperture and shutter speed you are using as this info will likely not be recorded to the photos EXIF data while using an extension tube.
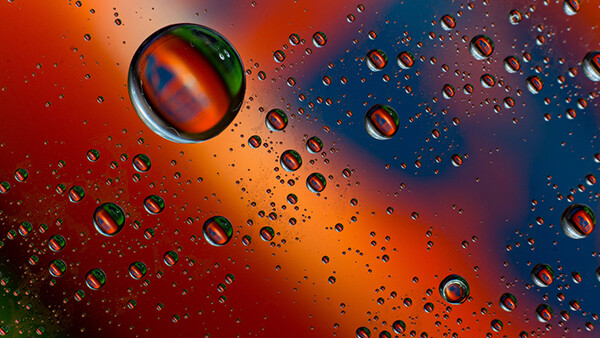
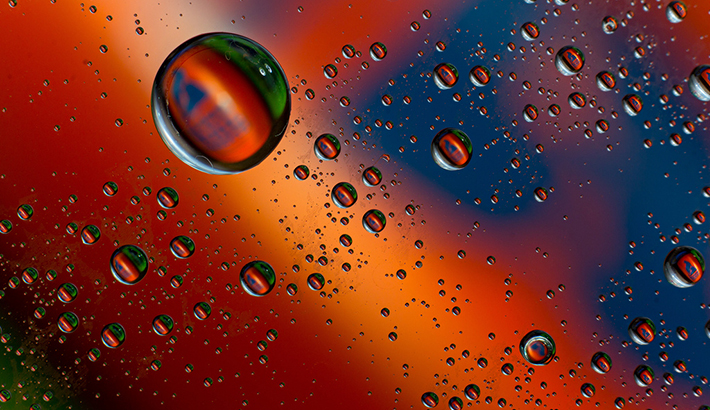
Like I mentioned before, have fun and experiment with this. Since we have our glass plane elevated, we can stick things underneath the glass for added effect. Brightly colored items really work great in this situation, since the drops of water will magnify and distort the objects below.
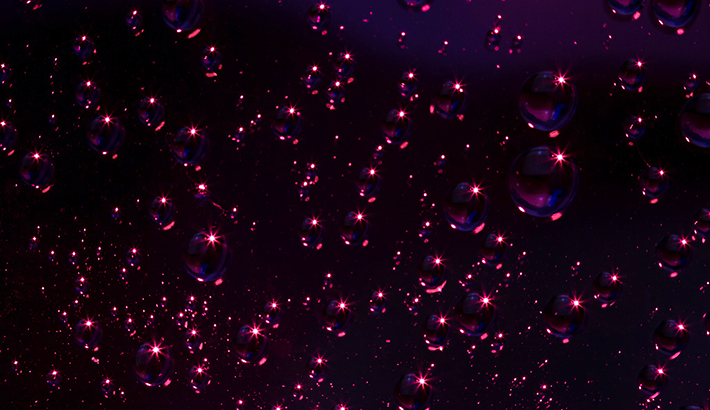
Another fun trick to try is to use a colored led light to cross light the water droplets. In the shot below, I placed a headlamp with a red light, just out of the frame, opposite from my flash, then stopped my lens down to f18 to create a starburst effect. The purple coloring came from adjusting the white balance in post production to a much cooler level.
Post Processing
Now that you have a collection of water droplet shots to work with, it's time to take these photos into your favorite photo editing software and fine tune them.
(Note: I highly recommend shooting in camera RAW to achieve maximum flexibility during post proccesing.) Again, creativity will be your guide here. Since this project is abstract in nature, you can color correct in any way that you see fit. Interpretation can go a long way with abstract macro shots. When I first loaded my collection of shots to the computer, I almost immediately saw a collection of photos that reminded me of the stars and other celestial scenes, and I edited accordingly, to bring out that vision. Perhaps you will see something completely different in your work and I encourage you to edit with that vision in mind.
For more from Patrick visit his Blog| Twitter | Website
If you would like to be a guest writer on Fstoppers, send us your submission for consideration.


Join the Fstoppers community for free
-
Post comments and join in the discussions
-
Browse the site ad-free
-
Share your work and get featured in the community
-
Compete in the photo contests for fun and prizes
11 Comments
Nice shots and great tips! Oh and the BTS photo is geotagged, you might want to remove that.
Thanks for the heads up. I haven't lived at those coordinates in a while, but I appreciate it.
They came out great. I'm going to have to try this!
There is so much potential with this stuff.
Here is one from Dustin Snipes http://dustinsnipes.com/#imagegalleries/Portfolios/Athletes/63
jeffgammonsphoto.com
I shot a short film based on the same principle a few years back based on the same thing. https://vimeo.com/24945191
I really enjoyed that, thanks for sharing!
You can, for not much more money, get tubes that have electronic communication..
Do you happen to have a link? I wouldn't mind getting one.
Mark Wallace also did a tutorial on this a couple of months ago: http://www.adorama.com/alc/article/13441
Just checked out his tutorial, very much the same principals I used. Thanks for sharing.
here is my try http://www.facebook.com/photo.php?fbid=10200292405344813&set=o.14568184…