Unifying skin tones in portraits is a pivotal skill that directly impacts the final quality of an image. This helpful video tutorial addresses the common challenge of mismatched or uneven skin tones, which can detract from the cohesiveness and aesthetic appeal of an image.
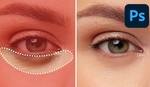
Coming to you from Kayleigh June, this informative video tackles the often-overlooked aspect of portrait retouching: skin tone unification. June illustrates, with commendable clarity, how to use Photoshop's tools like gradient maps, curves, and selective color adjustments to achieve a harmonious skin tone across the entire image. This tutorial is vital because it dives deep into the subtleties of color correction that many beginners, and even some seasoned photographers, may neglect. The emphasis on selecting appropriate colors for shadows, midtones, and highlights provides a structured approach to rectify varying skin tones, ensuring a natural and polished result.
Moreover, the video underscores the significance of fine-tuning these adjustments to match the subject's natural skin color accurately. June offers a nuanced perspective on enhancing portraits while maintaining the subject's individuality. This guidance is crucial if you aim to produce visually appealing images that reflect professional-level retouching finesse. This sort of adjustment is subtle and requires a bit of time and effort, but the results are well worth it. Check out the video above for the full rundown from June.