Lightroom and Photoshop have taken some massive steps forward with regards to their masking capabilities in the last few iterations, and if you have not taken the time to dive into all the new features yet, you are definitely missing out. This fantastic video tutorial takes a look at some of the best new capabilities and offers a range of tips to help you get the most out of them, making your workflow both easier and more efficient.
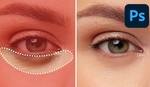
Coming to you from Matt Kloskowski, this awesome video tutorial will show you how to get more out of the latest masking features in Lightroom and Photoshop. The new features have certainly had a major impact on my workflow. In particular, the Select Sky and Select Subject AI capabilities have vastly increased my efficiency, and that increase in workflow speed has allowed me to improve my image quality be performing edits that would have taken too long to have been worthwhile before. For example, it allows me to precisely and easily emphasize the subject in portraits by selecting them, inverting the mask, and reducing the exposure by just a touch to make them pop against the background. Check out the video above for the full rundown from Kloskowski.