
Dodge and burn, frequency separation, and other techniques used by high-end retouchers are great but time-consuming. Shooting and retouching weddings, as well as fashion and beauty, I sometimes find myself spending way too much time on wedding retouching. Being used to cleaning skin with dodge and burn for beauty, I tend to do the same with weddings. Which, as you can guess, is not very profitable. The same thing goes for proofing portrait sessions. I like to give lightly retouched proof images instead of pure raw files. So for weddings and portraits proofs I had to come up with a quick way to clean skin without making my images look too bad. Here is how I do it.
Where This Technique Comes From
I used to use this technique for fashion retouching when a model would come in with poorly shaved legs. Removing small bumps, red dots, and tiny hair can be very painful. So unless my clients needed perfect retouching on the images when zoomed at 100 percent or more, I would use the technique I am about to show you. When taking the time to adjust all the settings of this technique, this method can give quite good results for small portions of an image.
The idea to use it for proofing and weddings pictures came to me when I encountered a bride with very bad skin. She was so stressed out the week before her wedding; her face was covered with red spots. However, she was usually not like that. To me, it was a shame to create sublime memories of her big day knowing the only thing she would see on her pictures were these spots. So I tried the different techniques I used for my beauty and fashion retouching until I found one that would take as little time as possible, but still give pretty decent results on most pictures.
How It Works
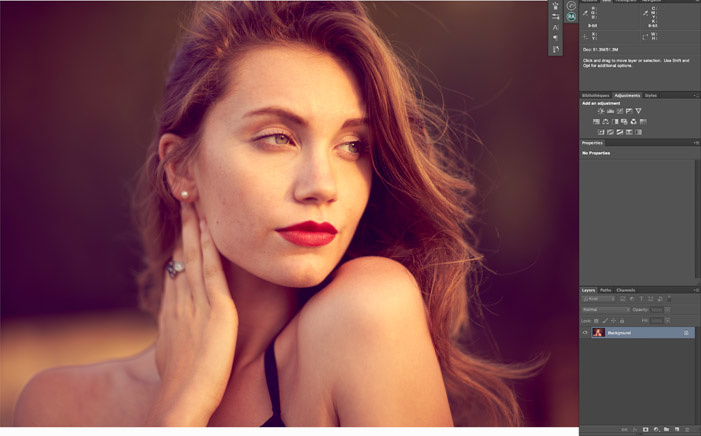
We are going to start with our developed raw file opened in Photoshop. The image below will be my sample image for the rest of this article:
The first thing we have to do is a copy merge of all the layers (or the background layer if you opened it with no previous retouching).

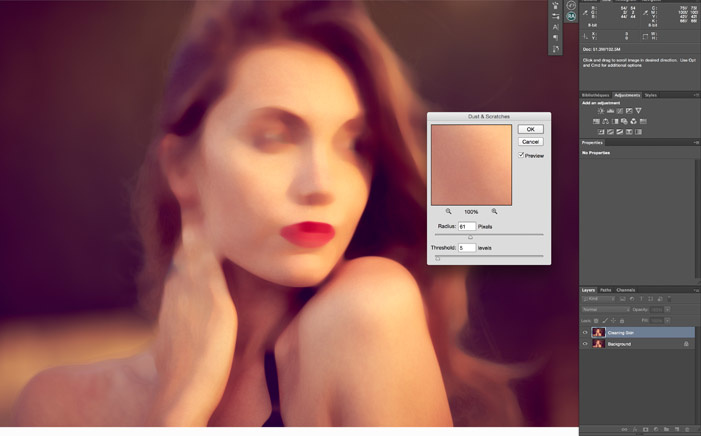
Then go to Filter > Noise > Dust & Scratches.

The window that just opened up offers you two options. The first one being the radius and the second one the threshold levels. If you are familiar with surface blur, this works pretty much the same way.

Turn the threshold to 0 and adjust the radius to blur problem area of the skin. Once the problem area is blurred with the surrounding areas, you can change the threshold to bring back details. For my sample image, a radius of 61 with the threshold levels set at 5 seems right. I focused on the cheek area as this is the part I wanted to clean up the most.
Now to go as fast as possible, I hide the cleaning layer, select the background layer and go to Select > Color Range. In the window that popped up, I select Skin Tones and adjust the fuzziness if needed.

Once my selection is created, I reactivate my cleaning layer and click the Add Layer Mask to create a mask. The mask will hide the adjustment on the image except on the skin tones.

I can then further refine my mask with a brush and even play with the opacity of my stamp layer. In my example, the eyes are affected by the cleaning layer but I do not want them to be altered. Same with the hair. Here's the final result with a little bit of tweaking done on the mask:


As you can see, this is very quick and efficient... and dirty. Do not think for a minute I would ever use this image in my portfolio or social media like this. It is by no mean an image ready to be delivered. However, for proofing in a small resolution, this does the trick perfectly. For weddings, I would only lower the opacity and reveal the stamp layer only where needed and not on the whole face like shown here. You can go even further and create an action or script that does all of it for you. It will allow you to only have the radius and threshold to adjust and then refine the mask.
The advantage of this technique over surface blur, Gaussian blur, or median filters is that you keep more details if the threshold is adjusted correctly. It can give a slightly blotchy result, but again if the images are not watched in full resolution, it will not be very noticeable.
A last note for those of you that shoot in studio, this technique can also do wonder to clean up a dirty seamless background.
Do you also use this method for cleaning the skin quickly? Have you ever used it for anything else? Do you have any other retouching techniques that you use to clean someone's skin in a rush?


Nice article but i think the Nik Skin soft filter does the exact same thing. Worth reading for photographers who do not own the Nik suite.
I have never tried any software from Nik, but I guess it is comparable to Portraiture in the way it works. I left portraiture because I found it slow when processing files in batch. A simple script with dust & scratch would run much faster. Perhaps this has changed with newest versions though. Another plus being that Dust & Scratches is included in Photoshop, so no additional cost :)
Hi Quentin, for a quick skin cleaning I use an adjustment brush with a negative clarity in camera raw (or lightroom). It's a simple and fast way to work on a raw file.
Hi François! Thanks for your feedback! I tried it, but find you lose much more details that with dust & scratches. But very small res files, I guess you could get away with it :)
My down and dirty skin retouch came from Scott Kelby. Copy the layer. Invert the copy. Change to overlay. Run High pass, adjust till skin is smooth but not overly blurry (around 14.1 on 16MP images). Then run Gaussian blur until some texture comes back. Then hide layer behind mask and paint on. If you set this to an action it goes really quick.
This technique is known as inverted high pass. It can work for cleaning up skin. However, it adds more steps to the process compared to dust & scratches. To get a proper result you'd also need to set the high pass to a radius divisible by 3, then use the 1/3 of that radius when applying gaussian blur :)
Retouchers use IHP (inverted high pass) often to to smoothen transitions between shadows and mid-tones or highlights and mid-tones.
Thanks. I am updating my action to take your advice into account. Good to know others use this method, even if for another purpose. Like I said, this is a really quick way once assigned to an action. But it's not great for final images.
What are proofs? Im not a pro photographer so I don't know what you mean by that. I can only guess and if it means that you have to present raw files, you shouldn't clean them up. It's simply not right.