
Since joining Fstoppers I had planned on doing a "behind the scenes" of one of my shoots, so today I've put together a lighting diagram courtesy of Kevin Kertz, and a detailed description of how the finished product was produced. Fair warning, I am a bit of a technique nerd and can get pretty detailed. We've all seen diagrams online, and brief descriptions on what goes where, but it seems there are always details left out that can significantly impact the results. I didn't want to do that. I wanted to leave no stone unturned and give you guys as accurate of a diagram and explanation as possible.
My goal for this shoot was to create a really simple yet stunning beauty shot showcasing the makeup, model, and hair. I contacted a local modeling agency, and found an amazing young model that would provide a youthful look, but a confident and mature presence, not to mention a cool hair cut. I also invited one of my regular makeup artists over to do the hair and makeup. This was a convenient solution because she is exceptional at the "clean and concise" makeup I wanted for this look, and was also in the market to expand her portfolio with respect to Hair styling. We met at my home studio (living room) and got to work!
Here are the nuts and bolts of what I was using on set:
- Camera: Canon 5d Mark III with Canon EF 100mm USM 2.8 Macro
- Light Meter: Sekonic L-758DR
- Lights: Paul C. Buff Alien bees, 3 AB800's and one AB1600
- Backdrop: Superior Seamless paper #66 "Wheat"
Here is what the first stages of the setup looked like.
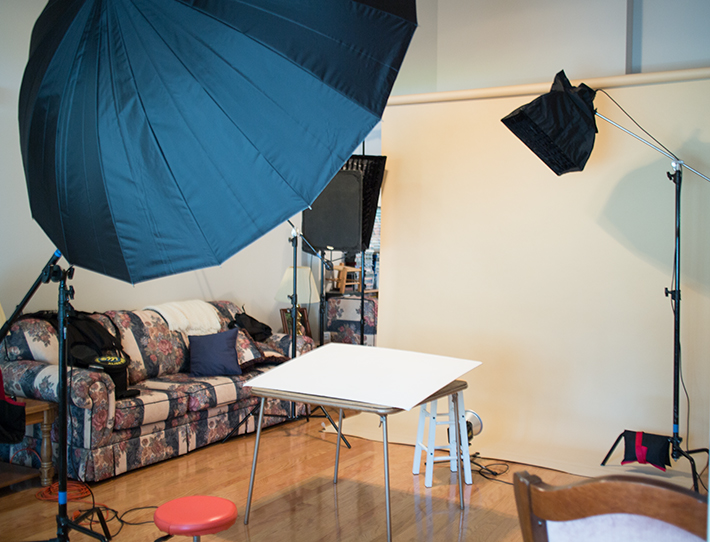 Just a heads up, this shot was done prior to the final setup, everything is exactly the same in the final setup with the exception of two "bookends" as noted in step 3 of the diagram.

- The "Main/Key" light is a Paul C. Buff 86" Extreme Silver PLM umbrella with an AB1600. I used this particular umbrella because it gives me a large enough source to wrap around my model just slightly, while giving that unique specular quality that silver umbrellas provide. It was positioned directly in front of the model, elevated enough so I could sit on my rolling stool below it, with the center pointed at the face of the model. This light was metered at f/11 (ISO 100) with the intention of shooting at f/8. This is to compensate for the transmission loss that the particular lens I was using falls victim to (in this case a 2/3rds loss in light), and that extra 1/3rd is to push my histogram over to the right side and give me as much usable information as possible.
- This is a simple piece of 3x4' foam core. I set it on a card table in front of the model to kick just the tiniest bit of light into the shadows under her chin. The card was actually angled toward the light since I wanted to use the main light for fill rather than catching the light coming off of the background which would affect the color on the model.
- I used two "V-Flats" or "big ass gobos" (which are made from 4 {2 each} 4'x8' pieces of half-inch foam core) to serve two functions. One: To remove any flare that may come from the soft box and hair light. Two: With a black panel next to the model it provides "negative fill" which will suck up some of light getting bounced around the sides of the model, effectively adding contrast and contouring to the face of the model.
- This is the hair light, plain and simple. In this case it was an X-Small Chimera Super Pro Plus with a fabric grid. This light provides a highlight to the hair as well as providing slight separation of the background from the neck and shoulders. I positioned this light above and slightly behind the model and was also metered to also be at f/11. This is really just a starting point because it really depends on the color and texture of your model's hair what this light will end up being. Mine happened to be just slightly "hot" at f/11 so I simply raised it about 6 inches rather than lowering it to change the power (yep, I'm lazy like that).
- To the models right and behind, I set up another soft box to provide a slight edge light, a Small Chimera Video Pro Plus with a fabric grid. This box serves a similar function to the hair light, however to a much lesser degree. I only wanted a subtle light to contour the face and provide a little bit of fill in the hair. To accomplish this, I positioned the box at eye level to the subject, and had it metered at f8. Even though it was a full stop less light than the others, I knew that the makeup would pick that light up because of the angle and it would be just the right amount of light to illuminate the hair (which if you remember is being negatively filled by the v-flats).
- Finally I wanted to add a bit of interest to the background. The main light was doing a pretty good job lighting the background as is. There really isn't much fall off from the model to the background, I believe it was only a half-stop. So I place a strobe with just the basic reflector on a floor stand and pointed it straight into curve of the seamless paper. I only wanted a very subtle gradient from light to dark and since the Main light was already putting the background at around f/8.5, I only needed to add a little light. This light was set to meter at f8 by itself, so when it was combined with the light from the main, it it pushed the exposure on the background directly behind the model to f 11. This gave me a near white glow behind the model that faded into the nice golden color of the paper.
That my friends, is all there is to it!
Ok, I'm lying, there is more to it than that. Shots like this are not made with just lighting. The entire team added their own unique piece to the puzzle. My makeup artist for example, understood how I like to light things, and knew what makeup and hair would fit the situation the best as well as enhance the model's beauty. The model provided not only a beautiful canvas, but her experience in posing and expression were invaluable in creating the final product. If I can indulge in a little bit of philosophy for a minute. We, the photographers, are but one cog in a machine that needs to work together in order to create amazing images. You can be the best lighting technician in the world, but if you don't have the team to support your talent, your work will always fall short.
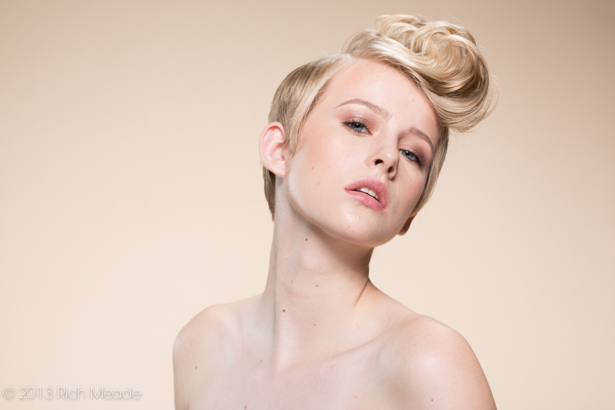
Ok enough gushing! Below is the finished product, before any retouching. This is "SOoC" (straight out of camera), only the default raw conversion done by Lightroom (which in this case is zeroed out, with only my camera's profile applied).
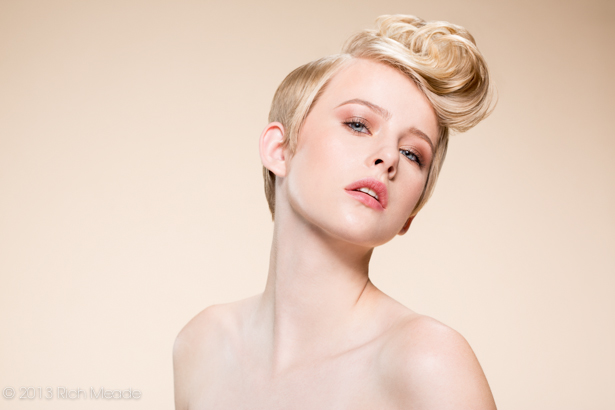
I was extremely happy with the way this shoot turned out! It came together even better than I had imagined, so I wanted to make sure I kept the amazingness going and I send the files to our very own Pratik Naik at Solstice Retouch for finishing. I gave him only one bit of instruction. "Honestly I'd like to let you do whatever you want to them, I just want them to be the best sh**I've made thus far". I feel like we accomplished that.
So GO FORTH and CREATE! Feel free to try and replicate this shot, if for nothing else, to get a sense of how to mitigate lighting ratios. Screw up! Yes do some things wrong when building this set, and see how that affects the image. Believe it or not, you could come up with something incredible that no one has even dared think of! Most importantly, share the knowledge. We as artist grow from seeing and experiencing each other's craft. Don't be shy, cruise on over to Kevin Kertz's website, download his diagram document and show us some of your favorite setups!
Join the Fstoppers community for free
-
Post comments and join in the discussions
-
Browse the site ad-free
-
Share your work and get featured in the community
-
Compete in the photo contests for fun and prizes
14 Comments
Nice setup. If I could offer some critique and/or personal feelings (Hey it's the internet and I'm some guy on there so it'd be a crime not to), I'm not a big fan of the PLM however because often, especially when working with models who have flawless skin/makeup that closely, light can be TOO soft. There is nothing wrong with a little shadow here or there or some contrast. It's a good headshot but nothing really grabs me. Part of the reason is that it's very evenly lit and it doesn't seem that natural and I think it needs to be zoomed in so we can see her eyes more. Perhaps using a smaller light source or a beauty dish would work better?
Thanks for the input! I actually find the PLM (and all silver parabolics) to be pretty hard light, and for me and my aesthetic this is far from flat. But to each their own.
Of course you have the benefit of looking at it on a big monitor too so it could be just on my side. But hey, I love stories on actual photography and not iPhones :)
great lighting... the pose is not so good... generally looking straight up a girl's nostrils until you can see her brains is considered "not flattering"... But everything else here is great
Thanks! Tis' true, I have a soft spot for boogers.
whatever. I'm a nose surgeon, and I take pictures up people's noses for a living. this doesn't even come close to a shot up the nose, trust me! nice shot though, and it would be interesting to also see a tutorial from your retoucher on what he did. I have some guesses of how I would do it, but I'm always surprised at how many ways of doing something there are in photoshop.
Scott, Pratik has some retouch info here:
http://www.youtube.com/watch?v=VKdk74Z_LCo
nice video, but what I was hoping for was an actual tutorial on this image, not just general info on how he processes.
Pretty nice for a rookie! LOL! I kid! I like it a lot, that looks like the Pongee paper we have discussed in the past. My question is... Is there a specific reason for using the umbrella as opposed to your beauty dish? Also, if you removed the v-flats and shot it again, in the very next frame, would you see a difference?
The PLM gave me a more specular source of light, while being large enough to give some wrap around the subject. The beauty dish, in contrast, wouldn't give me as much natural contrast on the skin (particularly the subtle highlights), nor would it have helped light the background as much.
If I removed the V-flats the area you would most notice the difference would be the shadow areas or areas not directly lit. Her upper arm/shoulder, for example, would get slightly lighter. Because studio (living room) has light walls, light flies around everywhere, and the flats main purpose was to keep all of that spillage off the model, and the flare out of my lens.
It's not a MAJOR difference without the flats, you won't see the difference and got WOW! that's amazing, but it does help a teeny bit.
Great - nice setup. Im just curious as to one thing; is the light meter really necessary? If one did this using test photos and the internal light meter, would that not suffice and yield similar results? I guess this is more of a general question rather than one that concerns this particular shoot.
You could do it without a light meter, however it would take much longer and would not be nearly as precise. You would be judging everything off of your screen (be it the camera's or the Tech's).
I knew (from experience) that I wanted to shoot at f/8. If I had just set my camera at f/8 and took test shot after test shot for each light (bear in mind I was alone on this, no assistant) It would have taken significantly longer, and would not have been as accurate as simply metering each light and getting the power right after only two pops.
Not to brag (even though it sounds like it) After all of the lights were in position, it took me maybe 2 minutes to get everything metered, and it was spot on. The only tweak I had to make was to the hair light because it was a touch hot, but I tweaked the hair light on every shot because of the varying hair texture (did 5 looks that day). Granted, I knew the ratios I wanted to work with, so I knew exactly what each light needed to be set on, which took less time than me fumbling around deciding what would look right. I knew this would look right.
I'm not saying a meter is critical but...if you have one and know how to use it, you will be much more infinitely more accurate and much faster than someone chimping a screen. Think of a light meter as not only "getting you in the ballpark" but getting you into the "infield" or even the "batters box" (to really stretch the metaphor).
Great advice - thanks! Also good arguments for using a meter, and since I mainly shoot concerts I have had no need for it, but when I do studio work I might look more into it. So far Ive been able to get decent results without it, and I dont think the lack of metering is the result of it being just decent, but anything to more accurately measure the lights surely sounds like a good idea.
Amazing Rich, loved the article!!! You never fail at posting intriguing stuff!!! This is definitely getting reposted, I appreciate you taking the time to share this!!