Have you ever wondered how photographers capture bullets flying in mid air? Or get that perfect lightning strike in the middle of the day? Well the newly redesigned Nero Trigger will help you do just that. Short of the creative jolt you get when you upgrade from pop-up flash to a full off camera flash set up, I'd say that this is one of the biggest creative boosts I've gotten in a long time. This is a piece of gear worth having if you need to get the creative juices flowing again.
The Nero Trigger is compatible with most camera systems, including Nikon (MC-30, MC-DC1 and MC-DC2), which is what this unit was tested on, Canon (RS-80N3 and 2.5mm) and Olympus. There are also adapters available for use with other camera systems. You can also choose the color of your trigger, with options including red, green, black and blue.
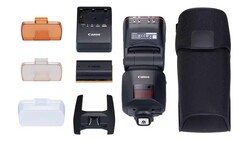
So what's in the box? You get a trigger in the color of your choice, the camera cable that coresponds with your camera (in this case a Nikon D800) and a flash cable (PC Sync to 1/8th in.) along with an instruction manual. The manual is well written and explains any issues you might have although due to the simplicity of the device, it's unlikely that you'll have any serious issues with figuring things out. It's all fairly intuitive.
That brings us to the trigger itself.

We'll start with the build quality, the Nero Trigger has a solid plastic housing with a piece, which allows you to attach the unit to your cameras hot-shoe. The button give a satisfying click when you press them and the screen is also bright and easy to read. All of the ports hold the cables in place without any wiggling and they're not tempted to fall out. In addition to this, I have had the trigger for the better part of two weeks and have yet to see any scratches or marks on the plastic. So it’s reasonably tough, solidly built and seems like it should stand up to anything you put it up to, within reason of course.
The menu system is very basic and very easy to navigate on the small but bright LCD screen. A simple click right or left on the directional keypad toggles through the different modes of the camera, and once inside the menu for each mode, there are 3 or 4 options which can be controlled again, with a simple click right or left with the directional keypad.
Speaking of the different modes, what are they?
Lightning Trigger - This turns the triggering device into an optical slave meaning that it can be triggered via lightning or any other quick light source.
Sound Trigger - This mode will allow you to trigger your camera or flash using any sort of loud sound, you are able to calibrate the sensitivity on a scale of 1-99.
Time Lapse - This allows you to fire an unlimited number of frames at exposures from 1 second to 59 minutes and 59 second.
Laser Trigger - This mode lets you use the built in laser sensor to set the precise spot where an object is captured.
HDR Mode - Does exactly what it says on the tin. Let's you bracket your images for later combining in post.
DIY Mode - This mode allows you to attach your own devices to the trigger to allow for custom triggering options.
So now that's what we've got to work with, let's see how they all work in the field.
First we'll start with the Lightning Trigger.
It took me a very long time to figure out how I should test this feature since, despite a crazy lightning storm in the days leading up to my writing this review, the cloud cover was so heavy that I wasn't able to get any streaks of lightning. I will say though that the trigger responded to all of the flashes quickly and despite the fact that it took me quite a while to get everything dialed in, when I had, everything worked well.
Next I worked with the Sound Trigger.
This was honestly the most fun that I've had with a camera in a long time. I began by trying to capture a balloon filled with air popping. This was causing me all sorts of headaches until a friend of mine who is much smarter than me, informed me that the noise from a popping balloon doesn't come until milliseconds after the balloon has been destroyed, thereby being too slow to capture using a sound trigger. I actually thought this was good news because I was excited at the possibilities that this feature held and I really wanted it to work. There were just a few things like, you know, physics, standing between myself and success.
So I decided a better plan of attack would be the always potent combination of a water balloon and an airsoft gun.
Instead of attaching the trigger to the camera, which would have a maximum shutter speed of 1/8000th of a second, I decided to wait until it was dark, set the camera on a tripod set to a 3 second exposure, and attach the Nero Trigger to my Nikon SB-800 flash. This may sound like a strange approach, but when you consider that the SB-800 has a flash duration at 1/128th power of only 1/41600 of a second. This is enough to stop even the fastest objects dead in their tracks. The only downside is that you must then be in a completely dark area with the flash quite close to the subject.
So using the airsoft gun to pop the balloon I came up with some very interesting results:


To be honest, these took a lot of fiddling around to get right, but that's not the fault of the trigger, just that it takes time to dial anything like this in. If you'd like to see more shots from this high speed shoot, like me on facebook HERE or my website www.CharlestonsWeddingPhotograper.com
What about the Time Lapse feature?
This one worked perfectly. My only real complaint is that when you stop a time lapse in the middle of it's run, there is no way to cancel it without turning the system on and then off again. This isn't really an issue, it can just get annoying if you're running multiple short time lapses.
The HDR system works perfectly and intuitively. The Trigger controls the shutter speed from 15 Seconds and 1/15th of a second. Some have pointed out though that this can be a bit of a limitation. Personally I don't often shoot HDR, but when I do it is tripod based a high f/stops and low shutter speeds so it wouldn't be an issue, but if you're attempting to do Trey Ratcliff style, run and gun HDR's, you might struggle with this.
Finally, I wasn't able to use the Laser Trigger because I currently don't own a laser pen, but from my experience with this device, I'm fairly certain that it will work incredibly well.
Final Thoughts:
As I said earlier, this is an incredibly fun piece of kit. I enjoyed using it immensely as it opens up an overwhelming amount of possibilities for creative photography and at only $200, it's a steal, if only it's applications in high speed photography. I'm really looking forward to using this in the future and I think that if you want that extra little push to do something creative, you'll love it as much as I do.
Interested? Well you should be. Check out the website for the Nero Trigger HERE where you can see more information about it or place an order.


Join the Fstoppers community for free
-
Post comments and join in the discussions
-
Browse the site ad-free
-
Share your work and get featured in the community
-
Compete in the photo contests for fun and prizes
12 Comments
Wondered what that second balloon one was before I read it. Looks like a baby girls ballerina shoe. Great shots, Best get saving :)
How does this compare with the feature-set and responsiveness of Magic Lantern? Of course ML doesn't have "laser mode" or a "DIY mode" (The latter one should be relatively easy to program), but it technically has all the other features.
So how does it compare in terms of response time, angle of view, ease of set-up, etc?
(Yes, I know this is a canon-only thing, so if Nicholas doesn't have any experience with ML, maybe someone else here has tried both?)
I have no experience with the Magic Lantern, however I would love to hear someone else's thoughts on it since for some applications it's a competitor.
I've used the sound trigger and the automatic exposure bracketing feature of magic lantern. Sound trigger works just as expected; I've used it to try and capture exploding eggs (need some subsonic ammo to do it right, I found) and it is very handy as a remote trigger when doing self portraits.
HDR, again, works as expected. You can manually set the number of shots and exposure values, or let ML decide how many shots it needs.
There is also a light trigger in ML, but I've never used it.
Oh, and they're all easy to set up; just go into the ML menu, turn them on, and that's it.
ML is an amazing tool (maybe the biggest reason I recommend canon cameras), but not all the features are equally responsive. Unless you were to strip down the feature set to the bare essentials and figure out a creative way to do task scheduling, things will always be ever so slightly laggy when running multiple simultaneous tasks. According to the wikia, (via the DataGhost speed test (that is no longer available)), you'd get about 200-300ms response time with the light/movement trigger. How fast is the Nero Trigger? Their website is thoroughly uninformative...
If
it's significantly faster, it could be better for lightning. But to be
honest, I feel that shooting lightning with a long-ish-exposure
timelapse-esque "take pics like crazy" works better. If your shutter is
open 95% of the time, you should capture 95% of the lightning, right?
(yes, I know that's now how statistics work :P)
It seems a nice gadget to me and the price is OK.
However, something turns me off a little bit since I would have been interested in its HDR capabilities. This article mentions:
«The HDR system works perfectly and intuitively. I have no complaints here.»
But after reading reviews on http://www.nerotrigger.com/#/review , I noticed this:
«The unit will only allow your fastest exposure to go to 1/30s so it does
have some limitations, this isn't a major obstacle, just something to be
aware of.» - Graham Moss, http://captivephotons.co.uk
Am I the only one or a fastest exposure of only 1/30s seems very slow? To me, it is a major limitation since most HDR is done in aperture priority, the varying parameter of the camera to change exposure is the shutter speed and here, it is limited.
Please someone, explain to me how this isn't a major obstacle. No intention to be rude here, just curious. Thanks,
Hi. I agree with you what you have brought up could be an obstacle, for my own uses however, if I'm doing an HDR it's tripod based and at very low shutter speeds so it wouldn't be an issue, however it is worth mentioning in the review so I will add something about it.
Thank's for bringing it up!
I've been using a Trigger Trap for a little while to do this sort of stuff. Very similar triggering capabilities
https://triggertrap.com/
For only $200, that's considered dirt cheap for what it does. Thanks Nick.
Sound very interesting. I do not really understand how to connect it to a camera to fire the camera. I have a Nikon D5200 but it only has one micro in plug. How would it be able to fire the D5200 for high speed photography ?
I think Magic Lantern is still the best alternative as it's free!
I used to make some startrails with a remote... always had to check battery, check if it's in my bag, plug in in the dark, leave protection seal out, bear in mind the wire....
Now I just have to bring my dslr, a tripod, my fav' lense without additionnal and "able to break/fail" external device
(excuse my bad english)
At first it looked like a wakeboarding shot with a big rooster tail