
Shooting something translucent on a reflective surface can take some effort, but with a few tips, you can do it with ease.
I've had this glass model of a car in my possession for as long as I can remember, and I've always found it beautiful, even though I'm not a car guy. Stuck in quarantine, I decided that it was time to photograph it.
The Gear
I shot this with a single light, a Cactus RF60x in a medium-sized parabolic softbox. I used my trusty Fujifilm X-T3 with the 60mm F/2.4 macro at f/22 for the deepest focus possible, as I was relatively close to the car. I also tethered into Capture One 20 with a Tethertools cable.
The Setup
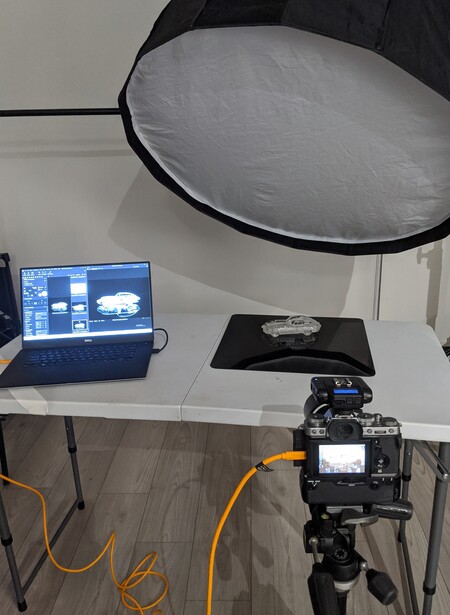
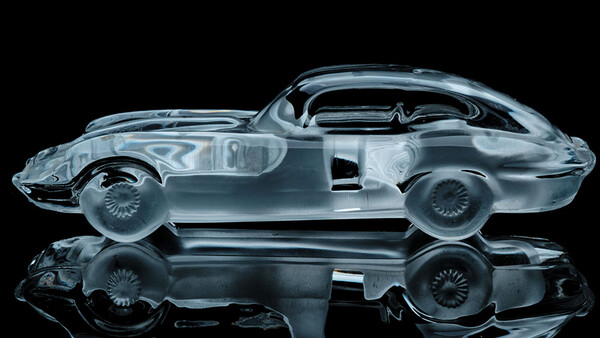
The first thing I did was wipe the car down with a microfiber cloth to remove all of the dust and fingerprints. I was also sure to never touch the car with my bare hands to avoid reintroducing said fingerprints. For this shot, I played with a lot of setups, different backdrops, colors, and more, but in the end, I found that in order to get the best results with the glass, I had to light it from behind, allowing the light to bounce around the inside of the subject and capture all of the internal details. This ended up being the best result, and there was something about shooting it on invisible black that just made the image pop.
In my final setup, I found that putting the light at approximately 45 degrees and pointing it towards the camera gave me the best results. I also feathered the light so that it was just skimming across the car so that I didn't actually need any black material behind the car, simply the lack of light behind it caused the background to be totally black. The final result is the image below:

As you can see, there are details in the wheels. You can see a lot of the internal structure, though it's a little distorted, because, well, it's glass. I could have gotten more of the internal details if I had shot straight down on the car, but then, I would have lost the symmetry of the shot. I was more interested in the silhouette than seeing the frosted interior.
The Post-Production
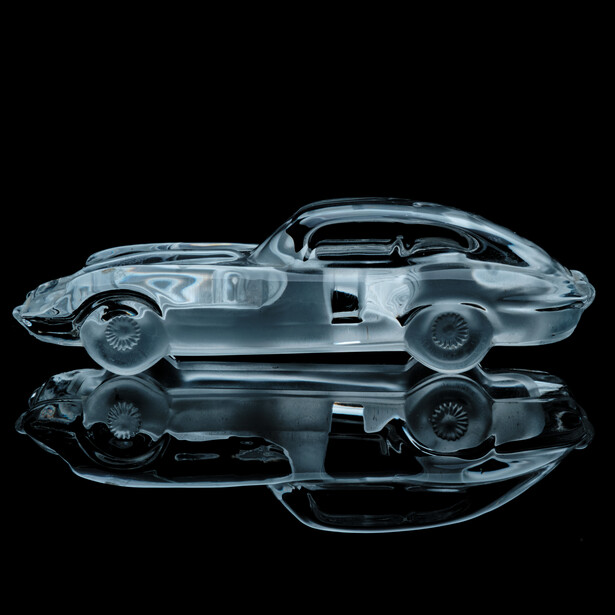
Post-production on this photo was ridiculously simple. I started out by cooling the image down with just the white balance, ensuring that things weren't quite blue, but had a nice cool tone. I crushed the blacks a little and brought the highlights and whites down so I didn't have any peaking and I could see as many details as possible. I did some sharpening using the "soft image sharpening 2" preset in Capture One (my go-to for sharpening images), and lastly, added a little bit of clarity.
Next, I opened the image in Photoshop and changed the crop to square. I did this in Photoshop, because if I did this in Capture One, I would have cut off the sides of the car. I needed to extend the bottom of the image to get the framing I wanted. Overall, there was only really one spot of dust that was bothering me, so I quickly took care of that, and boom, I was done!

Conclusion
As you can see, taking an image of a glass object doesn't have to be scary or difficult. With just a single light, you can easily capture all of the internal structure and details of a glass object as long as you position it properly. If you want to learn more about product photography, you can check out our tutorial, "The Hero Shot with Brian Rogers Jr."


Join the Fstoppers community for free
-
Post comments and join in the discussions
-
Browse the site ad-free
-
Share your work and get featured in the community
-
Compete in the photo contests for fun and prizes
No comments yet