
Unless you live in the big metropolitan cities like New York or Los Angeles, photographing models is easier said than done. That's because any chance of success in the industry, and the models move to the bigger hubs. That will not change, but there are opportunities to photograph models in generally any location and that's what I did with this tutorial.
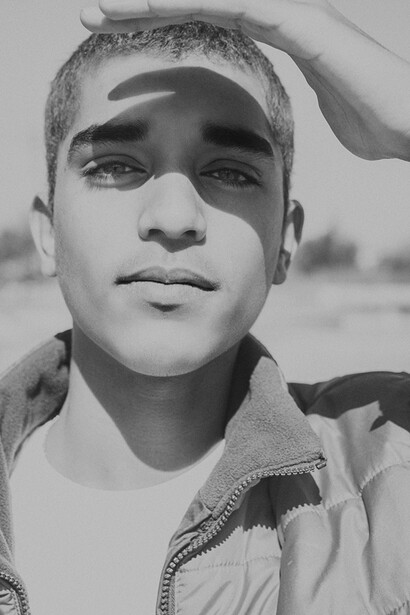
James is a brand new model that suffered jury duty with me. We spoke for a few hours and then I asked if he ever considered modeling. Photographers are shy when it comes to approaching new talent and to me, it's always been about the approach. I think we should be self-aware and put ourselves in their shoes. Once you get past the inquiry stage, there are a number of other steps in to increase the odds of a successful photo shoot.
I asked James if he ever thought about modeling and he responded by back saying he thought about it. However, he had no idea where to start. He asked if I would ever photograph him and now we have this tutorial.
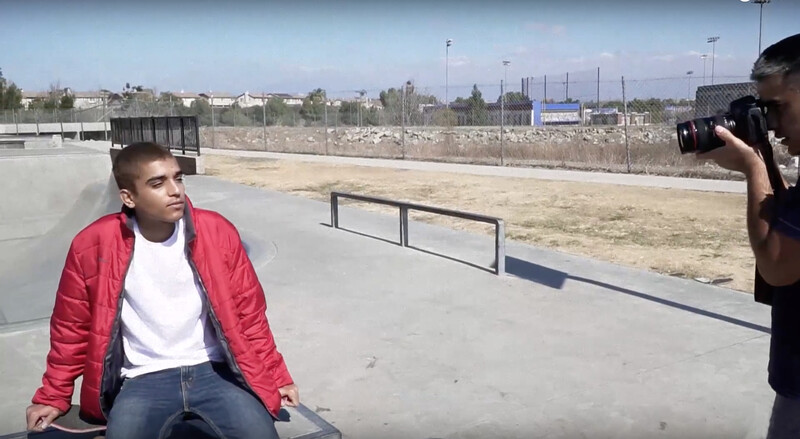
I'm going to break down a list of 11 things I did to have a successful photo shoot with James. The camera follows me on the photo shoot and you can see how I have a dialogue with the model, and how I work with him. This tutorial is how I move a brand new model from nervousness to enjoying the process at the end.
11 Steps to a Successful Photo Shoot With a New Model
1. PICK A MODEL: Even supermodels come from small towns around the world, and before they head on a plane to NY or Paris, you can be the one who discovers them in coffee shops, grocery stores or even on a social network. Find someone who has an interesting look and approach them. If they appear to be a minor, approach their parent first. If it's a female and you're a male, understand they might be hesitant and you should assess the situation. Use common sense and always respect their NO.
2. LOCATION: Pick an area where the model feels safe, where you can get the job done and you won't be bothered by the film police. Locations should not make or break the shoot, that honor goes to the photographer and the model. Locations can contribute to your overall aesthetic but in fashion photography, we want to see the face and the clothes more than the background. In other words, just pick a place and make it work to your advantage!
3. GEAR: I don't believe in the latest and greatest. Have a good camera and a better lens. You can borrow, rent or use the one that you have. Kit lenses? They're not the best, but I've been published with them many times. You'll do fine!
4. WARDROBE: If you're looking to do a test shoot with a newer model, consider asking for clothes that are basics and won't expire as quick. Fashion changes each season but certain basics will always stay in vogue, like blue jeans and a simple t-shirt "the Gap look."
5. CAMERA-SETTING GOALS: I keep a checklist and review if I'm on the correct F-stop or ISO. Write notes down because, at the moment, you might forget key factors. In the midst of a creative storm, you will likely forget a couple of important details. I once did a beauty shoot, aimed heavily at cosmetics. I picked an F2.8 for most of the production. I had the eyes in focus and much of the face had a blur. They didn't see the whole face as instructed and that project was a failure. Now I write notes to myself like: stay above a certain F-stop or whatever might be appropriate. You might change your mind in the middle of the shoot, but it's always good to write your initial mission.
6. TALK TO THE MODEL: This is key! Speak to them and be approachable. Make them feel comfortable and if you must, do the pose yourself first. Give them reassurance on what they're doing right and what should change. They are nervous and you have an opportunity to really make a positive impact on their future and self-confidence. Talk to them and make them feel comfortable! This is our opportunity as photographers to show that it's more than just clicking a button. We direct the entire photo shoot and that's something overnight photographers relying on apps cannot do.
7. FIND THEIR ANGELS: I do this on every single photo shoot. Look left, look right, look up and down, etc... Sometimes it's about finding their best angle and sometimes it is about eliminating the worst angles! Do it and you'll instantly increase the number of fantastic shots you capture.
8. THE SUN: For our light complected friends, this is a tough moment. I ask if they have issues with strong light and most do. So I do the, "1, 2, open! ... great, close your eyes. 1, 2, open!" thing with them. It goes at a slower pace, but we get better images and the trade-off is worth it.
9. SHOW THE PHOTOGRAPHS: Please sit down with your model through the shoot and show them what you captured. For professional models, I stop about every 40-50 photographs. I show them what I love, what I want more of and maybe what we can omit. Each time we sit down, they get better and my ratio of great photographs increase. With new models, I stop every 10-20 photographs.
10. FREEDOM: Remember that you selected that model because something about them caught your eye. It could have been the look or their energy. Once you have them relaxed and more familiar with the camera, allow them to move around more and be themselves. You'll get magic!
11. SHOOT DIRECTION: Why are you shooting? In my case for this video, I thought James would be great for a particular agency based out of Los Angeles. We aimed the photographs to match their aesthetic. James said he wasn't the 6-pack abs model and I showed him what the market hired. I said look at ASOS Models and Forever 21 to make my point. Our direction was that, the ASOS model who was hired from that LA agency. Know your direction and reason behind the shoot!
I hope my tips help you and you find them useful. Remember this is supposed to be fun and experimental. Have fun experimenting, make mistakes and appreciate the beautiful images that you capture. Develop your own style and do not worry about the pesky critics and internet trolls!


Join the Fstoppers community for free
-
Post comments and join in the discussions
-
Browse the site ad-free
-
Share your work and get featured in the community
-
Compete in the photo contests for fun and prizes
6 Comments
Ciao Walid,
Great video, but just a suggestion for next one.
First of all the words are impossible to read, use a white text with black borders. ALways easy to read, on top of any colour.
In addition to that, I can't read and try to follow what you are doing. so I need to stop, read it, and play again to be sure I don't miss anything.
So perhaps you could either jump to shot of you in your bedroom reading and explaining this
Good idea and thank you. Yeah I struggled with that lettering for sure. I know this video was packed with information - in hindsight maybe should have made it two videos. Either way, thanks for the input and for watching it!
It's possibly worth mentioning that a lot of people open one eye wider than the other and that if you check for this at the start of a shoot you may be able to even the eyes up by shooting from the side of the less open one.
Thanks David! Good tip
Really great tips!
Thank you Dan