

Some photographers like that soft, ethereal feel as they specifically seek out types of plastic to stick in front of the lens, or even go so far as to buy defocus control lenses and LensBabies that will allow them to distort an otherwise true image. That has its value. But this isn’t for that. This is the new go-to guide for absolutely everything to know about how to get your images to be tack sharp. Get ready to dive in: this is a no-questions-left-behind study on sharpness.
UPDATE: There are parts of this article that have now been updated for improved accuracy and thoroughness. Thank you to those who contributed in the comments and to those on Twitter who helped clarify and add some points. Notes have been made where updates exist and will remain for some weeks.
You may be in that category of “artsy” photographers that wants soft, diffused images. That’s fine. But there’s no doubt that every photographer has at one point needed or wanted to create a perfectly sharp image. Below, we discuss types of sharpness, illusions of sharpness, and how to get the sharpness you want. By the end, you’ll have a checklist to make sure that everything is in line for the sharpest image possible. Regardless of your intended subject or shooting style – this will have you covered. If something doesn’t apply to you, simply skip that section and go on to the next. To the best of my ability, these are organized by things that affect every photographer and get more specific as time goes. There is guaranteed to be something that you have yet to consider in this list – so don’t be silly and quit reading just because you feel like the beginning is a bit basic. Do yourself a favor and – you guessed it – skip to the part that applies to you.
Last preface: there is nothing in this article that can't be found elsewhere. This is simply the most comprehensive list of aspects to consider for all genres of photography that I now know of.
Welcome to the most thorough sharp-shooter’s checklist currently online. You’re welcome.
1.) OPTICS
Optics are extremely important. Your lens is what guides all of the light of the real world to your sensor (I will use “sensor” and “film” interchangeably, here, unless specifically discussing digital or film concerns). Without great glass in front of your lens, you’re already shooting yourself in the foot right at the start of your sharpest image marathon.
Sigma is out on a mission to create extremely sharp glass for quite a bit less money than the competition. PhaseOne’s newest lenses are ‘future-proofed’ by promising to resolve for sensors over 100 megapixels in size (their largest sensors are currently ‘only’ 80-megapixel sensors). Meanwhile, standout companies like Zeiss and Leica create well-known and extremely loved ultra-sharp ‘cult’ lenses and extremely small but still-high-quality lenses, respectively. Needless to say, a ton of energy goes into making fantastic lenses for your cameras.
So how can you tell if you have a good lens or what to buy? You’ll need to do some research. But I’ll try to clear up some issues or at least give some hints as best I can to help you get started.
Money
First, you always, always, always get what you pay for. Very rarely will you ever find a lens that is more expensive than a similar lens, yet not as great of a performer. So what to look for… Today, any lens in the low hundreds can be good, but is generally not great. The best lenses start in the mid- to high hundreds and can easily be above $2,000 (for standard DSLR lenses, that is). Medium format and even specialty full-frame lenses can easily be upwards of $4,000.
Generally speaking, prime lenses offer more bang for the buck in terms of quality and sharpness. That’s because they’re easier (physically and financially, considering R&D costs) to produce.
Constant Apertures and High-Tech Coatings
Also, anything with a wide aperture that stays constant throughout the zoom range of the lens, if applicable, is also something to look for (f/1.4, f/2, and f/2.8 lenses fit this description well – try to avoid f/3.5-5.6 lenses or any consumer options similar to this).
Finally, lens coatings are incredibly important, as technology has progressed tremendously in this area in recent years. Zeiss’ T* (T-star) coatings are excellent at reducing common optical issues. Meanwhile, Nikon’s ED, SIC, and most loved Nano coatings are also well regarded. Just about every manufacturer (including Canon with coatings like their SWC and UD coatings) has an equivalent set of coatings whether or not they advertise them. Any coatings that advertise a reduction in chromatic aberrations, flare, ghosting, or other optical imperfections are usually pretty good at doing those things. So look for that. As a bonus, fluorite crystal "glass" elements are also appearing in modern, mostly super-telephoto lenses for their excellent optical performance and light weight.
Where to Start Looking
As a starting point, Nikon’s f/1.4G primes and Canon’s f/1.2L lenses are excellent. Canon’s entire L-series lenses are great, professional-grade lenses; and the ‘L’ marketing helps to identify them easily. Nikon’s counterpart to the L-series lenses is its ‘gold ring’ line. They don’t market it that way, specifically – you’ll have to look for the gold ring on a photo of the lens or in person. But the concept in designating a ‘pro’ line of lenses is the same. Unless they’re super-telephotos, these are almost all f/1.2 or f/1.4 through f/2.8 constant-aperture lenses.
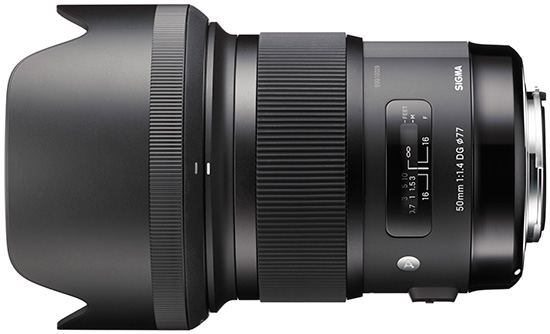
Sigma’s Global Vision series lenses (marketed as “Art,” “Contemporary,” and “Sport” lenses) from the last few years are also excellent and answer tremendously well to Nikon’s and Canon’s professional line-up. The 24mm f/1.4 Art (review here), 35mm f/1.4 Art, 50mm f/1.4 Art (pushing quality closer to Zeiss’ coveted 50mm equivalent), and the yet-to-be-announced but soon-expected 85mm f/1.4 Art are ones to pay attention to and to hold onto.
If your wallet can handle it and if you’re a real stickler for sharpness, consider Zeiss’ cult-classic, manual focus DSLR lenses. They are excellent. If you’re already considering these, however, then you know enough about lenses for me to stop elaborating, here.
Filters
Once you have your lens (or ten), use extreme caution when considering filters. You didn’t shell out the better part of your car’s value on lenses to ruin that pristine glass with crappy, plastic-like filters, did you? You don’t need UV filters for any reason, although I can certainly understand the draw to protect the front element of your investment. But if you’re going to do it, do it right. Quick anecdote: I was once headed to the desert for a wedding shoot with three brand new lenses. The thought of dirt, dust, and sand blowing into the front element didn’t sit too well with me, so I stopped by a camera store and bought three, cheap Tiffen filters (some Tiffen filters are fine, these weren’t) at roughly $30 a piece. I didn’t notice it while shooting, but when I reviewed the images on my computer, I noticed a very present, if subtle, lens flare on any image with a direct light source within or near the edge of the frame. It wasn’t pretty. I dealt with it; and everything was okay in the end. But the filters went into the trash five minutes later rather unceremoniously. Sans-filter, the lenses no longer exhibited the same flare issues. Problem solved. Lesson learned. Don’t skimp when it comes to quality filters.
So, what filters should you get? Again, get the expensive stuff. B&W and Heliopan filters are excellent, generally speaking. Stick with the multi-coated polarizers and brass-ringed filters. Variable ND filters are cheaper for a reason. They sound great, but they also have weird pattern issues at certain settings – even the “nicer” ones. Virtually all ND filters suffer from some kind of color shift, although Cokin’s recently announced “Nuances” filters promise to be the first shift-free ND filters, so you may want to check those out. And to be fair, many other, historically cheaper brands have some more expensive options these days that are on par with similarly priced filters. Stick with price as a way to judge these. It’s a lot easier that way, even if it’s more painful.
Quick Hint: The Step-Up Ring
If your lenses use the same or almost the same filter ring size, get one type of each filter you need at the size of your largest lens. Then just get a step-up ring for each lens that needs it (i.e. get 77mm filters, and then get a 67mm-77mm or 58mm-77mm step-up ring for your smaller lenses, if applicable). You’ll have to unscrew and rescrew your filters more often, but you’ll save money by not having to buy second or third sets of filters.
Vibration Reduction/Image Stabilization – or whatever you want to call it – is a fantastic feature that’s only gotten better over the years. While VR can help sharpen an image by stopping motion blur while shooting sports or other subjects while you are moving, it can also interfere with images if you’re otherwise well planted and not moving much. If you’re on a sturdy tripod and/or completely still, there’s simply no need for VR. Turn it off and save your lens the extra work. Your VR might know better than to do anything at all while your camera isn’t moving, but why take the chance?
Update: Notes on Super-Telephoto Lenses
Shooting with super-telephoto lenses poses a few specific issues. First, the more "zoomed in" you are, the more atmosphere the sensor is "looking" through before light from the subject can find it. While various haze and moisture in the air can certainly impact sharpness, the main concern in any location is that heat rising from a warming ground during the day will distort light as it travels between your subject and your camera. Think about the "water puddles" that you see in the distance on an asphalt road in the middle of a hot day -- or maybe wavy, vibrating light coming off of the hood on your car, heated by the sun or by the engine within. The concept is the same. And it is a very real concern and determining factor in image sharpness. In fact, many wildlife shooters shoot early in the morning not just because of the habits and lifestyles of the animals they are shooting, but because of the fact that heat caused by the sun will quickly start to distort the light they're trying to capture as early as mid-morning. So keep this in mind.
Moreover, the use of tele-converters will always lower sharpness -- there's no way around it. Some are better than others, but they all take away anywhere from just a tad to a very noticeable amount of sharpness.
The same goes for telephoto lenses in general. Keep in mind that there are many, many more millimeters of glass in a telephoto lens compared to a standard or wide-angle one. Each of those elements is another opportunity for extra glass and air between coatings, etc., to possibly distort light coming into the camera. This is part of why producing high-quality, sharp telephoto lenses is so expensive. So if you're shooting with a budget telephoto lens (even like the well-respected previous version of Nikon's 80-400mm, keep in mind it's not going to come close to your 50mm f/1.4).
Finally, don't discount the additional stress that a heavier and longer lens puts on your body (if you're hand-holding) or on your tripod. In both cases, you need to plan for additional stability in these situations. This may include a sturdier tripod, an even steadier grip, and/or a faster shutter speed to compensate.
2.) FOCUS
Accurately focusing is so obviously a part of great image sharpness that I won’t elaborate further on that. But how you focus and practicing better focusing habits you may not have considered can increase the accuracy and sharpness of your images every day.
First, consider using Live View to focus. If you’re on the move or shooting sports or any moving subjects, this is off the table. That’s okay – stick to autofocus and TTVF (through the viewfinder) focusing. You’re right – that’s the best option.
Use the Best Tools at Your Fingertips
But for landscape or still-subject photographers, using Live View’s ability to show you a 100 percent preview/crop of your image is priceless. It might look blurry or shaky while your hand is on the camera or while you’re punched in at 100 percent, but gently twisting the focus ring while switched on manual focusing will let you fine-tune your focus more finely than you otherwise could and more accurately (or worst case, with the same accuracy) compared to your autofocus system. Aim for the sharpest picture when using Live View to manually focus, not necessarily a 100 percent in-focus picture, since zooming in so much will often reveal a softer image regardless of how much you try to nail that focus down.
Focus with Depth of Field in Mind: The One-Third/Two-Thirds DoF Rule
Consider your desired depth of field for your image. Think of the closest point to your camera that you want in focus; and think of the furthest point you want in focus. Whatever your aperture (you’ll have to figure that out for yourself, but more on that later), if you look at your entire your depth of field, 1/3 of it will be toward the foreground of your point of focus, and the remaining 2/3 of your depth of field will fall toward the background of your point of focus. I’m sure there is a term for this, but I call this the 1/3-2/3 DoF rule (the “one-third/two-thirds depth of field rule”), for lack of a better term. Keeping this in mind will help you perfect where your focus lands. And because it’s a basic rule of optics, it’s true for digital or film shooting.
UPDATE: In spite of what I had been taught (although I think I now remember a bit about the truth, here...), I stand corrected on the rule above. This is only true if the subject is at the lens' hyperfocal distance. In other instances, the actual depth of field in front of and behind the subject of focus can range at a ratio from about 1:1 to 1:infinity. But in general, you will always see some depth of field in front of your focused target and the same amount or more behind that point.
The Rocker
For portraits or any work that requires an extremely wide aperture (and that therefore exhibits incredibly shallow depth of field), consider rocking your body gently back and forth between in- and out-of-focus areas while firing off a few frames in quick succession. This way, you’ll have at least one shot in the middle that has the front eye, for example, in perfect focus. This article by Dani Diamond actually discusses a number of tips in addition to this to help photographers shooting at wide apertures (rereading it, we unsurprisingly enough use a lot of the same terms).
3.) APERTURE
Diffraction
A combination of basic depth of field laws with respect to narrow apertures and things like Ansel Adams’ and Willard Van Dyke’s Group f/64 have quite a few of us thinking that we need to stop down to the narrowest possible aperture in every scenario to get incredibly sharp images. This, however, couldn’t be farther from the truth – sort of. Depth of field and sharpness are not the same thing. And as we stop down our apertures, our images begin to show something called diffraction. Diffraction is an optical property of all lenses and happens more and more at all apertures anytime you close down to the next smallest aperture. For most cameras, however, diffraction is not noticeable until reaching f/11 or, more commonly, f/16. Reaching f/16 and beyond, however, almost always begins to introduce quite noticeable diffraction that cuts into the sharpness of the photograph. Sharpening in post can help, but this practice is not a replacement for simply shooting at the sharper aperture of f/8, for example.
Best F-Stop for Diffraction and Hiding Lens Flaws Meets at the Lens’ Sweet Spot
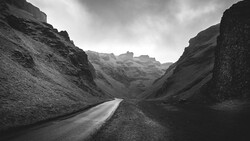
An image shot at f/2.8 will also have more diffraction than one shot at f/2. But diffraction at this level isn’t noticeable; and the image will still appear sharper at wide- to mid-range apertures like f/2.8-8 because stopping down also reduces the effects of flaws in the lens such as chromatic aberration. For these reasons, stopping down slightly from the widest possible aperture puts most lenses into their “sweet spot,” at which point they’re at their sharpest. Therefore, it’s always recommended to shoot at the widest aperture that still gives the depth of field necessary for your desired image. This will usually still be f/5.6 or f/8 at minimum for most landscape photographers. But if you have little to no true foreground, also consider that depth of field and field of focus increases exponentially as your subject’s distance increases from the camera. Therefore, if you’re shooting a mountain range, the closes trees from which might be a few hundred feet from your camera, you will likely be able to easily get the entire image in focus with f/5.6. This would allow you to benefit from minimal diffraction. The video below is a fantastic explanation of diffraction and should be watched all the way through at least once by any photographer or anyone who is at all unclear on how to combat its effects.
The Illusion of Sharpness and Focus-Based Contrast
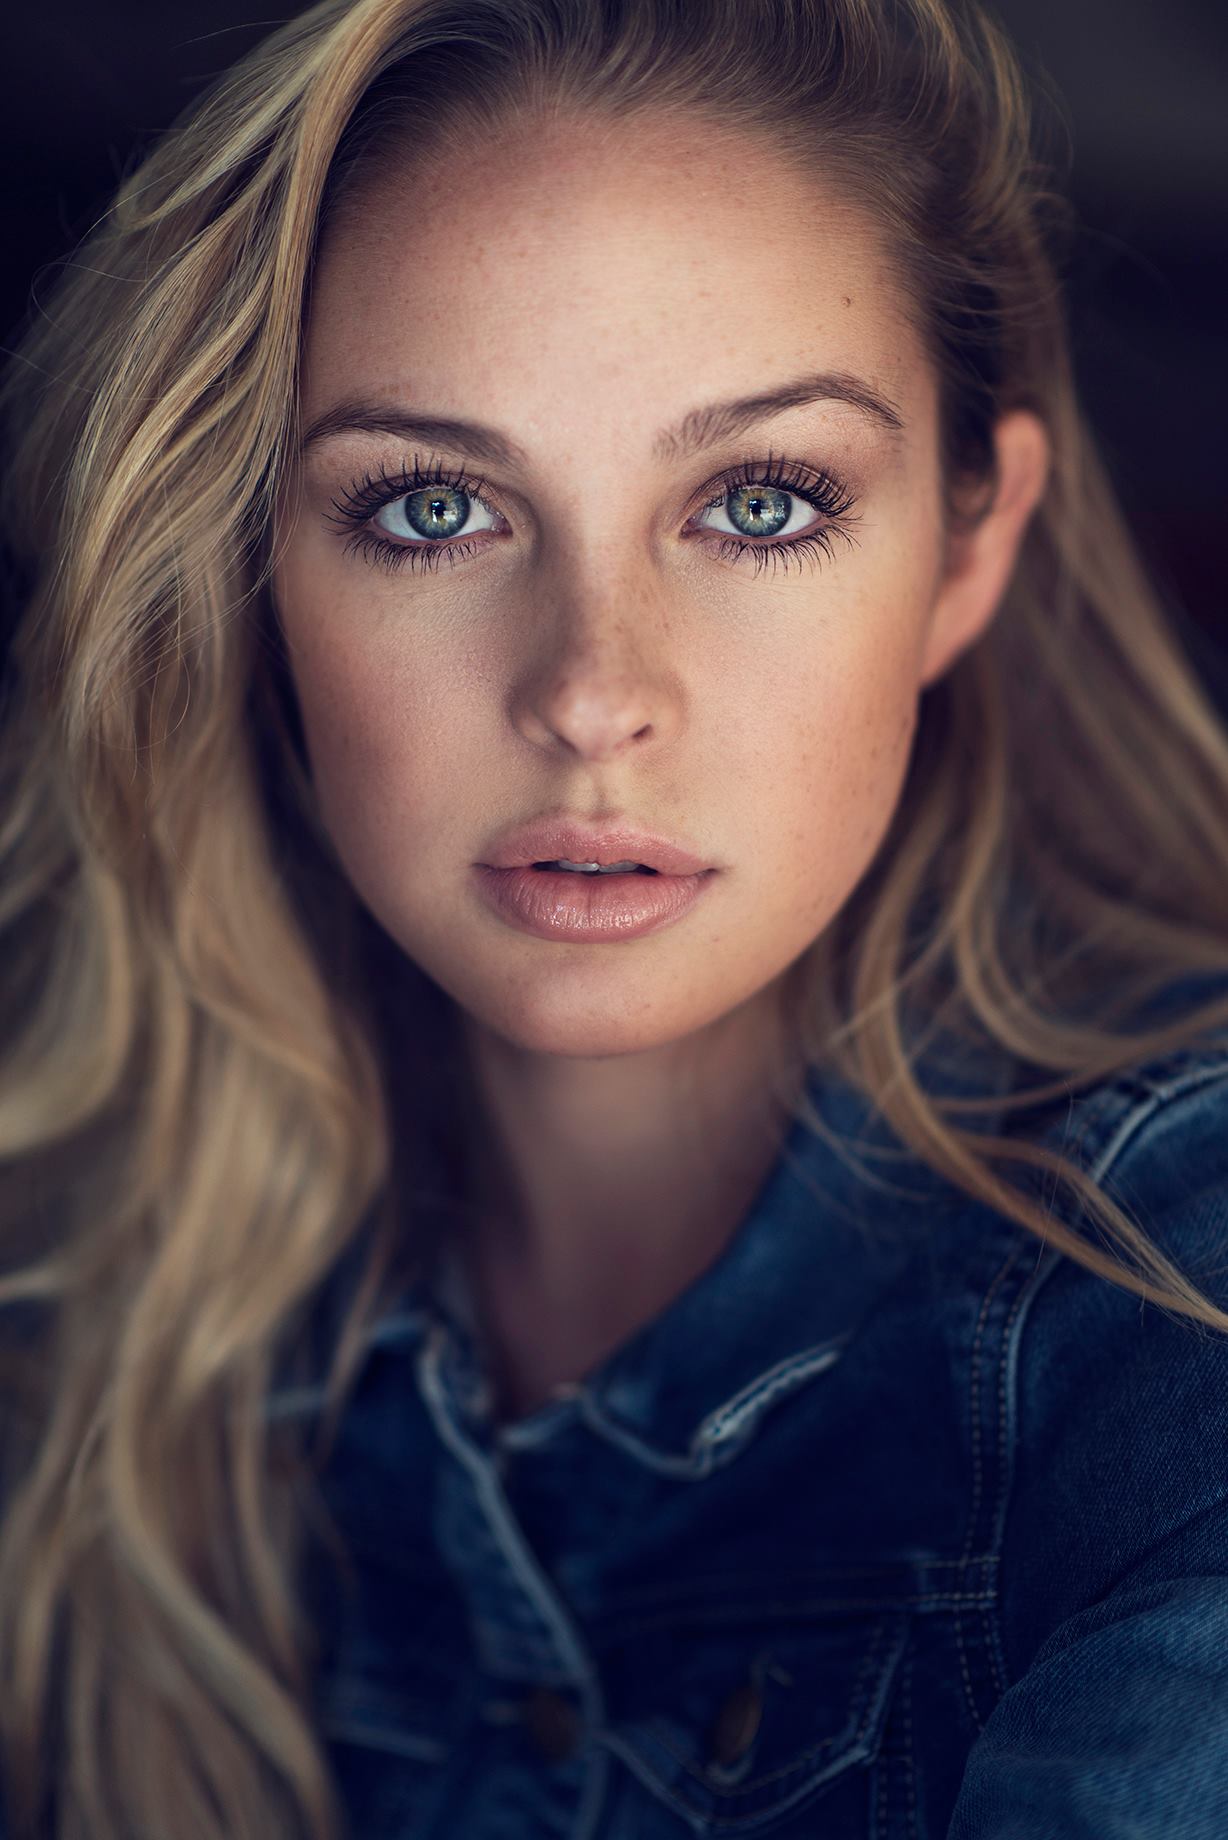
Contrast always excites the eye. And sometimes sharpness isn’t about getting the entire frame sharp, but instead relies on creating an illusion of extreme sharpness by increasing depth and introducing only one completely sharp element into the frame, creating contrast between what is sharp and what is soft. This is what often happens in excellent portraiture. Look at Dani Diamond’s photographs (who are we kidding? You all have….you know what I’m talking about). Not a single one of his photographs is not sharp. Yet he shoots between f/1.4 and f/2.8 for a lot of his images, depending on the lens/camera combination he’s using.
In portraiture, macro photography, and other genres that require a subject that is relatively close to the camera, soft areas of focus do not negate the need, desire, or eventual impact of paying attention to what will make your image sharp. With few exceptions, every image will have one sharp area that will become the focal point of the image. Sharp portraits help any emotion stand out. Luckily, portrait and macro photographers rarely have diffraction issues because of the apertures at which they shoot (though some macro photography requires extremely small apertures and large amounts of light and/or focus stacking to get the necessary depth of field to create and even remotely legible image, but that’s another story). Instead, such genres require an acute sense of perfect focus, which usually means rather robotically shooting many images with a rocking technique previously discussed (literally rocking your body back and forth either with manual or automatic focusing enabled – I don’t think it matters…I do both at certain times with great results).
4.) ISO
This one is easy, but the lower the ISO, the sharper your image will be and, it just so happens, the better your color rendition/reproduction will be, too. So shoot at the lowest possible, native ISO at all times. That means there’s no need to go to the “Low 1” or similar settings for ISO. But whether it’s ISO 50, 64, 100, or 200, use the lowest number your camera allows when possible.
If you’re shooting moving subjects in lower-light situations, it may be more beneficial to shoot at a slightly elevated ISO to allow for a higher shutter speed to freeze motion. You’ll have to decide whether you want motion blur or, alternatively, more grain/noise in your image. The only way to get around those issues is to add a lighting setup to the mix. More on that in 6.) Flash Sync Speed vs. Flash Duration.
5.) SHUTTER SPEED
Of course, shutter speed directly affects the sharpness of an image. If you’re shooting too slowly on an inadequately stabilized surface or while photographing a moving subject, you’re going to introduce motion blur. This can be okay if you want it (following a subject with vibration reduction on can blur the background nicely while panning with VR as an aid can help keep your subject relatively sharp).
If you want to avoid motion blur, consider both your own movement and that of your subject at all extremes (or consider using additional lighting, as discussed in 6.) Flash Sync Speed vs. Flash Duration).
For extremely long exposures one might use in landscape photography, be weary of every possible fraction of a millimeter of movement. Have a sturdy tripod. Dig its feet hard into the sand before framing and taking your exposure. Use a remote shutter release/cable release so as not to disturb the camera with your hand. Use mirror lock-up to first bring the mirror up (which causes more vibration than merely opening and closing the shutter, which is relatively light weight) before triggering the shutter. Make sure your ball head (or whatever head your camera is mounted to) is adequately tightened so it doesn’t loosen itself over time and sag. The same goes for all of the adjustable components of the tripod – even the tripod plate on your camera. Be sure that your tripod and head are both large enough to support the weight and position of your camera. Consider mounting your camera at your lens’ tripod plate, if applicable, instead of on the camera body. Hang a heavy object like a camera bag from the center column of the tripod to add stability, but only if you can keep it from swinging from a breeze, which could unintentionally add movement, of course.
For extremely fast action shots, consider using your highest shutter speed possible, including a possibly higher speed with an electronic shutter if your camera supports it (a lot of mirrorless cameras and pro-sumer micro-four-thirds and APS-C cameras are beginning to support shutter speeds above 1/8000 of a second with such features).
Remember, on a full-frame camera, handholding barely works at a shutter speed of 1/[focal length] of your lens. So if you’re shooting on a 50mm lens, you can technically shoot at 1/50th of a second (200mm lens can be handheld at 1/200th of a second, etc.). I prefer to double that -- at least -- to get truly sharp images. And all of this is assuming you’re shooting a completely still subject. Depending the speed of your subject, you’ll want to at least quadruple that number (actually, divide by four so it’s four times faster) if there’s any movement at all. Too often do photographers underestimate the necessary shutter speed for sharp images. And this is something you never notice until you get back to the computer since images with small amounts of motion blur look quite sharp on your camera’s display no matter what. So when in doubt, shoot at a faster shutter speed -- way faster.
UPDATE: A proper handhold is, naturally, one of the most important parts of pushing the limit on slower shutter speeds. In addition to having a solid stance with your feet roughly at shoulder's distance apart, you should have your elbows tucked into your chest, and your left hand should support the weight of the camera. People will argue that two or three fingers should pinch the lens, but I've found that personal style is flexible here. I grip specifically with the thumb and one or two fingers, but I do tuck my other fingers on the lens and/or between/around the lens and the front of the body near the mount. Holding your breath at the time of shooting also helps stabilize your body as a system.
6.) FLASH SYNC SPEED VS. FLASH DURATION
Adding lights to the mix is often necessary for the creative vision of the project as much as it might be necessary for technical aspects of the project to get enough light into the frame at your desired settings. However, different kinds of lighting and various physical properties of light present a number of things to consider when adding lights into the mix.
Constant lighting won’t help freeze a subject, but the addition of light can help get to the optimal aperture and/or shutter speed to aid in freezing a subject. That’s that.
Most of this conversation considers options and settings when using strobes. Flash sync speeds and flash duration are often mixed up and confused, but both are independently important.
Flash Sync Speed Primer
Flash sync speed is essentially the shutter speed at which your camera fires while your flash goes off. However, in the context of this term, most people are really talking about minimum flash sync speed (minimum meaning fastest shutter speed/shortest time). This is the minimum shutter speed at which your flash can fire while still exposing an equal amount of light across the entire frame. For more information on why this is important (if you don’t know already or if it’s not enough to know that it is important), check out this awesome explanation.
Most DSLRs feature a minimum flash sync speed of 1/250th of a second. This is decent, but far from adequate for most high-speed action scenarios. And thus, we have several other options.
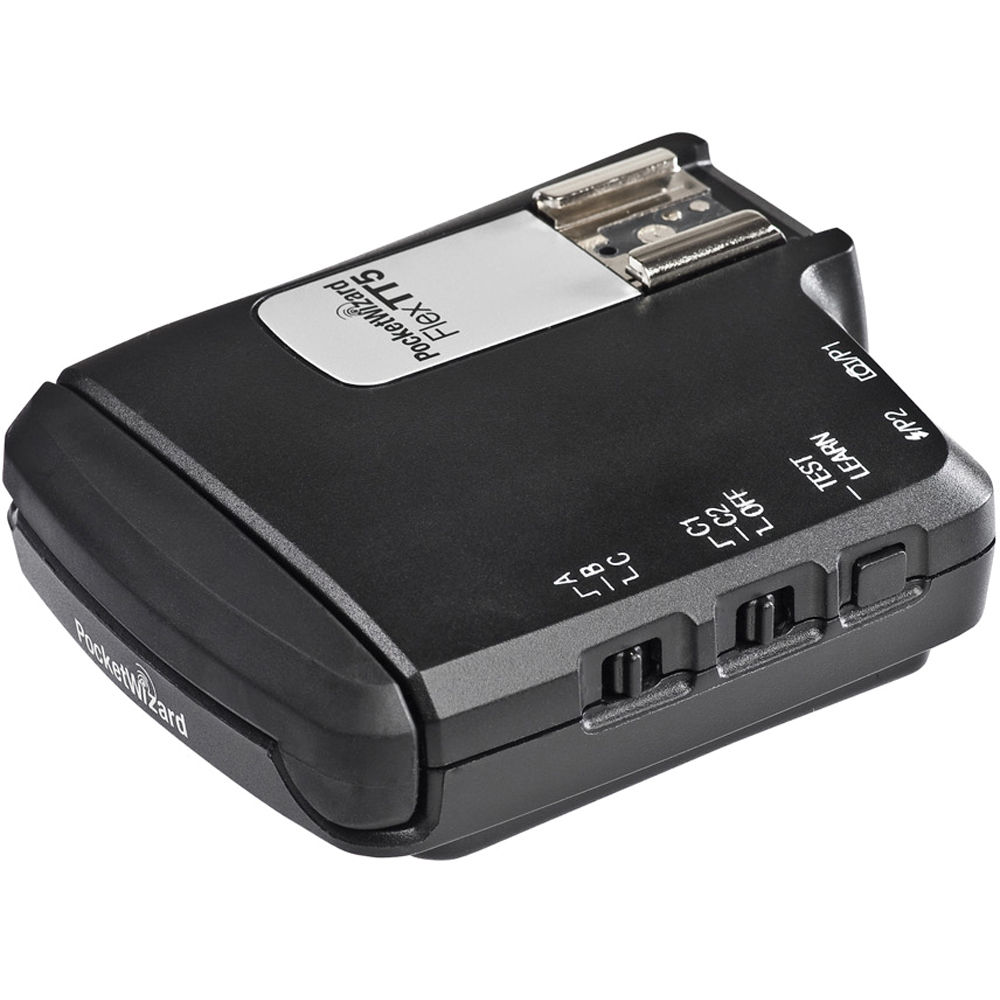
How to Get High Flash Sync Speed
A high flash sync speed helps reduce your shutter speed so you can freeze motion with greater ease. While the standard 1/250th is often too slow, special triggers like some made by PocketWizard can increase these speeds to upwards of 1/1000 of a second with minimal drawbacks.
Alternatively, medium format cameras and other high-end camera and lens systems (mostly all medium format or larger, however), feature lens lineups that have built-in shutters called leaf shutters. Not only are they built into the lenses, but they also work differently than your camera body’s focal plane shutter and allow flash sync speeds of close to 1/2000th of a second. So if you absolutely need to shoot at a higher shutter speed with flash, you may want to consider buying/renting/borrowing a medium format setup for your project. Just be sure, in this case, to get compatible leaf shutter lenses – not all medium format lenses feature leaf shutters, as it’s not uncommon for most medium format bodies to also feature focal plane shutters that take over in most scenarios and for which most lenses lack a leaf shutter.
Short Flash Duration
Flash duration is the amount of time that it takes for a strobe to fully ‘expel’ 100 percent of its light/power and is highly dependent on the type/quality of flash as well as the power output/setting of a particular pop of flash that you can set on a per-image basis. Generally speaking, lower power flash settings can complete their cycles in much shorter flash durations while flashes at full power will take longer to emit 100 percent of the light intended for an exposure at full power. Of course, we are talking thousands of a fraction of a second – but this all makes a difference when trying to freeze fast action like splashing water or spraying sweat off an athlete coming into contact with a ball.
With the combination of a short enough flash duration and powerful enough flash (think Profoto, Broncolor, and even the quite affordable Einstein E640 that feature minimum flash durations above 1/10,000th of a second), it will be the duration of the flash that ultimately and effectively becomes your shutter speed, if you will, since the flash will be exposing the action in the image for that short amount of time. The shutter, therefore, can stay open to record more information in the background such as ambient light. However, the actual shutter speed is often considered inconsequential in these circumstances and is merely a byproduct of necessity when considering a required speed for accurate flash syncing (i.e. you can shoot at 1/50th of a second while still freezing action with strobes that have extremely short flash durations). In this case, it is the flash duration and not the shutter speed that will determine the sharpness of the image with respect to motion blur. It's important to remember, however, that depending on ambient light and other factors surrounding your project, a fast shutter speed may still be very necessary despite ensuring high flash sync speeds.
This video by Broncolor shows the importance of short flash durations. While it's produced by them, the last statement in the video isn't entirely true. The Scoro is a great system, but you can get short flash durations from plenty of top-of-the-line packs and strobes even if you can't independently set power based on flash duration from the pack (in this case, it would simply be trial and error).
7.) DIGITAL SHOOTING CONCERNS AND CONSIDERATIONS
We all love digital; but that doesn’t mean we don’t have to be mindful about a few things when using digital sensors to record our images.
Megapixels/Resolution
Yes, there’s a difference. But for the most part, a higher megapixel count will yield a higher resolution and sharper image. Large pixels help with other things like color rendition and light gathering ability (the latter of which would help with higher ISO images). Of course, oversampling your final output by shooting at a higher resolution than necessary for your intended final output allows you to effectively downsize your original file, which will always increase sharpness for that particular application relative to that same file printed or displayed at 100 percent. So if you have the chance to shoot 80 megapixels for a 16x20 print, go for it – it certainly won’t hurt, even if it’s overkill. But for use practical beings, match your resolution with your intended print/output size.
A decent printed image is printed around 250dpi to 300dpi. This refers to the linear resolution of the file. In a perfect world, your resolution would match or beat your print quality. So a 24-megapixel D750 file is roughly 6,000 pixels horizontally. At 300dpi, you could print that file at 100 percent to 20 inches wide, making a 13.3” x 20” print. In reality, you do have more room than that. You likely won’t notice much of a difference printing at twice that size. But at some point, there will be noticeable degradation in the print quality.
For online or digital consumption, today’s highest-quality monitors prove no match for the modern DSLR file. At the equivalent of eight megapixels in size, a 4K monitor doesn’t even come close to requiring all of the 20+ megapixels of today’s modern, professional and even simply pro-sumer cameras.
Anti-Aliasing Filter
Here’s something that has changed significantly in the last few years. Moiré is an effect that plagues images exhibiting various, fine-detailed patterns when created with modern, digital, Bayer-interpolated sensors. The combination of the interpolation of pixels and pixel size can create an odd and often irrecoverable iridescent effect across variously patterned subjects. To combat this, manufacturers historically added what’s known as anti-aliasing filters on the front of the sensor. These filters simply blurred the light ever so slightly just before it hit the sensor to help spread the pattern over several pixels, mitigating the effects of moiré.
Recent advances in technologies in addition to a shift in thinking have led manufacturers to start forgoing the anti-aliasing filter in order to maintain critical detail and sharpness in the image. Some manufacturers have gone so far as to rearrange the pixels on the sensor in new ways to avoid moiré while others use improved digital processing and other advancements or a “deal with it, it’s worth it” attitude; but image quality and sharpness certainly benefits from this change.
Most consumer, pro-sumer, and even professional cameras, still have these filters. But more and more are beginning to lose them (Nikon’s D800E, D810, Canon’s 5DS R, and today’s medium format digital cameras all forgo the anti-aliasing filter). Getting one of these cameras can improve sharpness in a way that is impossible to do any other way.
Here's a quick D800 and D800E comparison article to help illustrate difference in the two bodies' images due to softness that an anti-aliasing filter might introduce.
In-Camera Sharpening
Unfortunately, many non-professional cameras sharpen their images way too much in order to maintain the illusion of sharpness at less-than-100-percent resolutions. However, when examining the file more closely, it becomes apparent that the file has been over sharpened in an attempt to mask other flaws. Over sharpening creates artifacts in an image that ultimately and counter-intuitively make the image look less sharp.
UPDATE: That said, professional cameras also have in-camera sharpening settings (some are adjustable, and some are not). In these cases, I tend to lean with manufacturers' suggestions of "normal" because they know their images better than anyone else. If they think an image needs a certain amount of sharpening at least as a starting point (and don't be misinformed -- every image needs some sharpening), then they probably know what's best and have taken numerous steps in the form of testing, etc., to ensure they have a decent formula already included in the camera's software.
8.) FINAL OUTPUT
Printing
A portion of this was covered above, but be mindful of the type of print you’re receiving (and be mindful of your final intended output as you’re taking the photograph and/or planning what gear to use for a particular shoot). That $3 poster print from Costco is $3 for a reason. And that $48 fine art print of the same size is $48 for a reason.
If you’re printing at home or have the luxury of working with a printing professional on an inkjet print, be sure you’re using high-quality, brand name inks. Other manufacturers sell similar ink that may perform on par with the real thing, but you can never be sure of another manufacturer’s quality – and sometimes you won’t find out for years until the print starts to fade just a few years later instead of lasting a lifetime. Clean print heads and proper ink/paper settings are also crucial to a great inkjet print.
In a better world, a true photographic print like a C-Print/Lightjet/Lambda print is the best you can get. Whether printing a film or a digital photograph, printing onto light-sensitive paper means that the colors are actually embedded into the paper. It should last longer, look better, and be as sharp as possible this way.
Printing on special papers like Kodak’s Endura Metallic paper can be a great option for your particular print. And it’s a fantastic paper. But sometimes the iridescence/glow of the print can add a slight softness to it. That doesn’t mean prints aren’t sharp on this paper. It’s just something to consider, that’s all. Most prints onto actual metal, however (as opposed to in paper that has metallic features embedded into it), is almost always noticeably softer than a true print. Kodak’s Endura Metallic paper is still a far better option in this case and still offers true, photographic printing.
If you’re simply considering a standard luster, semi-luster, high-gloss, or matte print, be sure to use high-quality, fine art papers. Companies like Hahnemühle, Strathmore, Moab, Ilford, and Red River are just a few of the better and more respected names out there (in no particular order). Between these companies, you can find plenty of photographic and inkjet papers covering a wide gamut (no pun intended) of finish options and paper types.
Back to printing a digital inkjet for a moment: one more time, be mindful of your DPI in the printer settings. Don’t print at 72dpi. That’s for web – end of story (and even that’s changing with the advent of retina displays). But do you absolutely need to print at 300dpi? Maybe not. Will your print be up on a wall above most people’s heads? You could probably easily get away with printing a larger image at 150dpi in that case. Test your particular print with different settings before making your final decision.
For scanning options in consideration of final output, refer to 10.) Film Shooting Concerns and Considerations.
9.) EDITING
Too much editing will always negatively impact your image – actual and perceived sharpness included. I recently visited a “fine art” gallery in Vegas’ Bellagio that was selling high-priced, super saturated landscape images, each about three to four feet wide. From outside of the store, looking in, the prints looked okay (grossly oversaturated, per some people’s tastes, but the quality looked fine). Upon closer inspection, however, the image reeked of poor editing. Luminance of certain hues was obviously overdone as parts of the sky started to blotch out. That wasn’t helped by an over-adjustment on toning down highlights, which lined and filled the clouds with the indicatively over-highlight-controlled gray halos. Meanwhile, the blacks under the pier were incredibly noisy from being brought up too much. And all the while, interestingly enough, not enough work was done because the edges of the pier suffered terribly from chromatic aberration – something easily fixed in post these days. Terrible editing led to what might otherwise have been a fine print. I immediately felt sorry for anyone that was somehow awed by this obviously broken image.
Sharpening in Post
Sharpening in post is a big deal, as it should be. Digital files are always a bit soft (so the same goes for digital scans of film files). Sharpening is, therefore, critical in order to gain some of the missing detail in these files. But too much sharpening can lead to trouble in the same way that it does when a consumer camera over sharpens an image in-camera. There are a million and a half ways to do it, but consider some kind of selective sharpening technique that isn’t a 100 percent global sharpening solution (use various types of selections in Photoshop or the masking tool in Lightroom). I’ve included one video below of one person’s solution that works quite well.
I especially make sure to sharpen photos even a tad more for my Instagram account since I can really get away with it to really help the image pop. In the second image, however, you can see how over sharpening in the Instagram app before posting led to artifacts in fine details like the thin strands of hair in the air.
This article by Trevor Dayley discusses the best way to ensure your images stay sharp on Facebook. If you want to keep them sharp for Instagram, keep in mind Instagram recently increased its image resolutions to 1080x1080 pixels to give a better experience on higher pixel density displays.
10.) FILM SHOOTING CONCERNS AND CONSIDERATIONS
Film is a beautiful medium. But when put up against its digital alternatives, it’s easy to think of film as cumbersome and time-consuming. Still, there are several reasons that you may want to stick with film – and if you want the sharpest image that humans can possibly product, you may have no option but to consider large-format film.
Type of Film
Your film is your sensor. If you don’t get this right, there’s no coming back from it. Use low ISO, professional films to get the sharpest, highest-quality images. That’s an obvious one, yes. One more semi-obvious one: the larger the film, the sharper the resulting file. This is like increasing your megapixel count and sensor size at the same time -- it can only help.
Film Scanning
Film scanning is where most detail will be lost. And unless you’re printing an unedited version of your film shot directly from the negative (which is quite rare these days), you or your lab will be scanning your film.
The first type of scan to realistically consider is a dry, flatbed scan (these will be in ascending order of quality and expense). Whether at home or in a lab, this will be done with something similar to an Epson V750 Pro or V850 (which is somewhat of a standard in its category today). A dry flatbed scan consists of placing your negative in some kind of plastic holder, placing that into the scanner, and scanning it to your computer. Of course, selected scanning resolution, sharpening, dust removal, and calibration/placement for focus (flatbed scanners don’t focus on their own – you need to adjust the holder to be at the precise height for your specific scanner via the good ol’ fashioned and extremely scientific trial and error method) all affect the final output.
Next up is a dry, glass-mounted flatbed scan. This is identical to the previous scan, but involves sandwiching the film into a glass holder that keeps it more flat, therefore increasing the overall sharpness by ensuring uniformly sharp “focus” across the image, assuming the aforementioned calibration was well done. You’ll hear the term “Newton glass” to refer to a special type of glass that keeps Newton rings from appearing in your scan. Google it if you’re so curious, but know that you’ll want that Newton glass (you often don’t have an alternative if you’re shopping around for glass holders for your scanner).
Wet, glass-mounted flatbed scans are surprisingly (or not-so-surprisingly) much sharper than their dry-mounted counterparts. Much in the same way that water helps our eyes focus and stay sharp, the same goes for a wet-mounted negative between two glass plates. The water removes tiny air gaps that might otherwise diffract/refract light passing through the negative and glass for the scanning process. It’s a serious pain considering you have to get the mounting solution, clean the negative, mount the negative, scan the negative, and then clean and dry the negative once more before storing it. But this represents the first real and impressive jump in scanned image quality. A well done wet-mounted flatbed scan can easily exceed the cost and quality of the following option depending on film type and other factors (such as the competency of the lab tech).
Noritsu or Frontier scans are done on big machines by the same names and are often offered side by side (with few, but noticeable and important differences to some, depending on personal preference). Many, many film labs use these machines; and they create excellent, quick, and rather cost-effective results.
Hasselblad’s Imacon scans are “virtual drum scans.” Film is slightly bent to make it “equidistant” so focus can be more accurate. They’re quite good; and a large part of the industry loves them. I’ve only personally had experience with one Imacon scan in Vienna and had a poor experience. The test scan was noisy and unusable. In fairness, I suspect something was wrong with that particular scan for whatever reason. But most of the industry does agree that it is expensive for what it is given the alternatives and that this “poor man’s drum scan” is no replacement for the real thing.
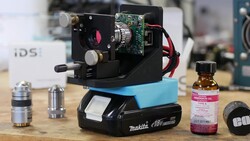
PhaseOne’s new-ish (they have a newer one that was recently released, but they’ve been at this for a while) scanning backs are essentially the same thing as their medium format digital camera backs, but with a few tweaks to make them more capable image scanners. A light table pushes light from behind the negative via a glass and/or wet-mounted holder and into the lens, which finally directly light onto an 80-megapixel image sensor. Multiple, closer “photos” can be taken and then combined for a higher resolution “scan,” or one image can be taken for an up-to-80-megapixel scan. I recently got a quick look at the process at Digital Transitions in New York a few weeks ago (quick iPhone shot below). These are highly regarded, but they are rare, and it’s currently difficult to find any labs that have this equipment.
Drum scans are the holy grail of scans. They’re rather time-consuming and require expensive equipment (doesn’t it all?). And at around $500-$600 a pop (give or take depending on who, what, where, etc.), they are anything but cheap. But a drum scan gives the sharpest image money can buy. And the combination of expertly exposed large format film and a good drum scan is impossible to beat even by today’s highest quality digital solutions as far as I’m concerned (some will argue with me on that, but I haven’t yet seen proof of their claims with my own eyes). Meanwhile, I’ve been promised by some that PhaseOne’s scanning back can do at least as good of a job as a drum scan can. I will have the opportunity to explore this further in the near future and will update this at that time.
Conclusion
No one ever said it would be easy. There’s nothing easy or cheap about getting tack-sharp images. It’s certainly not for those who are lazy. But neither is photography as a profession, in that case. So buck up, save up, and look up to a higher standard. Below is your checklist for ensuring you have the sharpest images possible.
Did I miss something? Let me know -- I’ll add my take and/or research any answers to questions you might have.
Reminder-Style Checklist (Use this checklist before every shot to make sure you are ready to capture images that are as sharp as possible):
- Optics
- Start with great optics: you get what you pay for
- Constant apertures and professional quality glass w/ great coatings
- Caution when using filters: go big and use step-up rings if necessary to save a buck
- Focus
- Live View/TTVF
- Manual/AF
- 1/3-2/3 Rule for DoF
- Aperture
- DoF considerations
- Diffraction (f/11 or under?)
- Optimal/“sweet spot” f-stop for your lens?
- Shallow DoF sharpness considerations for portraits/products/close object
- ISO
- This is easy: lowest ISO = highest quality for both sharpness/structure rendering and color whether digital OR film
- BUT: Remember to balance ISO with ability to shoot at an adequate shutter speed. May be better to shoot at slightly higher ISO to allow a ‘frozen’ image at a higher shutter speed
- This is easy: lowest ISO = highest quality for both sharpness/structure rendering and color whether digital OR film
- Shutter Speed
- Subject Moving
- If subject moving, may require high shutter speed
- If subject moving extremely quickly, may require more than 1/8000 shutter speed (i.e. electronic shutter or, more likely, extremely short flash duration needed with good flash setup – see, 6.) Flash Sync Speed vs. Flash Duration)
- A monopod may not be necessary, but in certain circumstances, it can also help steady a shot (especially for sports/motor racing applications)
- Subject Not Moving
- Mirror Lock-Up if subject is not moving and/or if you want to leave the shutter open for a landscape shot
- Sturdy Tripod
- Subject Moving
- Flash Sync Speed vs. Flash Duration
- Flash Sync Speed
- High enough for your moving subject and/or the background?
- In-Lens Leaf vs. In-Body Focal Plane Shutter?
- Flash Duration
- This is what will freeze aspects of your image even more than your shutter speed can or will
- BUT: This requires extremely fast/short flash duration, which is unrelated to sync speed (think of the flash duration as your shutter speed in these scenarios – if it’s a ½ second, you’re going to have a blurry image if there’s any motion)
- This is what will freeze aspects of your image even more than your shutter speed can or will
- Flash Sync Speed
- Digital Shooting Concerns and Considerations
- Megapixels/Resolution
- High Megapixel Count
- Oversampling possibility – compare to intended print/display size
- Large Sensor Size
- Anti-Aliasing Filter
- High Megapixel Count
- In-Camera Sharpening (consumer vs. pro-sumer/professional cameras)
- Megapixels/Resolution
- Final Output
- DPI vs. PPI
- Check/Consider Print Type:
- Paper (fine art papers vs. consumer grade, matching to printer/ink if applicable, metallic papers, etc.)
- Emulsion/Lightjet vs. Inkjet, etc.
- Ink Type
- Focus and stability of print/printing table if printing yourself
- For scanning considerations with respect to final output concerns, see, 9.) Film Shooting Concerns and Considerations
- Editing
- Too much editing will always degrade image quality, including sharpness (this goes for film/darkroom ‘editing’ as well as digital editing whether from a 100 percent digital file or from a scanned file from film)
- Sharpening
- Film Shooting Concerns and Considerations (Largely same as with any photography, but some special considerations, here)
- Type of film
- Low ISO is obvious, but professional films and even slide vs. negative films will behave differently (read reviews/experiment first)
- Film scanning is where most detail will be lost, assuming the negative was exposed well and the image was originally well-focused, etc.
- Type of scan (in increasing order of quality and expense – some of this is debatable)
- Dry, plain flatbed scan (Epson V750 or similar)
- Dry, glass-holder flatbed scan
- Wet-mounted, glass-holder flatbed scan
- Noritsu/Frontier scan
- Imacon scan
- PhaseOne Scanning Back OR Drum Scan
-
If you're passionate about taking your photography to the next level but aren't sure where to dive in, check out the Well-Rounded Photographer tutorial where you can learn eight different genres of photography in one place. If you purchase it now, or any of our other tutorials, you can save a 15% by using "ARTICLE" at checkout.
- Type of scan (in increasing order of quality and expense – some of this is debatable)
- Type of film


Join the Fstoppers community for free
-
Post comments and join in the discussions
-
Browse the site ad-free
-
Share your work and get featured in the community
-
Compete in the photo contests for fun and prizes
50 Comments
This post will forever be the Godzilla of Sharp. Nice.
The beast is alive. IT'S ALIVE!! MUAHAHAHAHA
That's how to lay it out there!
As far as Nikon primes goes, the 35mm, and the 50mm f/1.8G are sharper than the f/1.4G offerings. The 85mm f/1.4G is still the king of Nikon primes though. Being sharper than the 85mm f/1.8G, and just about any other piece of glass I know of. Just wanted to put that out there. Other than that, great article. I agree witth Adam; Godzilla of Sharp!
Sharpness is... Relative!
I like it! New theory of relativity right there! :-)
I absolutely agree! All of this is good, but i can and do get acceptable photos with much less than the top of the line gear indicated here. Mid-range gear stopped down a little does wonders too.
That's true. This is all relative, where the idea was to give the best possible circumstances as "goals" to reach for. In every instance, you can compromise here and there without a noticeable difference.
Thank you for such an in depth and thorough article. I rarely read articles so slowly and thoroughly. I learned a lot from this. Thank you.
This post deserves to be in a book!
It would be amazing if the authors of f-stoppers could come together, and make "a book of basics" that provided information at this level about all topics considered "basic". I really like the f-stoppers way of putting things, and the video tutorials are great, but a hardcover book would be even better.
The hardcover book idea is interesting... I can't speak to that...but as for the idea of getting that particular information out there.... Sssshhhhhhhhhh! Don't give any secrets away... ;-)
Longest most depth post ever on fstoppers! lol! This will take me a few days to fully read but from the parts I've read it is very interesting!
Quite surprised to see no mention of the importance of a proper camera handhold.
Safecracker Handhold™ (left hand pinching lens between thumb and middle finger) is very popular, and any time I've had the opportunity to see shots taken by people who shoot that way, they're always at least slightly blurry from camera shake.
See! I can forget something! Of course, I'm thinking of a tripod in my head for most instances... But yes! I will update the article with your suggestions in the near future. Thank you for contributing.
Really great and detailed article!
Funny thing about the shutter speed section, I find I need a exposure double my focal length as well. I've also found some people can stay much more still which affects what SS you can use too.
Yes. I think the entire 1/[focal length] thing is in the best of circumstances when you're shooting a still subject and are very steady. In real life, that doesn't happen too often :-)
Any advice on the tele end. Alot of these examples were with situation 20ft of the camera.I find myself second guessing myself with sharpness and softness for shooting subjects that are really far away (using a 400mm). I force myself to give myself a leeway when zooming to check focus, since when shooting subjects that far away. Than if they are relativity close to me.
First of all, thank you for reminding me (in the context of telephoto lenses) to update the article with a quick mention of teleconverters and what those do (in addition to other adapters, etc.). You probably weren't expecting that to help remind me, there...but thanks, anyway :-)
Second, I will also update the article with some words about your question, here, in the near future.
For now, I assume you're not using a teleconverter (those can cause sharpness issues, of course). Are you on a tripod with that 400mm? What's your shutter speed like (probably needs to be 1/1000th at least)? Is your focus tested and/or sharp/spot-on for sure? Finally, the more telephoto your lens is, the more atmosphere is between you and your subject...assuming you're shooting a ways out. If I recall correctly, Backcountry Gallery also had a great video discussing this (I think it was them/Steve). But people often underestimate the dust in the air, etc. More than that, even, is the effect that heat has on light as it comes up from the ground during the day. This -- aside from following natural animal lifestyles -- is actually a main reason why wildlife photographers shoot so early in the morning -- so that heat won't come up and distort light before it can reach the lens.
I hope that gives you a good start. But it looks like I do need to add a few hundred more words to this article.... :-)
Yeah great article none the less. I am not using a tele converter. If I am handhold I limit myself to 1/1000 or faster. But I lately have started to use a tripod and I know I can shoot down to 1/250 no problem I've repeated it several times now. Which lets me use the lowest ISO obviously, I digress. I have heard that too that the atmosphere, heat etc. all have effect. I believe I am second my guessing myself and saying that it isnt "sharp" but actually is and that other elements are softening the image up a little. Like I said I give myself some leeway and also only zoom 1:3 not 1:1. If they were closer I'll use 1:1 and its always sharp and yes wildlife is typically a good distance away and not filling the frame. Maybe this image will help with distance....maybe. I feel like this could be sharper when zooming in to check focus. I try to force myself to not be over picking with pixel peeping. So zoomed out it looks great but like you said heat will have a major effect. This was shot at 1/2pm with zero cloud coverage. 400mmL 7d2 1/500 f/8 iso 200 on a tripod no crop.
Thanks for the info. I would guess that the 7d2, as great as it is, might be limiting you just a tad on the sharpness IF we're pixel-peeping at the 1:1 level. But then ANY camera would be "limiting" a tad at 1:1. The only ones that have impressed me to the point where my jaw just drops are the high-megapixel, full-frame, ANTI-anti-aliasing filter bodies like the D810 and the Canon 5DS R. I'm not saying you need to get a new camera. But yes, maybe keep in mind that these things are still affecting every image ever so slightly when you're looking 1:1. Your images may be a perfect candidate for a well done post-applied sharpening method...
That's a lot of supposing and assuming... Hopefully it helps :-)
KM: I'd suggest that you use a em5ii. You could give up the tripod, the change in sensor size would make no noticeable difference in those lighting conditions, and you'd have no problems afford, carrying or shooting with a 600mm equivalent lens. You could buy a cheapish 100-300 zoom or a "pro-grade" 300 f2.8 (remember that 2x crop factor.) The results will be vastly better than digital zooms and you'll be able to see the real image you're capturing through the evf. So you might chosen to expose in a way that stopped the subject from blending into the sky glare and increased contrast - and its contrast that sharpening algorithms work on.
Thank you for the suggestion. There is a lot to weigh in. Size and weight is a plus for sure and that is your best argument for Olympus. The amount I already have invested and focus speed/accuracy. Also I do shoot more than wildlife and I am sure the most of shots are stand still subject. I do shoot some concerts and sports. If I ever do switch to anything it would be full frame a7 series for landscapes. And simply it down to a a7/24mm and the 7d2/400 for hiking. I would find myself in situations of wanting the focus speed and not having it. Thanks nonetheless.
If your aim is to get sharp pictures of distant wildlife, a em5ii with a decent 600mm equivalent lens will do that better than the gear you already have - and cost less than the re-sale value of the gear you're using. You'd come out ahead on cost and quality. Better stabilization, the ability to use a wider aperture with the same depth of field, and less need for digital enlargement - reduced moire filtering and Zukio lenses that are just better than Canon's current production - all more than compensate for the sensor size difference.
As for landscapes and shooting on m43 vs Alpha...
The results from a higher resolution sensor, if you're not using lab grade procedure, are often be *worse* than a smaller one. Again, this is something a competent article would have covered, so here's a link:
http://blog.mingthein.com/2012/11/05/resolution-shot-discipline-image-q…
Put simply, smaller sensor blobs make it more likely that vibration will cause light that should be falling on a given pixel to smear across it's neighbour. This is a Very Bad Thing.
The real benefits of large sensors at the current stage of technology are only two:
i. very high resolution sensors work well in studio conditions (if you need that much sharp to please the client)
ii. large low pixel count sensors let you use very high ISOs (but this is often negated by better stabilization for smaller sensors and brighter lenses.)
Also, given landscapes don't high ISOs, a Sigma Foveon system with its 40-60MB RAWs will give noticeably better results than a Sony Alpha. It's a less versatile - it hates high ISOs, can't do decent video, and can't focus fast - but as a specialist tool it leaves the Alpha dead. (Compare the Sigma SD and DP Merril and Quattro flickr pools to those for the Alpha.) The Alphas are undeniably great cameras though and will certainly do an excellent job.
Dude! So refreshing to read something this smart and well written.
Took the words right out of my keyboard!
Thanks, Tim!
I got the same feeling when I read fstoppers back in the day, you really put great effort into this article! More stuff like this plz!
I have a proposal for improvement to the article. Please add a recommendation to the "In-camera sharpening" section. It reads like this is a bad thing for some cameras, but should it just be turned completely off? I think the current way its written leaves this open and unanswered. Otherwise a superb/excellent resource for obtaining sharp pictures. Great write up.
Great suggestion, and another thing I missed. I'll update that, too, tonight (I hope).
For now, I would recommend keeping a "normal" level of sharpening in-camera (or perhaps whatever the camera defaults to). This is because manufacturers know their images best and have done a decent job knowing how to get the best results out of the camera. Some in-camera sharpening certainly helps; and if/when you need more, you're better off adding it in post where you have more control. My two cents...
Ah section 9 made me chuckle. I also had a similar experience visiting a photographer's gallery whom I had really respected and looked up to and was only tragically disappointed when viewing his fine art prints in person.
Terrible editing and none of the images were sharp. I walked out feeling incredibly let down all because of what his final editing did to the final image sharpness.
Before leaving I asked the gallery worker "who does the editing." The response was the photographer does all his own editing. I was still amazed though that some of the prints were selling for $4K and above without being sharp enough to be pleasing to the eye (we're talking 12x12 prints and many less than 40") . I also left wondering if I was caring about the wrong things in producing prints for sale.
Some points I'd like to add.
One is making use of optimum aperture (the "sweet spot", as you mentioned) and image stacking for studio work. This is dependent on product quantity, shooting schedules, and client's desires for sharpness, but I've shot products (of course, small ones that needed close-up macro setups) exactly this way to get megasharp images at full depth of field. A PC lens can sometimes do this as well, but not always. As a matter of fact both a PC lens and optimum aperture image stacking compliment each other, and are two more ways to get ultra sharpness.
As for film scanning, flatbeds are notoriously NOT properly focused on the principle point of focus. They are "pre-focused", and their calibration may or may not be correct. Typically the latter when it comes to the high resolution scanning precision required for film. So unless your principle point of focus is ABOVE the glass surface, all the fancy film holders aren't going to do shìt for you. Normally I would suggest using a dedicated film scanner, but unfortunately all modern film scanners are also pre-focused, so you wind up in the same boat. Both scanner types compensate for this by digitally sharpening the image, typically using unsharp mask. Nasty.
Incidentally, some "high-end" scanners do this as well. I used to work at an agency that had a Heidelberg Tango photomultiplier tube drum scanner, only to find out this $50,000 unit was pre-focused, had no aperture control, and used unsharp masking to compensate for focus inaccuracy!!! So don't think that using a high-end scanner may be any better. It may not.
There is only one scanner I know of that not only focuses on the film plane, but has a glass carrier option to ensure your film is perfectly flat across the scanning film plane. Unfortunately it has been discontinued. That scanner is the Nikon Coolscan 9000. You can still get them used on ebay, but they carry premium prices because they are really the only game in town when it comes to getting high quality film scans, on your desktop no less. However if you regularly need to scan film, and do it right, the money spent on one of these units will pay for itself even at it's inflated prices.
Thank you for the added points. I will add that I've had extensive experience with the Coolpix 9000. As much as I love it, I left it out because of its discontinued status and expense. While it does allow autofocus (and yes, flatbeds require fine-tuning with the height of your holders, and even then are less than ideal), it also takes forever (which isn't really a huge problem for me) and most of all, is becoming less and less available. Moreover, drum and PhaseOne back scans are absolutely still better. Of course, that last point assumes you have a great operator and decent equipment in every part of the process. And they're both even MORE expensive, arguably. But it's something worth pointing out that just because the Coolscan 9000 has AF doesn't mean that other options don't do a better job. But if you can get your hands on one, yes, I'd say it fits somewhere between the flatbed and drum scan options.
Great Article
Excellent article! I got tickets to a practice round of The Masters 2015 (cameras are allowed for practice). I took two cameras, one digital, one film. The digital was a Canon 5D Mk III with a 100-400mm f4.5-5.6L II lens; the film was a Canon F-1N with a Canon FD 28mm f2.8 loaded with Fuji Velvia 100 for the scenic. Right now, the film is in the frig while I decide who will develop and scan. I'm leaning to Dwaynes since they processed the last roll of Kodachrome from Steve McCurry. But if there are other slide film shooters out there, I welcome your advice for slide film developing.
I work with Pro Photo Connection in Irvine (in person OR for mail-order) because they're extremely affordable, kind, and they know me now... But there are a ton of great film labs out there. Dwaynes is great and well-respected for everything they do (I wouldn't necessarily say 100% because of the last roll of kodachrome processing...that's just beside the point is all...but they're great nonetheless). Just look up reviews depending on where you are :-)
WOW - That's what I call I comprehensive list. Thank you so much!
>>First, you always, always, always get what you pay for<<<
Utter. Bloody. Nonsense. Sigma consistently produces lenses that match or out-sharp Canon, Nikon and Leica - and sell for a moderate discount over the first two and a HUGE discount over the third. And then there are the lenses on the Sigma DP series, where the entire camera costs less than a comparable Leica lens. And the Ricoh GR has optics in this league.
(And indeed, you actually admit that cheaper Sigma optics often out-perform their competitors, so why did you write the above? Don't you realize the two statements are contradictory?)
You've also failed to mention that some Canon, Nikon and Leica "pro" lenses have considerable sample variation. The makers naturally make sure that "goldens" go to reviewers and test labs, but only a minority of lenses will hit this standard. For a take from someone who actually knows the basics of what they're writing about, I suggest http://blog.mingthein.com/2014/05/06/qc-and-sample-variations/
One of the reasons Sigma lenses are a good buy is that they're engineered in a way that greatly reduces sample variation, so the lens you buy is much more likely to match the mtf scores you saw. But with CNL, assuming "You get what you pay for" is ruinous. Especially with the high aperture pro-zooms, you need to test half a dozen lenses to find that golden sample.
Also:
>>> The video below is a fantastic explanation of diffraction<<<
Speaking as the possessor of a physics degree, it's simplistic and alarmist. Bayer sensors work and moire filters much reduce the impact of diffraction fuzzies in practice - and actual MTF graphs often show only a minor impact.
>>Too much editing will always degrade image quality<<
Well, yes - because "too much editing" is defined as the the amount that will degrade image quality. This statement is meaningless.
And the author tells us that primes are easier to make than zooms but doesn't mention - presumably he doesn't know - that mirrorless wides are vastly easier to make than ones for reflex cameras - the retrofocus designs that DSLRs need are a nightmare. And that lens for smaller sensors are easier to make than larger ones, especially where elements with aspherical curvature are needed.
(If anyone doubts these claims, go compare the Ricoh GR with any full frame Canon or Nikon full-frame 28mm.)
Together with knowing about the existence of sample variation, this knowledge probably matters more than the sum of what he wrote. It's depressing enough that this article can get published, but even more depressing that people treat it as a revelation.
To completely prove the point - ie that the effects of aperture diffraction are a limit on sharpness, increase significantly at small apertures, and that there is no way around this "Because - PHYSICS!!!" here is an MTF chart for a Zeiss Otus lens:
https://www.ephotozine.com/article/zeiss-otus-55mm-f-1-4-apo-distagon-t…
..It's sharpness is awe-inspiring - and all but the same at every aperture. Including f11 and f16.
However, to prove another my points - that you do NOT "get what you pay for", I doubt anyone could it's results from those of a Sigma costing about 1/20 the amount providing both lenses were at f5.6-f8:
https://www.ephotozine.com/article/sigma-60mm-f-2-8-dn-a-lens-review-22…
As for diffraction fuzzies, the problem is that a 1% of people are arrogant enough to pontificate on this without understanding how the sensors in real world cameras work - and that 98% of people are silly enough to believe anything said confidently. As a corrective, read http://www.cambridgeincolour.com/tutorials/diffraction-photography.htm
..Diffraction as a sharpness limit exists, but it's less severe and more complicated than the alarmists make it sound - they often attribute other problems with a lens to it solely because they've heard of it. And compared to the sample variations that Ming Thein reported, "It ain't no thing" anyway.
>>>So, what filters should you get? Again, get the expensive stuff<<
Again, WRONG. Paying top $ for a filter is not a guarantee of quality - or even that the filter will be better than a much cheaper one. You actually have to use your brain and do research. Eg a Marumi in this objective test easily outperforms a Tiffen costing twice as much and is close enough to the very highest performers that it is doubtful that you would see a difference:
http://www.lenstip.com/115.4-article-Polarizing_filters_test_Results_an…
The author of this article really is a marketing department's dream - he's codifying gullibility.
Great article. Please do you have a print version of same?
Amazing Article. Thank you.
Excellent article, however, it seems that something very important was left out, at least insofar as obtaining tack sharp images while you have a moving subject. Auto Focus. It would be great to see an additional piece added to this article which talks about sharpness in relation to AF-S, AF-C (continuous) and AF-C 9, 21 or 51.
Thank you for the feedback. While I did discuss focus in section two, you're right in that I didn't cover the various AF modes in any significant depth. I did this because some cameras have different settings and simply work so differently that it seemed a bit pointless to discuss specifics about the number of AF points.
For cameras that offer decent 3D Tracking such as professional Nikon and Canon bodies, details on those settings can be found in the manuals of those cameras quite easily; and there are a number of online resources for this information, too.
If I hear of another request, I'll consider diving into it a bit more, but at the end of the day, you simply need to just get focus to begin with. And I think I covered a few ways to manage that... :-)
I'll still keep your suggestion in mind, however, and am open to any suggestions you may have in how to take a stab at covering this topic.
Adam Ottke, thanks for writing a very detailed and informative article... No doubt as Photographers it will not only sharpen our images but also sharpen our skills in the offing...
What a great and thorough post, thanks so much!
LOVE the outline review at the end. Incredibly well presented article!