
Have you ever seen images and wondered how they create an editorial look that you just can't seem to recreate? It's clean, it's crisp, it may be edgy or sleek... you can't quite put your finger on it, but whatever "it" is, you want it for your work. Here are a few tips, from composition to post-production, that will upgrade your images and give you a more professional look.
Angles
The first thing to consider that could bring a major upgrade to your work is your angles. From Under Armour campaigns to the cover of Vogue, if you start paying attention, you will notice that pros think about their angles. Angles have the power to help communicate your message. Larger-than-life sports legend? Get on the floor and shoot up (I would add with a wide angle lens). One mistake that is often made is that photographers shoot a majority of work from what we call "man's eye view," the way you see things when you're standing. The problem with that is, we've all seen it that way. It's boring. We already know what that looks like. In my days of being an art teacher, I would tell my students that if they shot something from "man's eye view," they were also required to turn in adjoining shots from "dog's eye view" (from below), "bird's eye view" (from above), or through something, (framing). Try different angles and you may be surprised by how interesting your composition becomes.
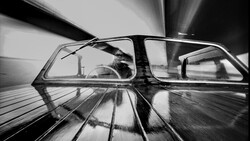
Dog's Eye View: From fashion portraits to sports imagery, once you start paying attention, you will notice how many images are taken from below the eye line of the subject, often from the ground, shooting up.
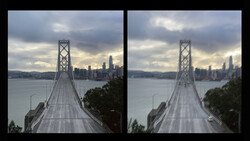
Bird's Eye View: Here, the photographer left the track, walked up to the bleachers and shot from above using the shadow as an element of composition
Framing: In this shot, the photographer added a hand in the foreground. If you shoot nature, try using leaves, branches, snow, or something blurred out in the front to create layers of depth to your image.
Lighting
All our readers photograph different subjects and are at different levels of expertise for lighting, so I decided to write a few possible advancements to try. Find where you're at, and consider what new technique you could adopt.
If you're a "natural light photographer" and tend to shoot only in the shade or during the golden hour, try taking portraits in full sun with a silver or gold reflector. Put your reflector on the opposing side of the sun to bounce light back into the shadowy side of the subject. It's a technique called cross lighting.
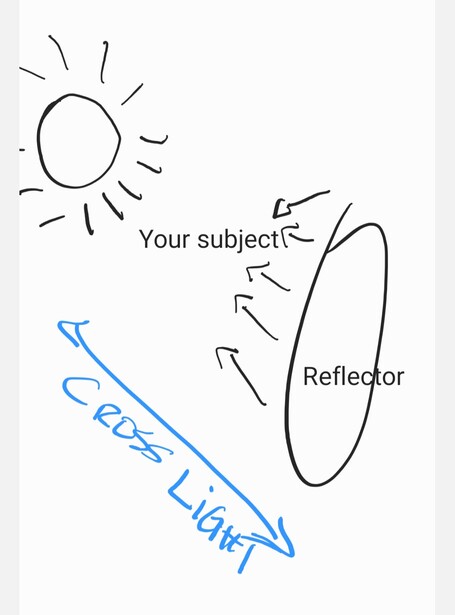
Full sun is very editorial if you know how to work it. Using a silver or gold reflector bounces back more light than a white one. An important note when shooting with bright light: always expose for highlights. When you blow out your highlights, the camera doesn't have texture and detail information to recover. Always explore your images for your highlights, and you can lighten your shadows if needed.
If you shoot event work and use flash frequently, there are many techniques you can make use of to improve your imagery. If used in the right way, flash can lead to beautiful images. You might be surprised to know these images are lit with a diffused flash and nothing more.

Here are a few things you can do to upgrade your flash skills:
1. Shoot with your flash on manual. This is a no-brainer. You definitely want full control of the amount of light output. Change your mode to "M" and you can shoot from full power all the way down to 1/128th power depending on your flash.
2. Use diffusion on your flash. If you point your flash at your subject with no diffusion, you will find yourself with washed-out skin tones and dark backgrounds. It's time to try diffusion on your flash, and I'm not talking about the one-inch bounce card that pulls up from the flash head. I've tried a dozen or more flash diffusers, and my favorite by far is the MagMod. It creates a softbox look. I mentioned it to my assistant recently, and he bought a knock-off, which worked excellently. Gary Fong also makes some great ones, and there are many more competitive models on the market. Using one of these will break up your light and make it fall more softly on your subject and around the room.
3) Learn how to bounce your flash off walls. When you bounce your flash off a wall, it spreads the light and causes it to fall in a more even way. There are many tutorials online about bouncing flash available online. I like to use this technique when I'm taking a room shot or a wider angle shot and I have a white or neutral colored-wall.
If you shoot with strobes, well, I could write a novel, and simultaneously, I still have novels to read myself. Strobes are my favorite, and in my opinion, they are the crème de la crème for lighting. You can create absolutely any kind of lighting in any space if you really know how to use them. If you shoot one strobe, try to upgrade to a two-strobe setup with cross lighting. Cross lighting gives a beautiful rim light from the back and a nice, wrapped light from the front. It's very professional-looking. Have you already mastered that? Try a two-light strobe in full sun! Using strobes in full sun leads to very editorial-looking work. If you've never used gels on your strobes, try throwing color into the mix with gels. If you're a product photographer, try using a snoot, shooting through vellum paper, or shooting bare bulb. Each setup will give you a completely different look. If you're a portrait photographer, try adding a patterned shadow. I love using the spot by Lindsay Adler and Westcott. Wherever you are, try something new. It's all about learning new techniques and growing.
If you always do what you've always done, you'll always be where you've always been. - Henry Ford
(I have this written on a post-it note by my desk.)
Editing
Here is another potentially black hole topic, but just as we did with lighting, let's pick a level you are at and think about your upgrade. For Lightroom preset editors: lean to use local adjustments. Slapping a filter on a batch of images and exporting them is not going to allow you to reach the maximum potential of your images. Click on the local adjustment brush and explore your options. Try sharpening or texturing the focal point at a higher level than the rest of your shot to draw the eye in. Try a radial blur. Work on your highlights only or your shadows only. Work on your skin tones separately from the rest of your images. Open the HSL/Color tab and edit your blues, greens, or yellows separately from the rest of the colors. If you're shooting nature imagery, it's interesting to play with the hue slider for your blues or greens selectively.
If you edit portraits, try learning frequency separation and the mixer brush. These two techniques will allow you to get that magazine-ready look on your skin. Two retouchers I've learned a lot from for these methods are Phlearn and Prince Meyson.
If you edit sports: I love a good grunge and high-drama look. Have you ever learned about sharpening with high-pass? If you edit products, a game-changer for me was learning to use selective color and edit with a hue saturation layer.

This allows you to edit the hue, saturation, and lightness of a specific portion of your image without affecting the rest of the image.
Angles, lighting, and editing each give you a front on which you can step up your work. I still have a long list of techniques I want to improve on. I take quarterly pauses where I block off anywhere from three to five days for professional development. I take a class or practice a technique I want to become proficient in. We are fortunate to live in a time when lessons from the top professionals are so easily accessible. What is on your list? Let us know what your next level-up is in the comments below or any techniques you have recently discovered that have upgraded the look of your images.


Join the Fstoppers community for free
-
Post comments and join in the discussions
-
Browse the site ad-free
-
Share your work and get featured in the community
-
Compete in the photo contests for fun and prizes
No comments yet