
Photographing the night sky can be very frustrating if there is a lot of light pollution. That is when a light pollution filter may come in handy. I reviewed the Haida Clear Night filter for the Haida M10 filter system.
If you live in an area with lots of light pollution, it may become nearly impossible to take nice night sky photos. For me, there is not a single location to see the Milky Way on a clear night within a radius of almost 150 miles. Well, there are a few places that allow me to take images of the Milky Way, but then I need aggressive post-processing to make it stand out. Even in the so-called Dark Sky Parks of the Netherlands, there are still large bulbs of light at the horizon.
A Bit of Background Information
Light pollution is produced by the excessive amount of light that mankind uses at night. It spills into the night sky, where it is reflected back from even the tiniest layers of clouds. On clear nights, with no visible clouds in the sky, layers of moist air can reflect the eerie yellowish light. Nights never become dark, obstructing a clear view of the heavens above. It also disturbs the day and night rhythm of nature, but in general, civilization doesn’t care about that.
The sodium-vapor and mercury-vapor lights produce a very specific color of light. Therefore, this narrow band of wavelength is easy to filter out. You need a filter that blocks a wavelength close between 575 nm and 600 nm. By blocking this wavelength, the light won’t be able to penetrate the filter, and will not be registered by the camera sensor.
The first light pollution filter I used was the Lonely Speck Pure Night filter, back in 2017. It was a crowd-funded project, but other manufacturers followed soon after. I used the filter with good results for years. Now I received the Haida Clear Night filter for the Haida M10 system for a review.
A Closer Look at the Haida M10 Clear Night Filter
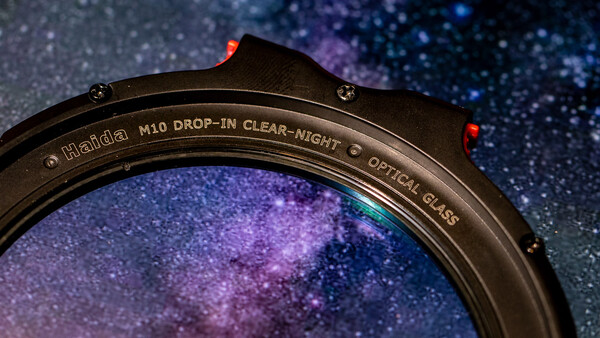
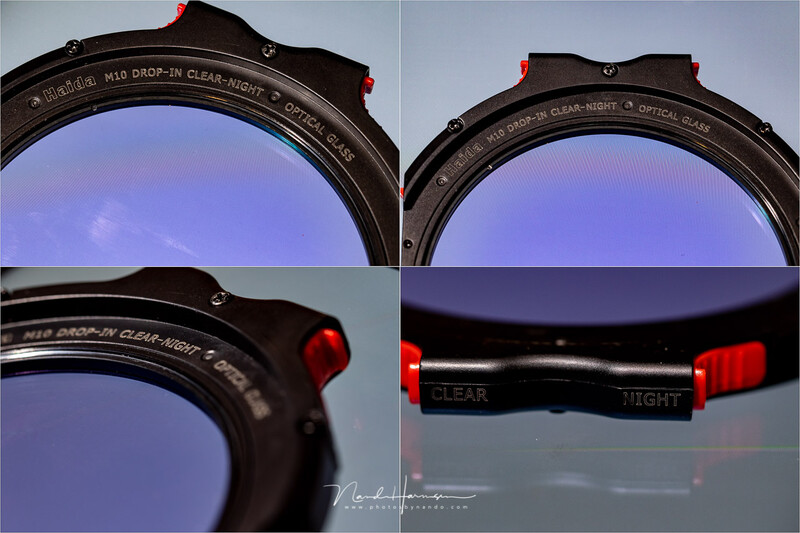
Haida has released the Clear Night filter in different flavors. You can choose between a regular filter that can be screwed onto the lens, a 100 x 100 mm square filter that fits most filter holders on the market, and filters for lenses with a rear drop-in system. Haida even has a filter for the DJI Mavic Pro 2 drone. I received the M10 drop-in filter, made exclusively for the Haida M10 filter holder. It drops in the slot that is used by the polarization filter in a normal situation. It fits perfectly, preventing any accidental light leaks.
The filter shows the typical blue color that is specific for light pollution filters. This indicates it is blocking the yellow light efficiently. Haida tells us the filter blocks yellow sodium-vapor light, mercury-vapor light, and the yellow light emanating from low CRI LEDs.
Using the filter is very easy. If the Haida M10 filter holder is in place, you can simply drop the filter in. The small plastic latches prevent the filter from falling out, in case you hold the camera, and filter holder upside down. Removing the filter is just as easy, by pressing the two lashes on the sides.
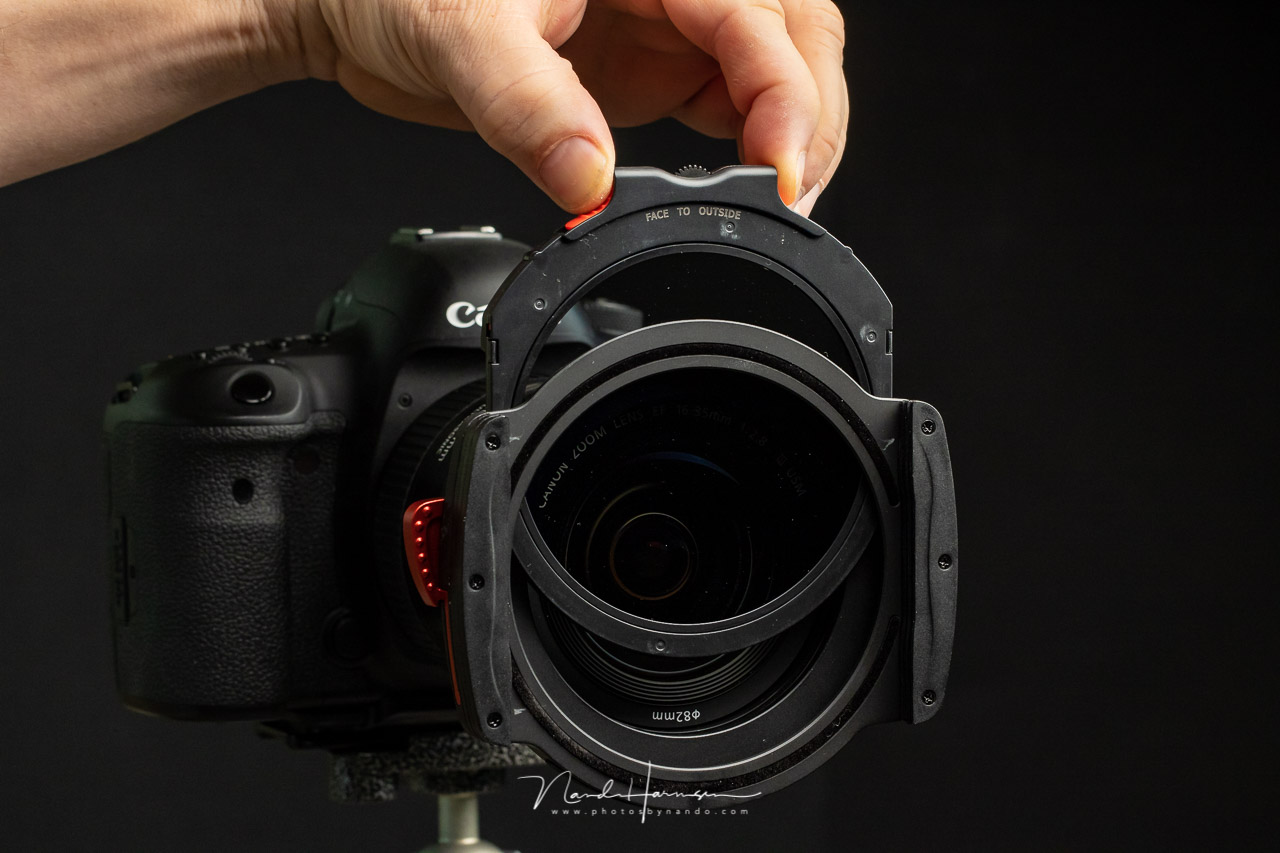
I love the way the Haida M10 filter holder is used. Placing the filter onto the adapter ring is very easy. It can be done with one hand without any problems, even in darkness. Nevertheless, it is wise to check if the filter holder is placed correctly. You wouldn’t want your expensive filters to fall. I wrote an extensive review for the Haida M10 filter system here on Fstoppers, if you're interested.
Using the Filter at Night in the Light Polluted Suburbs of a Reasonable Sized City
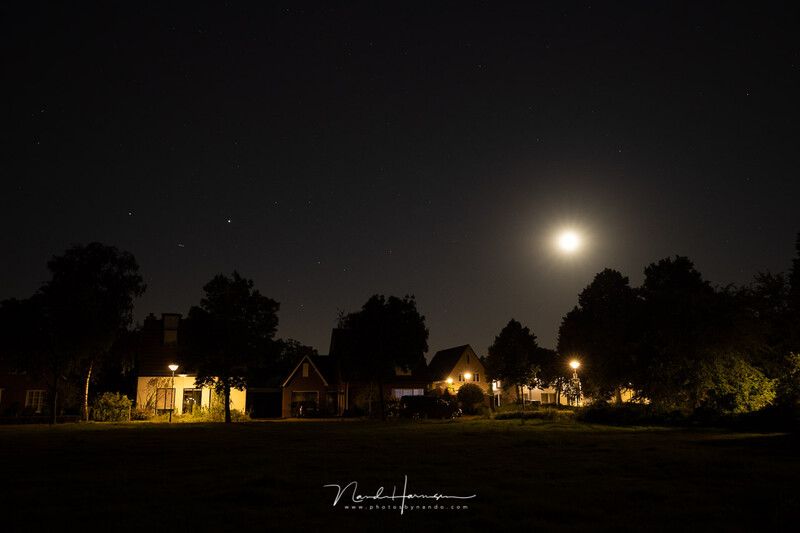
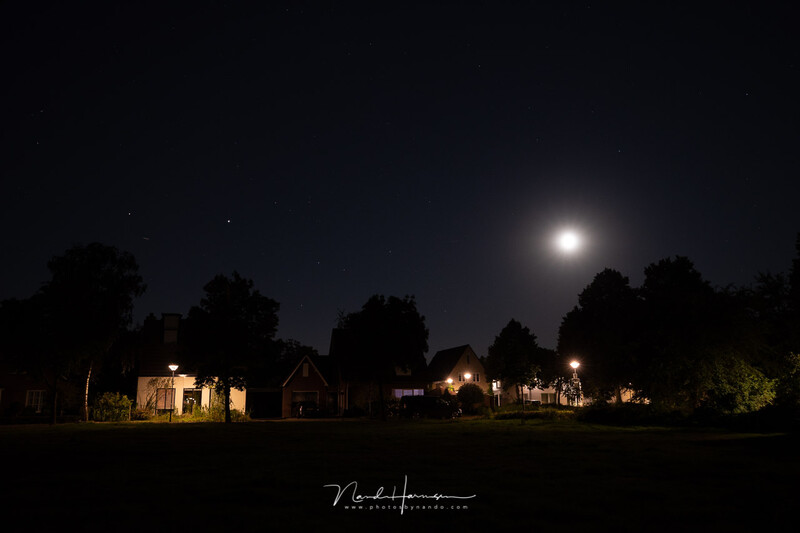
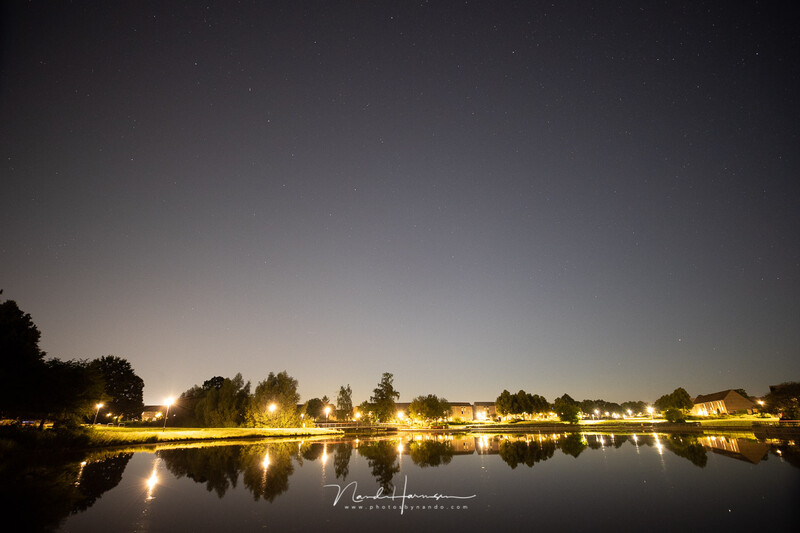
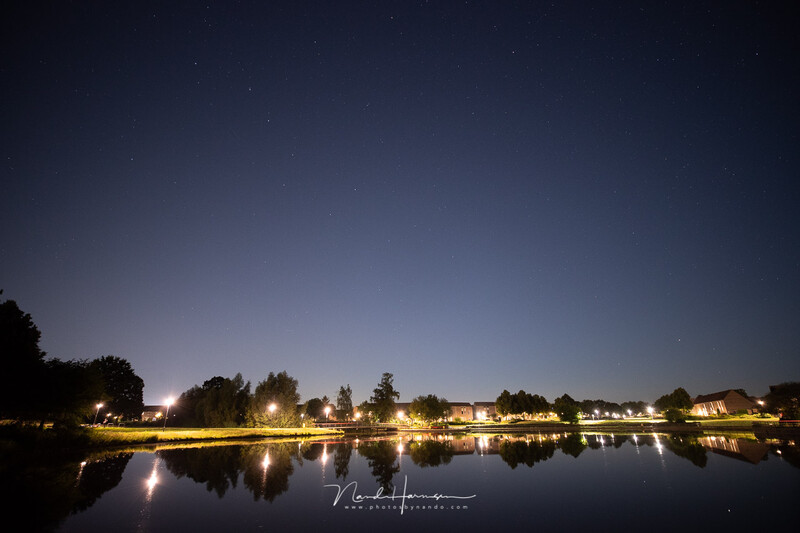
I did the first experiments with the Haida Clear Night filter in the park nearby. There is a lot of light pollution present, but it is not a light-flooded city environment. It is about class 6 on the Bortle scale, on the far end near class 7. Because I used the Lonely Speck Pure Night filter before, I knew what to expect.
It was a gibbous moon during the particular evening, illuminating the sky in the typical blue light. I kept the white balance at daylight for this occasion and started shooting with, and without a filter. For both images, I kept the same settings: ISO 1600, f/4, and 1.6 seconds. I used a focal length of 30mm on a Canon EOS 1Dx Mark III. All images in the next before-after comparisons are without post-processing, and with the same camera settings.
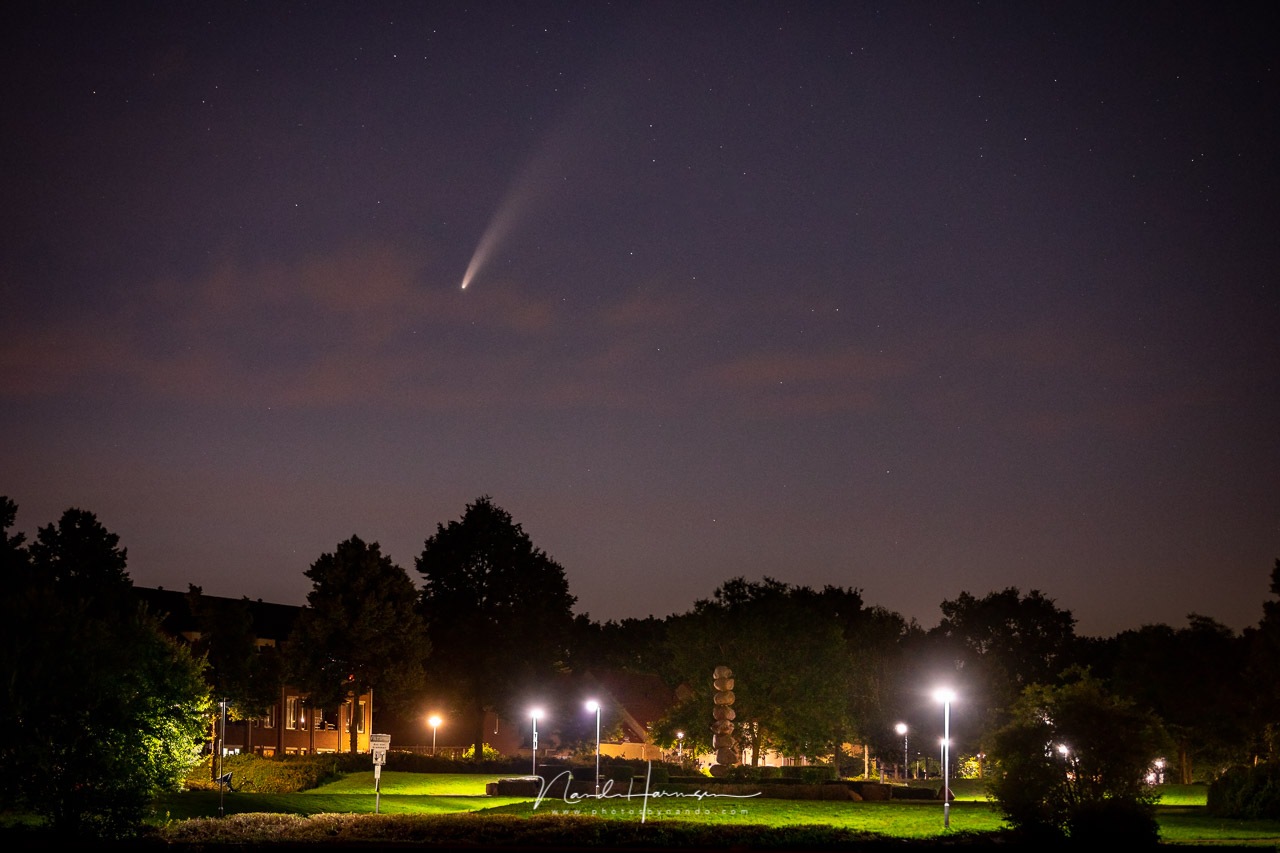
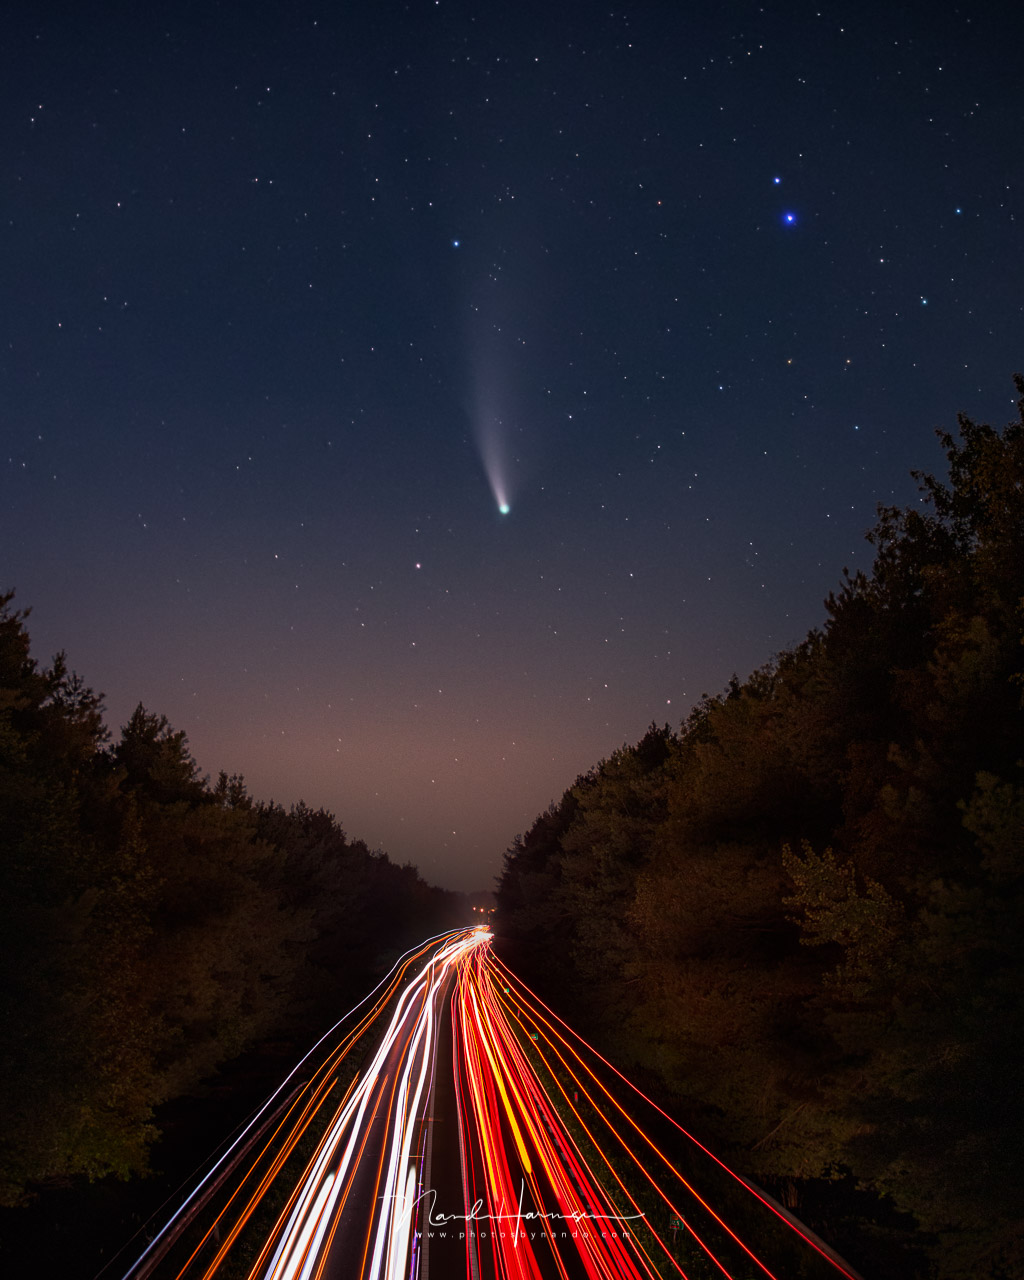
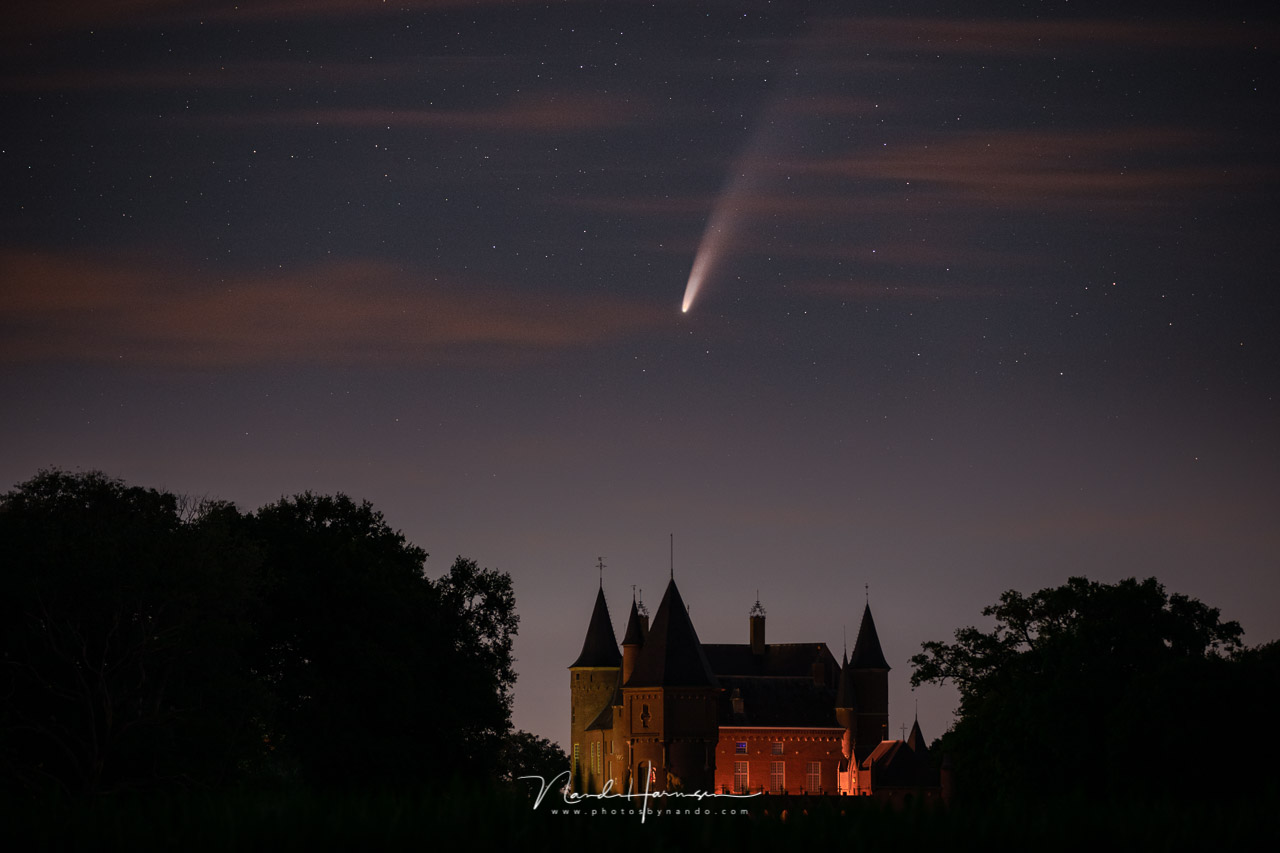
Next, I turned the camera in the other direction where comet NEOWISE should be. The comet was already on its way to the farthest reaches of space, far beyond visibility. But the stars shone brightly in the moonlit night sky supplemented by the sodium-vapor light pollution of my home town. Again, I photographed the park with the Canon EOS 1Dx Mark III and a 16mm focal length. This time I used ISO 3200, f/2.8, and a 5-second exposure on white balance daylight, for both images.
The filter is definitely making a difference when shooting a night sky in a light-polluted area. Although it does remove the yellow color cast, it isn’t removing the brightness in the sky itself. In other words, you won’t be able to see more deep sky objects with this filter under these conditions.
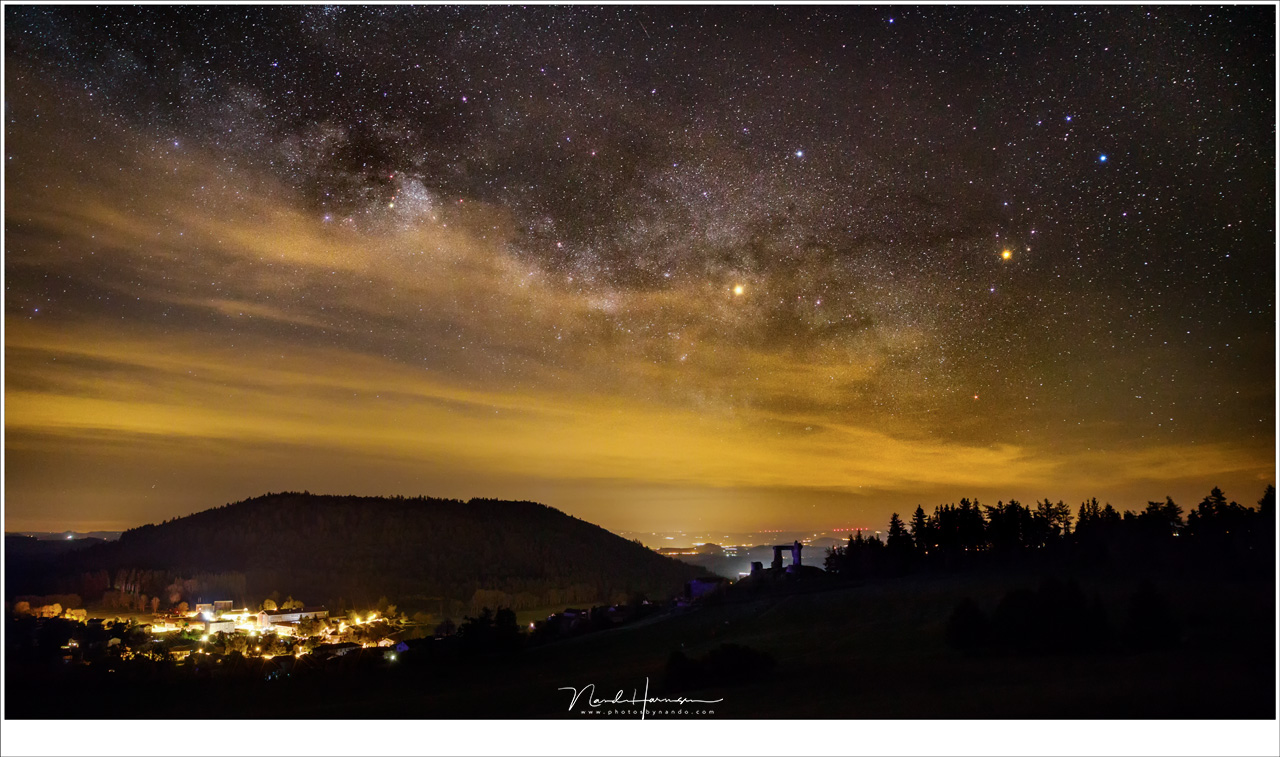
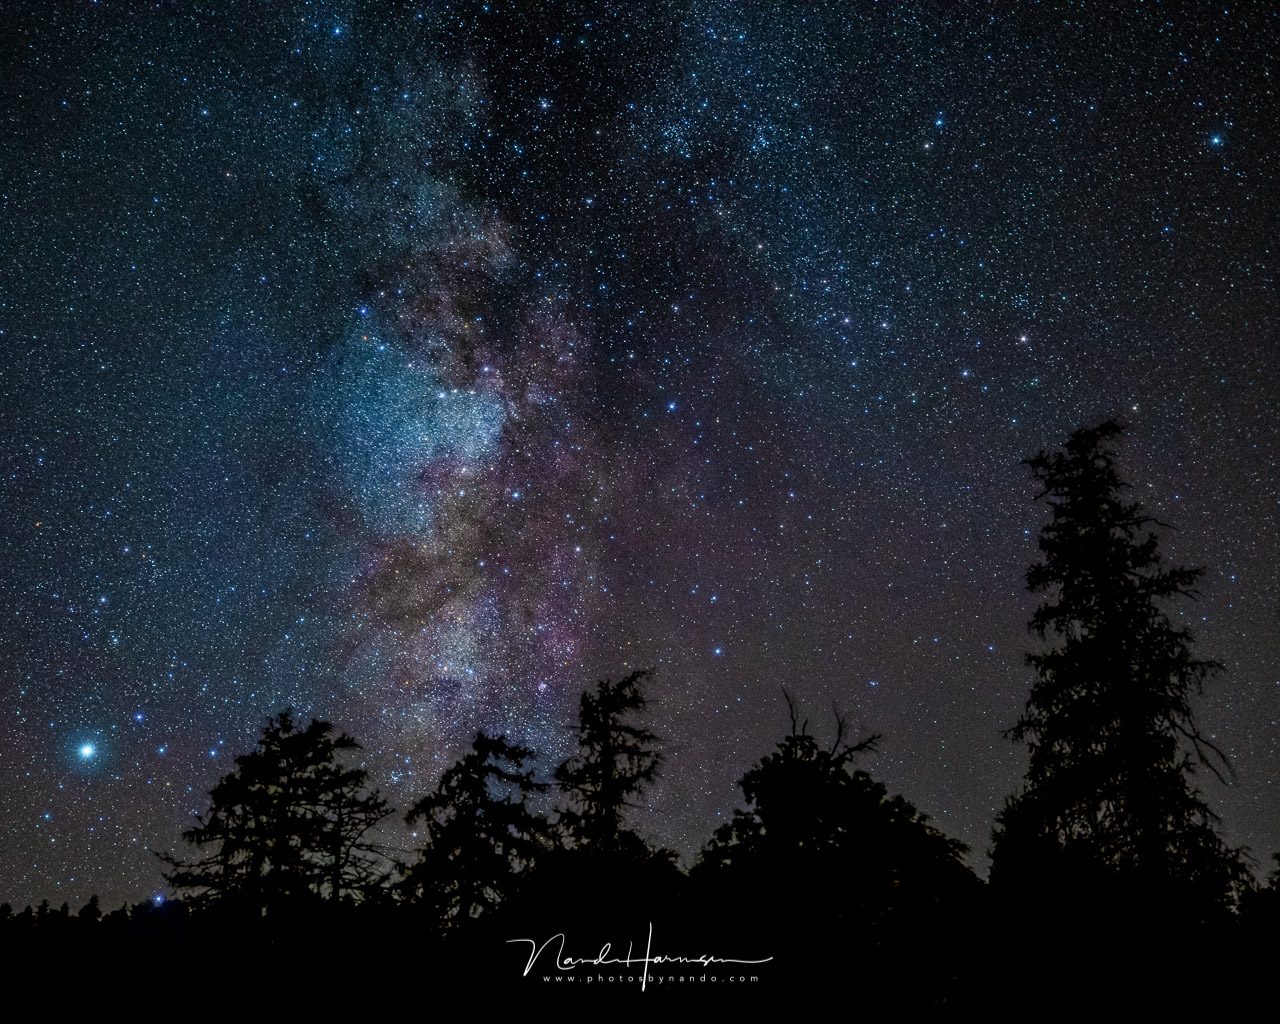
Shooting the Milky Way From a Dark Location
I used the Haida M10 Clear Night drop-in filter also in a dark location, somewhere in the middle of France under a rural sky, and a suburban transition sky (class 3, and 4 on the Bortle scale). The filter still has some effect, filtering out the remnants of the artificial light that gives the night sky a yellowish hue.
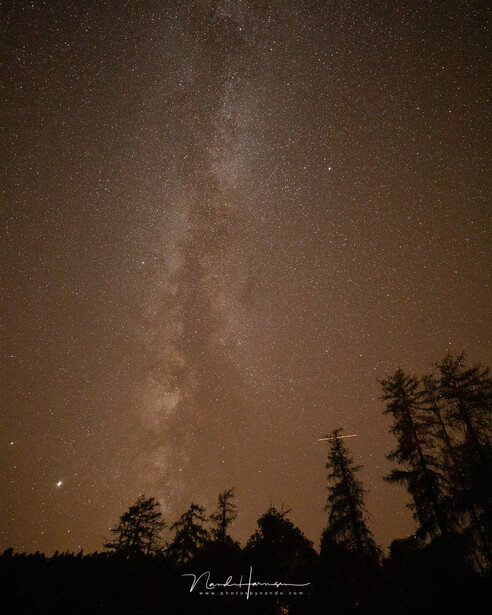
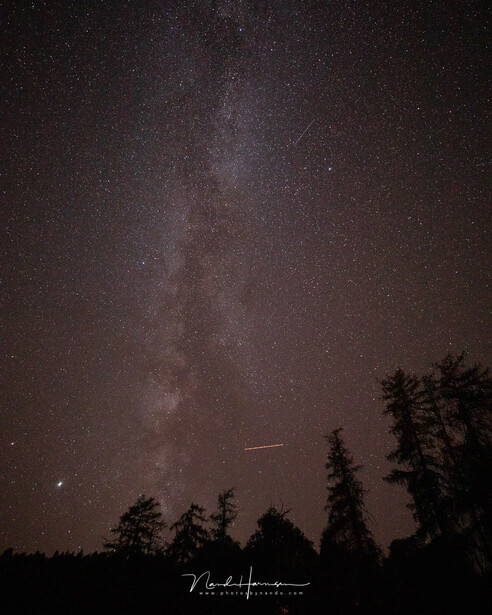
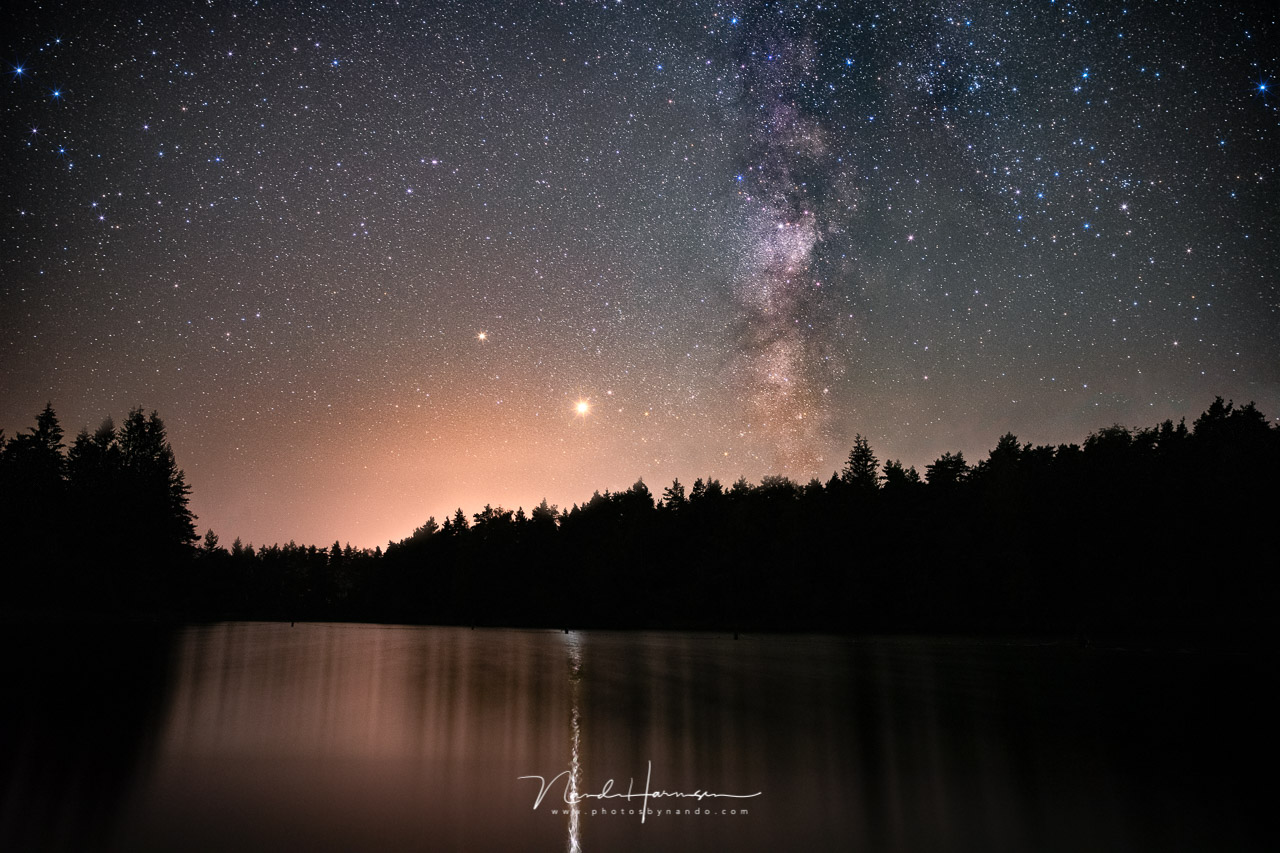
I believe the filter performs at its best under these conditions. Although it is a dark environment, the filter removes the last bit of color hues produced by artificial light in the surrounding villages and streetlights. Nevertheless, it is wise to stay away from the light-polluted villages that lay scattered through the land.
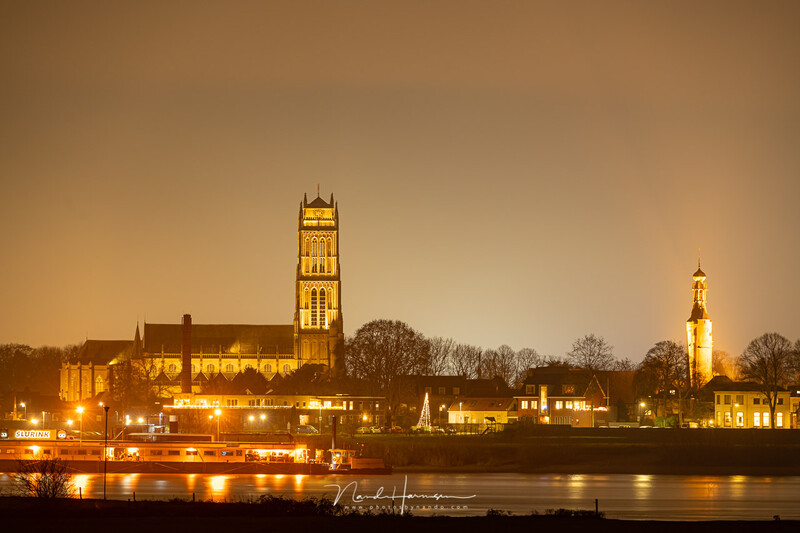
Does the Filter Have Any Benefit For Shooting Cities at Night?
Up until now, I have been using the filter primarily for shooting night skies, preferably with a nice Milky Way. But I also used it for photographing comet NEOWISE in the light-polluted Netherlands. This is the reason why I chose to use a night filter in the first place.
But I wondered if the filter can also be used for photographing cities at night. Would it have any benefit in this kind of photo, since all the available light is produced by artificial light itself? When using the Clear Night filter for this kind of photography it will remove the typical yellowish light, but it is producing a bit of magenta color cast.
The following before and after images are with exactly the same exposure settings, the same white balance, and the same post-processing.

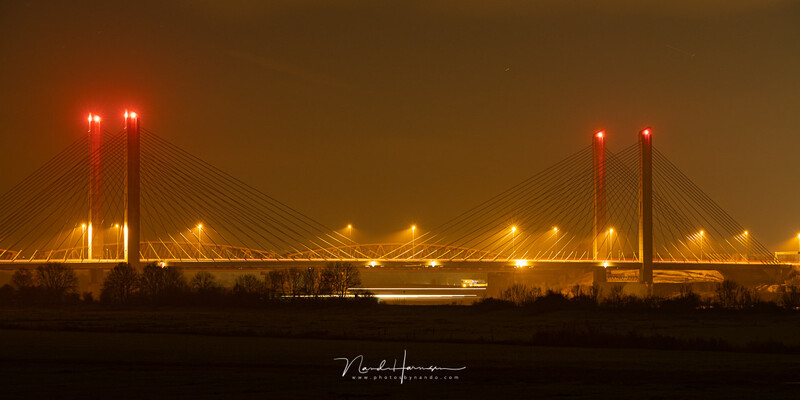
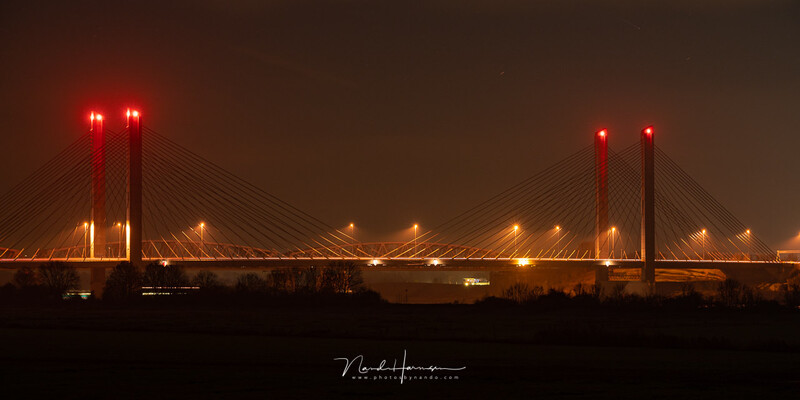


I was wondering if the result from the Haida M10 Clear Night filter could also be achieved with post-processing. When I did try it in Lightroom Classic, I noticed it can mimic the same result, but it does have a small difference depending on the type of light available. The reason is obvious: The night filter is blocking that the small band of light, which does not reach the sensor. The images without the filter do have that specific color of light in the image, which cannot be filtered out completely.
The before and after images below is post-processed in Lightroom Classic, to achieve a similar result. Can you tell which one is shot with the filter?

My Conclusion
Although it does show a bit of difference, I think there is only a limited benefit from this filter when shooting inside a city at night. But it does make a big difference if you are shooting the night sky itself. For that, the filter does have a big benefit.
The filter is holding back about one stop of light, something to take into account when shooting the Milky Way. You might need to bump up the ISO one stop to compensate for the loss of light. As expected the filter has little to none effect of you are photographing the night sky from a typical truly dark site. This would be a class 1, and 2 on the Bortle scale. Because you lose one stop of light, it would be wise not the use such a filter under these situations. From class 3 or more, the Haida Clear Night filter can help you suppress the typical colors of light pollution.
The filter might also help to achieve more natural-looking night shots of cities and streets, but the benefit is much less prominent. It would depend on the situation and the type of artificial lights. If there is a lot of night sky in the frame, the Haida Clear Night filter will have a significant effect. If there is no night sky in the frame, there will be no real benefit.
Pros
- Removes the color cast of sodium-vapor and mercury-vapor light
- Is also usable for street photography (but limited)
- Perfect for night sky photography with rural skies and suburban transition skies
- The Haida M10 drop-in filter is easy to use
- Available as a drop-in filter, normal filter, and square filter
- Good quality K9 optical glass, nano-coated
Cons
- The increasing use of LED’s makes the filter not always effective
- Holds approximately 1 stop of light
- Color cast is removed, not the brightness of the sky itself
Do you use a light pollution filter for your photography? Or would you consider one? Please share your thoughts, and example image in the comment below.


Join the Fstoppers community for free
-
Post comments and join in the discussions
-
Browse the site ad-free
-
Share your work and get featured in the community
-
Compete in the photo contests for fun and prizes
21 Comments
Does the filter has any degree or levwl like ND filter or just mention night filter and you will get one?
No, there is just one kind. There are no levels of any kind for these type of filters
This is the same as an Intensifier, yeah? Supposed to be good for fall foliage too.
That is right. I had to look it up, because I haven't heard about an intesifier filter before
This is definitely not worth purchase.
If you're serious about astrophotography or night skies / night cityscapes in general, you need to purchase proper astrophotography oriented filters ( H-Alpha filters, LPF [Light Pollution Filter], etc ) from respected in the field manufacturers
Thank you for your thoughts.
I wonder, can you explain why there is a difference between this filter and the LPF your mention?
"This is definitely not worth purchase"
This I disagree with as it has value outside of just astrophotography. As mentioned above fall foliage has a significant pop to it when using one of these light pollution filters.
Now, in terms of "If you're serious about astrophotography", this I can get behind as the H-Alpha filters allow you to photograph deep space nebula, planets and the milky way even during a full moon, which the Haida filter will not.
However, the key phrase in your statement is "serious about astrophotography" and I promise you because astrophotography is so niche, the majority of photographers interested in being able to shoot the stars close to light polluted skies will opt for the easier barrier-to-entry filter, than going through the headache of handling H-Alpha results. The likelihood that people who have bought and used the Clear Sky filter, or the Hoya Intensifier, understand color channels in Photoshop enough to process them is probably a very low percentage.
I know H-alpha is perfect for showing the red reflection nebula. I didn't know it will also work in more light flooded night skies.
But I got already a significant better result with the orion nebulosity with a LPF filter, and for me that is already worth it. The attached image is the best result so far, and although there is a lot of improvement possible, I's already happy with it.
With or without filter, I find post processing stacked images very very very difficult, even with all the practice and experience I have with Photoshop.
I 'm always impressed by the people who manage to make amazing deep sky images.
"professional" grade light pollution filters do enhance the resulting image "significantly" ( significantly at least compared to this and the correspondingly cheap Hoya, Cokin, etc filters of this type ).
Filters from the likes of Astronomik, Optolong, Lumicon, Huetech, IDAS, Skytech.
similar results to the ones with the filter mentioned here can be obtained by doing multiple exposures and proper post processing ( slightly above beginner astrophotography level of processing )
I know there is a difference between different kind of LPF filters. Cokin and Hoya are indeed not that great. I have seen these tests..
If you have a link to a test between your professional grade LPF and the high quality filters like Haida, and Lonely Speck, that will show the differences you mention, I would be very thankful
I don't have any reviews handy. I might have some old shots on one of my drives with the Hoya filters from the past, but not for a direct comparison with the new filters that I bought like 2 years into astro shooting.
Until I had to give up my astro designated equipment however, having used both cheap/affordable and very expensive equipment after doing all I could with the cheap ones, there was a significant difference ( however the better the spot where you shoot from the better the results got, and that played a bigger role in the shots than any LPF filter, H-Alpha filters remain useful in any location anyway ) when shooting in non-ideal locations.
So I understand you have experience with old filters like the one from Hoya, and not the new high quality type of filters.
In that case I think it is not fair to assume these are similar to the ones you have used.
I believe from my own experience these filters like the Haida are perfect for those who are occasionally in the opportunity to shoot a landscape under a starry night sky.
But I do agree for real deep sky imaging you will need something different, and other equipment as well :)
You didn't read my message well :D
I said, I started with the affordable Hoya filters.
But then I sold them and went with professional grade ones from Astronomik.
For cityscapes none of them was worth it imho (everything they do can be done in post ).
For astrophotography, you better be serious, as in, have a telescope and a tracking system like Skywatcher, in order to "justify" the price of purchase for the professional grade filters.
Ah, now I understand. Thanks for clearing this out for me :)
Thank you for another excellent article! I'm not fortunate enough to live near areas free of light pollution. I have to travel several hours at a minimum to find and area that is *mostly* free of light pollution. I have been wondering about these filters and if they really worked well.
I hope that Mr. Peppas replies to you about the filters he mentioned.
Thank you for such a well written article. I recently went backcountry camping for a week just so I could work on my Astro skills. I had this filter in my bag the entire trip. The location is listed as a dark sky so I didn’t even bother using it. I’m wishing I did now though.
I can see some light pollution traces in your image, but nevertheless it looks great. I wish I had such a location nearby.
Hey Nando, I finally gave the filter a try and every image is incredibly dark in the center. Did you not ever experience this? I used this on a 16-35 GM at 17mm/2.8/91sec/kelvin 4200/ISO 100 as this was not a dark sky location whatsoever. Any idea what it might be? It definitely helps with light pollution but I'd almost prefer the warm glow over this. I'm not finding anything online so I'm hoping it is just user error haha. Take care and stay safe!
If you were trying to capture stars, start using a much higher ISO. It won't work with ISO100, even with 90 seconds. Stars are moving through the night sky. If you want to capture the stars as stars, you need to take this movement into account. With 17mm on a full frame you will never must exceed 29 seconds.
Nando, I should have mentioned that I was testing out a startracker as well at the same time. I was just trying to see how well my polar alignment was and check for streaking. At a proper ISO, the image would have been blown out. The star tracker was a success, just couldn't understand why the Haida produced the darker image in the center. Thanks
I don't understand either.
You could experiment with it during daylight. Shoot a white surface and look at any vignetting or other uneven exposure that might be present. Just to check what the filter does.