
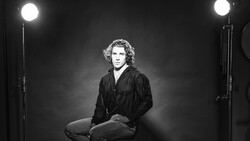
In this simple lighting tutorial, I discuss how to create a soft and dramatic image by placing my light overhead.
About two years ago, I released a video on YouTube showing three ways to use a Parabolic Softbox and it is still one of my favorite lighting modifiers for portraits. Because a parabolic softbox, like the Phottix Para in the video above, is a large form of light with a lot of depth, it provides a lot more control over light compared to something like a shallow reflective umbrella.
Having that extra control allows me to accurately pinpoint the angle that I'd like to place my light in order to create subtle tones in my image. By using a 1-stop inner and 1-stop outer diffusion material, I can then soften the overall quality of light overall, leaving me with a very directional, but soft, light source that I can position as necessary.
In the video above, I show you a simple setup that you can use to create a very soft and dramatic portrait, by being particular with the placement of your light.


Join the Fstoppers community for free
-
Post comments and join in the discussions
-
Browse the site ad-free
-
Share your work and get featured in the community
-
Compete in the photo contests for fun and prizes
58 Comments
This is a great tutorial! I've been wanting to get a similar look, and this helps a lot. I've been mulling over a deep octa, mainly the Westcott Zeppelin because you can reposition and re-focus the strobe inside of it. How does your Phottix compare to a standard softbox?
Hi Jay jay! Thanks so much for watching! I own both the Phottix and the Westcott (47" & 59") Zeppelin. Truthfully, it really matters more about understanding the properties of light moreso than the modifiers themselves, but I feel that the Phottix adds a SMALL bit more contrast than the Zeppelin. I'll have to compare them at some point... but I did a video two years ago with it here:
https://youtu.be/UdrHVA9nX3k?list=PLJKDlprbdANx1DojyHVe_dNK0UFgLlLNs
Hope that helps! :)
Jeff, Thanks so much! Which do you use more? Do you use the zoom rod for the Westcott's? And what backdrop are you using in this video? I want to replace my paper with canvas and have been looking for something suitable for a while.
Usually I opt not to use the extension rod, but that's just because it's just an extra item to set up. The backdrop is a SeamlessPhoto.com backdrop that I co-created a couple of years ago. You can find them at SeamlessPhoto.com
hey Jeff! looks awesome. big fan of big light directly overhead. quite enjoyed your Adororama talk last week!
Thank you infinitely my friend! Still can't believe that coincidence. lol
Hi Thank you very much for Amazing video tutorial. I have one question. You said you are using Phottix Hexa-Para Softbox (59"). Is the speedring on it interchangble with balcar (PaulCBuff Einstein) type of mounts?
I looked up at BH but they supply only Elinchrom and Bowens speeedrings. I wonder if I can buy balcar speedring myself and replace it.
Thank you very much
Thank you for watching and taking the time to write.
Truthfully, I'm not 100% sure what your mount looks like, but the Indra 360 mount is a Bowens mount, so when I use the Indras, I'm using a Bowens speedring. Alternatively, I've used the Westcott Zeppelin with a Profoto speedring on a D1... you'd have to ask your local retailer what works for you. :)
Thank you very much.. I will google it now. ))
I actually asked the same question in the Strobist Facebook group a couple days ago, and I was told this is the speed ring you'd need.
https://www.bhphotovideo.com/c/product/1282110-REG/phottix_ph82592_spee…
Thanks Brian!
What a great/quick tutorial! The simplicity really yields some stunning results. Kudos, and much thanks for this!
Thanks so much Ken for watching and taking the time out to write. Hope it comes in use! :D
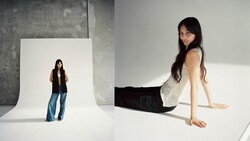
Dear Jeff, you rock! I love shooting this way but what would you change, if you wanted to shoot the same look as a full body portrait. add a softbox under the camera to fill in the legs or change the angle to have less fall off....?
Great question... rather than explain it in words. Here's a picture. Given the same power / settings and a different crop... the legs would be under-exposed if the light is placed directly overhead.
If you increased the power, you'd increase the overall intensity of light making the quality of light harsher. If you move the light farther away, you'd also change the relative size of the modifier compared to the subject and therefore make it smaller than it currently is... ending up in harsher forms of light.
If the light source were larger and you change the distance equal to the percentage of the size increase, you'd be able to retain the same quality of light.
Hope that helps! :)
Wow, Jeff. Have a bit of a man crush now. Thank you for going in to such detail.
So I am guessing you would stick with the one light as long as possible rather than adding a fill. That is why renting a studio makes more sense than shooting in my living room…
Lol Anytime! Whatever I can do to help. I know that it makes it easier to understand when it's illustrated rather than written. It's also a good practice for myself to be able to explain things in context. :)
I had the same problem some weeks ago. Just one lightsource and too much fall off. I can not show the original pictures, but my son is my model today:
I wanted a narrow light shaper to emphasize the cheekbones. So I used a striplight in front and slightly above him. So the face gets a strong smal light, the belly gets medium brightnes and size and the feet are illuminated by a dimm, large light. In total about one stop difference.
If you use a large octa with a dark diffuser (aka ringflash) for soft light your problem may be solved.
I hope, my snapshots are shown - it's my first post :-)
I love this look and great tutorial. If only I had a high enough ceiling...sigh! :)
lol Time to buy a new house? :P
this is also my problem. Jeff, could you make a video on shooting full length with a 2.5m ceiling? Just for us home shooters... =)
Lol I'll work on it! Just found the right team to help me produce more content. I really enjoy putting these together. :)
Or use this look with your subject sitting. :p
lol exactly! :)
I don't get using a deep para type light with both diffusers, it becomes a softbox at that point. The even light coming off of the white diffusion has no depth to it its been cancelled out might as well use a shallow okra. Bron and Breise have very think diffusion for just the front that you can basically see through that still let the effect of the para shine through.
Glowing white fabric is glowing white fabric, the structure behind is just helping to make it even...
Incorrect. The quality of light is NOT the same. Rather than explain it verbally, here's an illustration. Given two modifiers of equal size.... Not only is the overall control different, but so is the overall contrast and feather of light (transition between highlights and shadows).
To add to my point.... You're basically saying a beauty dish with diffusion is a softbox since it bounces off a panel is diffused by that panel and then when it travels through that diffusion material... it comes out like the quality of a softbox.... which is absolutely not true.
The light quality (especially in the feather of light) for a beauty dish has MUCH more contrast than that of a traditional softbox. In that same contexts, this modifier has a long distance to travel down the depth of the light creating a very controlled light source.
Terrific tutorial. So much to love about it but I particularly liked your calm, gentle and confident narration.
I much prefer this style of delivery to the guys who almost burst out of the screen at me, shouting how great they are and how I can be as good as them if only I can withstand their barrage of over-enthusiasm. Thank you!
You're very kind. Thank you so much Simon. I appreciate the kind words. :)
Jeff this is awesome. All of your tutorials are very clear and easy to follow. I left a comment on your youtube video, inviting you to do a shoot at @eggstudiosnyc. Hope that's allowed for me to say that here? Just a big admirer of your work and would love to shake your hand and buy you a coffee! (dunkin or hipster variety, either or)
Hey Tom! Thanks so much for reaching out. I may have some time next week, I'll shoot you an email later. :) Cheers! Jeff
Great content. Thanks for sharing.
Thank you and thank you for watching / sharing. :)
Simple and crisp,...Loved this one alot. Thank you Jeff for sharing. :)
Thank you and thank you for watching. :)
Jeff needs to audition for NPR lol
haha! right!?
lol I wish! I blame my cold... Maybe I should get sick more often. lol
Great article/video! To the point and great content. I wish I had saw this before the last time I rented studio space...
Thank you kindly. :)
Great setup - I've used it on several photos in my insta-stream - I'm sure you can guess which ones: https://www.instagram.com/bechbox/
Nice! :)
Jeff, great tutorial and thank you for sharing your knowledge. How would you mimic and get the same effect using everyday house hold lamps or incandescent lights?
With better control and attention to the properties of light. :)
I'm going to try this set up next time I'm in the studio. But I might add some negative fill.
P.s. I love your minimalist approach to sound design.
lol as in a broadcasting microphone and music afterward?
Echoing what everyone has said- great tutorial.
Thank you so much! :)
Some of these shots do look great, but some of them suffer with the soulless eyes of not having catch lights. Just kind of bugs me having been always taught that there must always be catch lights. Do you just not care (please not being rude, just you can't have a voice tone in text and the right wording has not come to my mind) or is there a reason why you would not have the catch lights in some of the shots?
Great question! So... these two images are of the same subject, framing, lighting, etc. The core difference (aside from color) between these two images is emotion. Does the catch light in the second image take away from the emotion you feel or does the fact he's in mid laugh (eyes halfway open) without a catch light taking anything away?
The answer is that it's subjective. In this case, I think I did a great job at capturing emotion even if it "failed" traditional portrait tests. :)
Yeah like I said, just the way one is always taught, it is kind of like being for lack of a better reference right now "bible bashing" you get taught it is a must. Now with these two I think is awesome to have the emotion in it, but like the first photo where eyes are open with the glasses, I can't see, and with this whole upbringing of it being a must, it just got to bug me a little. Not because I think it is wrong, but it is against what a person gets taught.
Thank you for your answer :D
There really are times people do need to break away from what they are taught and try other things for sure.