
It's strange to think that I have been a photographer for over 10 years now, yet I have never printed my own work larger than an 8x10. Unfortunately we live in an age where sharing low res digital photos on social media has become the end all be all for the majority of our images. Recently I decided to celebrate some of my favorite personal photographs by printing them LARGE and installing them in the Fstoppers Studio. The resulting 60"x40" acrylic prints I made through WhiteWall.com has me wondering why it has taken me this long to install fine art on my own walls.
If you talk with any photographer who started their career back in the days of film, almost all of them will tell you that the ultimate final presentation of any image is a real, tangible print. However, it's pretty shocking how few of us have actually ever printed our own images. Sure, we have printed some of the images have have taken for our clients, but when was the last time you printed a huge poster sized image for your own home, apartment, or studio that you were actually proud of? As a wedding photographer, I have lost count of the number of 4x6 and 8x10 sized prints I've made for my clients but I clearly know how many fine art prints I've made for my own enjoyment: ZERO! What is even more sad is I have installed gallery style lighting in parts of my home in the anticipation of one day displaying my work. Unfortunately those images have yet to actually go out to a printer. This trend of not printing my own work has finally been broken, and breaking that trend has been one of the most satisfying yet unexpected events of my entire photography career.
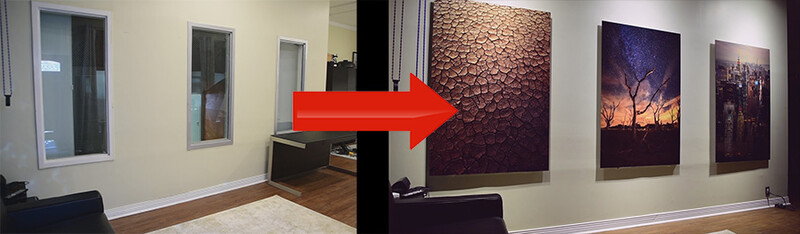
That Ugly Studio Wall
The main shooting room that Fstoppers has called home is a pretty cozy and comfortable studio space. Unfortunately this space also has 3 weird exterior windows that actually face into a storage room. I've always wanted to remove the windows or at least hide them but I never took the time to actually tackle that project. The idea to hide the windows with massive prints was suggested by either Lee Morris or our studio manager David Strauss. This seemed like the perfect solution but with our busy schedules no one actually took the initiative to order the three prints we needed.
An Introduction to WhiteWall
Each year, some of the Fstoppers staff travels up to New York City to attend the annual Photo Plus Expo. If you have never attended this event in the fall, you should seriously consider it because it is one of the best photo events hosted in the United States. While we were there David and I struck up a conversation with the team from an online printing company called WhiteWall.com. WhiteWall is a massive print lab that produces large, high quality prints, and their specialty is mounting huge photographs behind thick acrylic. Photos mounted to acrylic have always looked super slick to me, but the costs associated with "encapsulating" prints usually costs thousands of dollars per print. Encapsulation has always been way outside of my budget, but the acrylic mounted prints WhiteWall was displaying at their booth seemed very reasonably priced, and the images still retained that polished look you often see in high end galleries like Peter Lik, Andreas Gurksy, or Gary Malin.
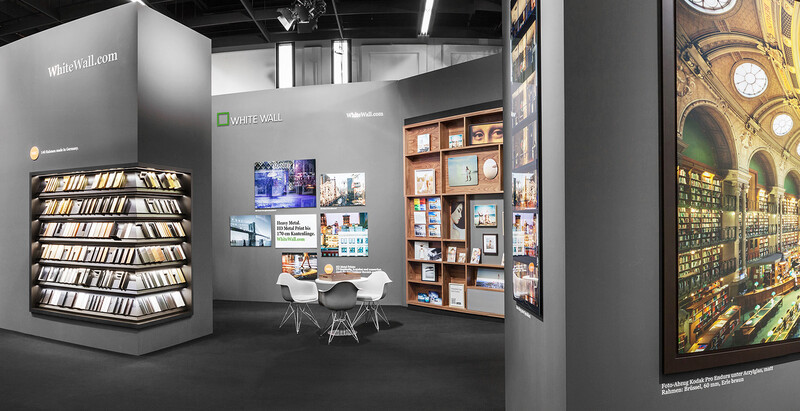
Since WhiteWall is based out of Germany, normally I would dismiss the idea of printing through them as a resident of the US. However, after talking with some of their staff, they assured me that the shipping cost for the size prints I was needing for my studio would actually be very similar to the costs associated with shipping locally in the US. I was hoping to print about 40"x60" which would require freight shipping no matter where I placed my order. Surprisingly, the shipping cost they quoted me for a single large acrylic mounted print from their facility in Europe was only $60! I can't even get a box of Flash Discs shipped internationally for $60 so this seemed a little to good to be true, but as I would soon find out, the shipping they offer is not only affordable but also extremely fast and well packaged.
Choosing the Photographs
When I initially decided to take on this project, I thought the most difficult part would actually be finding a lab to print through. After my conversation with WhiteWall at PhotoPlus, I was confident they were going to do a great job on whatever I uploaded to their print facility. What I did not anticipate was how difficult it was going to be to find three vertical photographs to actually print. First off, I have not taken many images in my career that I would consider "fine art" or even art that I would necessarily want to display permanently on my walls. Second, the few images I am really proud of are horizontal and not vertical. This was going to be a problem.
As fate would have it, Dylan Patrick and I had planned a New York City helicopter photo session literally the day after I met the guys at WhiteWall. I already felt the pressure to capture something from our helicopter session, but now that I knew I needed three vertical images for this print project, the stakes were even higher. Our NYC helicopter experience turned out better than I could have imagined, and my photograph looking down 8th Avenue from above Central Park seemed like a perfect image for the studio.

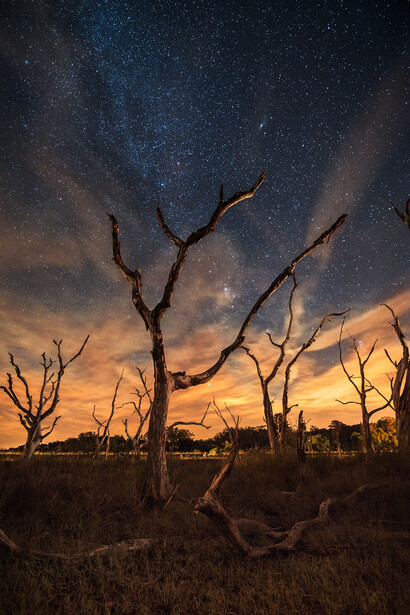
The second photograph I decided to print for this project came out of my first ever attempt at shooting the night sky. Again, I never would have planned for this experimental image to turn out so well but just like the helicopter experience I was able to walk away with a unique image that captures the low country of South Carolina perfectly. If you want to see how this photo was capture, you can view the entire video and post titled A Few Tips on Astrophotography and How to Capture Stars at Night.
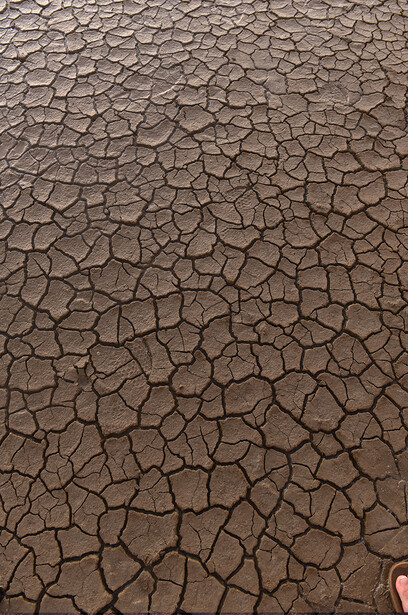
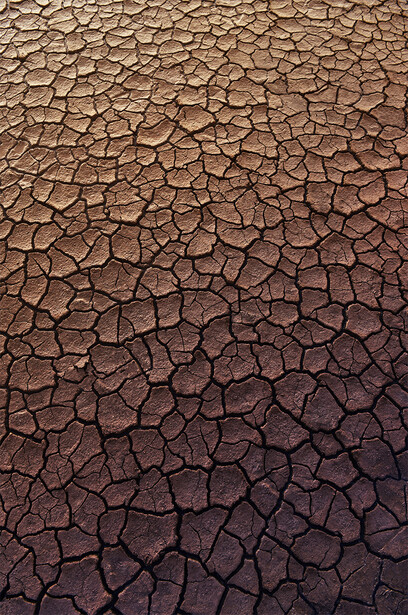
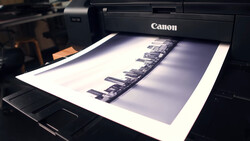
Now that I clearly had a nature/cityscape theme going for these studio prints, I knew that I had to finish the series with another interesting image that fit together with the two images above. I simply couldn't print a portrait or wedding photo; I needed another landscape photograph. The final photograph presented itself during our travels to the Caribbean island of Curacao as we filmed our latest photography tutorial with Joey Wright: Swimwear Photography - Lighting, Posing, and Retouching. One of the lessons was filmed on an old dried up lake bed we simply called Flamingo Pond (you can see the location in the Fstoppers video here). While we were frantically filming the last lesson of the day, I was able to grab a quick vertical shot of the cracked ground as the sun cast interesting colors and shadows across the lake bed. This photo was literally a snapshot and I even shot the entire photo in medium Jpeg (which was about 14 megapixels). Admittedly, this image won't win any awards but it captures one of the most memorable trips of my life in an abstract way. Since this image doesn't have a full behind the scenes video associated with it, I have shared the straight out of camera image below along with the final image I tweaked in Photoshop.
The Final Prints
Once I felt comfortable with the final three images, I went to WhiteWall's website and placed my order. As I explained in the video above, the ordering process was extremely easy, and unlike a few other print companies I use for my clients' work, WhiteWall allows you to upload your files directly to their system without any extra software like ROES which I personally can't stand. Initially I thought I was going to print all three of these images on the same paper for continuity but after a bunch of inner office debating I decided to use the best paper for each particular photo. The New York City photograph looked absolutely stunning in the Kodak Metallic Premium paper while the night time star photo seemed to pop the most on the Fuji Crystal DP II paper which is WhiteWall's most glossy paper. The Curacao dried river bed photo definitely looked the best on the Fuji Crystal matte paper but because of technical reasons WhiteWall recommends printing on glossy paper and then mounting the final image to acrylic that has a lightly frosted matte finish. While all three of these print options do offer quite a difference in presentation, in the end I think all three of these prints look absolutely stunning.
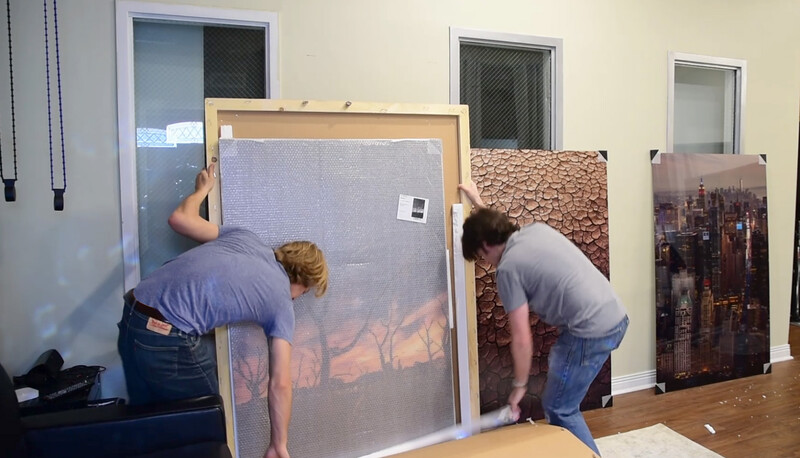
After I placed my order, it was only about 11 days later that DHL was knocking on the studio door. The prints were packaged up really, really well, and for the first time ever in my photography career I was able to experience the joy of seeing several of my own photos printed 5 feet tall. These prints turned out perfect. There was no streaking, no bubbles, the acrylic was razor sharp and clear, and the backing aluminum material was extremely light weight yet rigid. David and I must have looked at the photos from a ridiculous 6" distance for over 20 minutes. I had never really been that excited to print any of my own personal work but I'm a bit worried now that I'm going to have the itch to print many more of my images at large gallery sizes.
The Final Installation
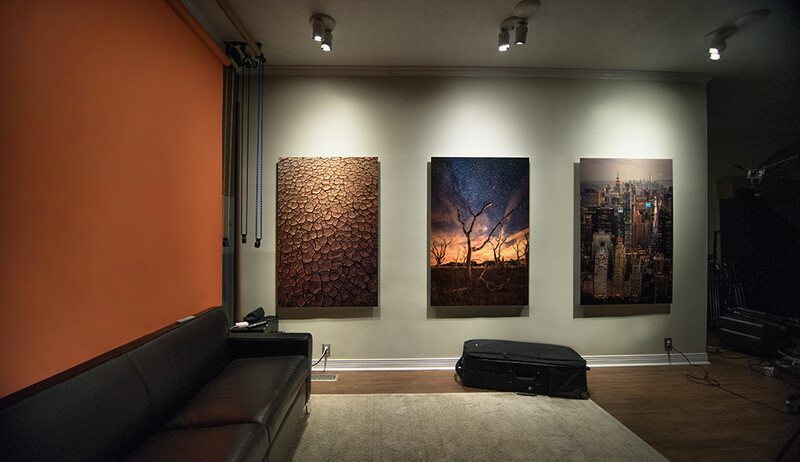
Hanging a print on the wall for most people is a pretty easy process. Simply locate your studs and screw in a few hangers and boom, you are done. As you can see in the video above, my studio wall needed a little more attention and required a little handiwork to make everything clean and seamless. I'm not going to go into detail about the whole process (watch the video for that), but I will share some of the lighting items I wound up buying for the final presentation.
Photographers know how important lighting is and many will even say clique things like "it's all about the lighting" to emphasis that point. Well lighting isn't just important in the photo taking process, it's also extremely important when you want to get the most out of the images hung on your wall. When you mix metallic or pearl paper with hard studio lighting from above, the results are simply magical. If you are ever in a Peter Lik showroom, ask them to turn off the over head lights to see exactly what I mean.
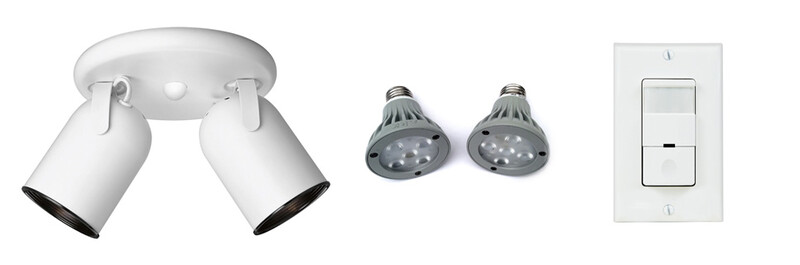
It was important for me to light my prints with LED lights because not only do they give off a lot less heat than standard incandescent or halogen bulbs but they also use significantly less power (and LEDs last forever). The problem with LED technology at the moment is it is relatively weak in output compared to traditional lighting options. Because of this, I chose to go with a lighting fixture that had two adjustable lamps. My favorite lighting option I found was the Progress Lighting P6149-30 2-Light Directional Fixture because I wanted two lights without having to mount an entire track lighting rail. For the LED lights I wound up buying six 60 Watt Equivalent Dimable LED bulbs because they were the most powerful lights I could find that still had the PAR-20 based required by the fixture. With two of these bulbs on each mounted photograph, the light output was perfect while the two bulbs allowed me to adjust the direction and light intensity on the images. Finally, I installed an LED vacancy switch to the entire overhead light circuit so that the lights would always be on anytime someone entered the room. The best switch for this application is the TopGreener TDOS5-W PIR Vacancy / Motion switch since it is designed for low wattage LED bulbs. This switch also offers a bunch of settings to control the sensitivity and shut off time as well as a manual on/off button in the event that you want to turn the lights off for photo or video sessions.
Conclusion
For most of us, printing our images seems like an almost archaic process. It's pretty ridiculous to think about how much time many of us spend tweaking and retouching every pixel at 100% magnification only to display those images online in a relatively low resolution format. If you are like me, maybe you have always had the intention of printing something for your home or apartment eventually but for whatever reason you never get around to actually printing something worth hanging on the wall. It is funny that the main reason I finally decided to print large was not because I wanted to finally enjoy my own work in my house but because I needed to conceal three ugly windows in my studio. Now that I have overcome a hurdle that far too many digital photographers never even realize is a systemic problem within the photography community, I'm confident to say that I will be printing many more large prints so long as I have wall space to display them. This process of documenting a simple studio redesign has really opened my eyes and reminded me why printing can be so fulfilling.
It has also been extremely rewarding to capture images that are outside of my normal day to day routine. I would never consider myself a fine art photographer or even a landscape photographer, but by forcing myself to create images for a specific installation like this proved to be some of the most fun I've had as a photographer in a long while. If you find yourself in a less than inspiring place with your own work or your clients' work, sometimes it pays dividends to explore those areas that inspired you to pick up a camera in the first place. In the end, you have to continue to keep growing as a photographer by placing yourself in uncharted territory, and sometimes a simple challenge like capturing three images worthy of being printed is enough to give you that extra push you always needed.
After completing this project and writing his article, WhiteWall has been kind enough to offer the Fstoppers community a discount on anything purchased through their website now until April 30th. You can use the discount code "WW20Fstoppers" upon check out to save 20% off your first order.
If you have printed large sized prints in the past and have them hanging on your wall, feel free to post a photo of your own art in the comments below.

Join the Fstoppers community for free
-
Post comments and join in the discussions
-
Browse the site ad-free
-
Share your work and get featured in the community
-
Compete in the photo contests for fun and prizes
25 Comments
Thanks for sharing Patrick, I've been looking to print a few of my own images. Doesn't hurt with your discount!
Yup
I just went through this myself. Had a restaurant space (Hope & Olive in Greenfield, Mass.) that wanted art on the walls for 3 months -- and it happened to be a favorite place of mine. I couldn't resist, and ended up making acrylic prints with bumblejax.com. Smaller than what you made here, but 17 of them to fill up the joint. Haven't sold any so far (it's a fairly expensive process) but it feels like a huge turning point in my photography to get gorgeous prints made -- and then get them prominent in a very public place. Had dinner there last week with my photos up and watched a table of people point at a few of the photos and discuss them. What a great feeling.
My work comes down at the end of this month. I'll hang some in my home and then get to work getting the rest shown in another venue soon.
Patrick,
Thanks for finding WhiteWall. I backed up the video during the ordering process to see the price and I almost fell out of my chair; but y'all were ordering massive print sizes.
I checked their website and smaller print sizes are more reasonable. Yea, I will be ordering from them!
Yeah they aren't cheap. As I said in the video, this size with the thicker acrylic was around $800 but you can get the same prints without the acrylic for about $200. I remember when Lee did some massive prints (and made an FS video about it), he was getting quotes for $2000 - $8000 for encapsulation out of NYC and a few other places. It can get expensive for sure but IMO $800 isn't that bad for a massive print of your own that you will enjoy for years and years.
Very nice!
I've been using Whitewall for a couple of years. I'm just astonished at how inexpensive they are for the quality provided. I feel sorry for the local print shops.
Unfortunately here in Charleston we don't even have anyone who can print this or mount it to acrylic :(
We have only one (Chromatics) in town, but Whitewall is so convenient and good that I don't bother with anyone else. BTW, the images you selected are great. I really enjoyed your article.
We had 6 large acrylic prints up for our Holiday party at Jack Studios in December. We also print them up to 40x60 pretty frequently for clients. Its a great looking product.tough to explain to people how much goes into making an aerial photograph and then printing it in this format....so we made this video to demonstrate how cool they are
https://www.youtube.com/watch?v=vSaQPNqkuz0&nohtml5=False
..great article btw
I've noticed that over the past year LED equivalent bulbs that are far brighter than their incandescent counterparts have become much easier to find online...and still use far less electricity.
For example, from what I can gather a run-of-the-mill 50-60 watt incandescent par20 bulb has ~500 lumens.
However, you can now find LED par20 bulbs using 7-11 watts that are more than double the lumens. One decent vendor shows both watts/lumens on all their bulbs:
https://www.1000bulbs.com/category/led-par20-3000k-fl/
Despite LED bulbs being more expensive they actually were a no-brainer when I built out a large track lighting setup. Using PAR30 bulbs that had ~400+ more lumens per bulb meant I didn't have to install as many track-heads to light the room. In addition, with 16+ foot ceilings I wasn't going to be able to replace burned out bulbs easily at all and to date I've never had an LED bulb die on me.
I love LED bulbs!
Nice job guys! The prints look great!
Hi Patrick, what dpi did you print them at? Thank you
Impressive. But now I need to take some shots that can hold up to a 3'x5' print size. :P
Part of me thinks you don't need much. I remember Lee printing some 24"x36" off a d300 shot in JPEG and they looked amazing. I think a lot of people get too fixated on megapixels when you won't necessarily see it in print
Totally. But I really meant I need to shoot something worth printing. I'm in one of those, "everything I've shot is crap" phases. :)
The title is misleading, as you didn't make them, you had them printed. I really expected this to be an article about your experience printing. Once upon a time, we "made" our prints in a darkroom.
If you want to spend your money in the US, check out http://www.persnicketyprints.com/ - they do an awesome job, especially with mounted prints.
Thanks for the article! Loved it! I've spent month deciding what media to print my Maui sunset pic that a friend wanted to hang in her place. Finally two weeks ago, I consulted a friend and suggested acrylic and I can't tell you how awesome it feels to have that 36x24 hanging on someone's else pad. Plus it turned out amazing. I will def try out WhiteWall once I go bigger. :)
This is great! I had no idea it could be so affordable. I have had my prints done in 16x24 canvas, but only when they are on sale for $25 or so. They look great, but knowing I can get them done like this opens up new avenues for me. THANK YOU!
It's somewhat funny that I just had the same experience. I know WW quite some time and always wanted to print something, just never thought any of my photos are good enough.
Having been to Sydney again (in from Germany), I decided to finally print a photo on brushed Aluminium. Only regret?: I should have printed it bigger. It just looks so unbelievably good. Instead of white (I overexposed the sky on purpose) nothing is printed and the brushed aluminum shines.
Now I'm looking for the next photos to print in similar size and quality to what you have chosen.
Btw (not sure this also works outside of Germany) you can order samples of everything they do to get a feeling for it.
Thanks for sharing WhiteWall. The prints do look high quality but they are not cheap. I actually do find myself printing many of my own photos and obviously print for my clients. I've recently begun using http://Printhug.com and they've been great and I always seem to find discount codes :)
That really made a difference to your studio. Well done. I prefer to support companies in the US and have always had great acrylic face mounting work done with http://www.bumblejax.com in Seattle. They are more expensive when shipping large pieces but love the options of thicker acrylic (1/2" and big 1" blocks). Also as a smaller company get to know the support people and trust i'll be taken care of.
I recently had a very negative experience with Whitewall. I placed a $3500 order with them for an exhibit I was having. I was assured by their customer service over the phone that the acrylics would arrive within two weeks, which still gave me a 10 day buffer in the event they weren't true to their word.
Close to two weeks passed and I finally noticed in my account that the items were about to be shipped. Days later I had to contact them again to confirm the status of the order and receive a tracking number, which they had never sent. This wasn't looking good for their guaranteed delivery.
Apparently they must use a turtle on Valium for their shipping method as the package slowly plodded its way to England en route to North America . About a week after it was shipped, I noticed that the movement was in limbo stuck in an English port. Eventually the tracking status indicated it was being sent back to its origin.
I waited a couple of days, unwittingly believing they would actually contact me, but I never heard anything. In fact I had to make them aware of the status glitch myself. It took a while for them to tell me the package was indeed coming back to them and they needed to wait until they received it to assess.
As expected, it took another week for it to be shipped back to them about 30kms over the English Channel. The package was damaged and we were effectively at step one again - one month after I placed the order!
Throughout the ordeal their customer service was slow to respond, unapologetic, and void of any optional solutions or compensatory offers.
I still don't know the status of the order, but I suspect I will be waiting another 2-3 weeks.
I was apprehensive about using a European based service provider and in hindsight, should have gone with my instincts. I ended up printing and stretching some canvases myself for the exhibit. A further cost and inconvenience to me.
I would suggest opting for more local options if available. I know I will be in the future.
I recently ordered two prints, from White Wall, on two separate occasions. Both came rolled up in a tube. They are rolled face in which causes creases in the ink surface. Both prints are trash.
I communicated the issue, including pictures and suggestions and even offered to pay extra for flat packaging.
They completely, and arrogantly, rejected my suggestions and offers but did offer to replace the image or give me a gift certificate.
Well, I'm going to see how many f'd up images they are willing to send me before they give up.
Tom