
The holiday season is right around the corner, and for many photographers it’s one of the most lucrative times for print sales. If you’re selling framed prints of your work, it’s imperative that you package your products correctly in order save yourself a lot of money from damages, and to avoid having disappointed customers. Let’s take a look at how to do packaging the right way and earn yourself repeat customers that will come back year after year.
Firstly, we should consider why strong, solid packaging matters. Aside from the obvious, that it keeps your goods from being damaged, in many cases it will also be the first real-world impression a customer has of you. Even if you have a generous return policy, satisfaction-guaranteed warranty, or purchased insurance from the courier company, the customer is going to be at least a little disheartened when they see their hard-earned money was turned to chipped and broken framing. On top of that, the holiday season requires that products arrive perfect the first time, otherwise your customer is going to be left without the gift they joyously wanted to give. This turns in to a complete loss of sale rather than an exchange. I will teach you how to avoid that.
Supplies To Keep On Hand
- Bubble wrap
- Packing peanuts
- Corner protectors for the frame
- Packing tape
- “Fragile” warning tape/stickers
- Shipping labels
- Cardboard boxes – Choose sizes that are several inches over your framing dimensions.
- Corrugated cardboard sheets – Sized to fit inside your box, but larger than the outer dimensions of your frame. I've never actually had to purchase these as you can find flat currugated cardboard easily.
1. Final Inspection
All the supplies are on hand, but before you start packing take the time to examine the final framed print for any signs of inadequacy. Soon, your art piece will potentially be thousands of miles away and quick fixes are going to be off the table. Be sure there's no dust settled on the acrylic and that everything is clean.

Fair warning: I’m not a studio photographer. These example photos may not be the prettiest, but they are still worth 1,000 words.
2. Wrap It Up
Using bubble wrap, go ahead and cover up the entire front, back, and sides of the frame in one coat. I should note here that while adding five layers of bubble wrap certainly isn’t going to hurt the frame’s protection, it is going to start hurting your wallet when you consistently overuse materials. One layer of bubble wrap has never caused problems from me, personally. Also, this is only one of five forms of protection we will be using.
3. Protect Your Corners
Next up, add four corner protectors over top the bubble-wrapped frame. The ones I use have 3 different notches to accommodate for different framing depths. This comes in handy for me so that I don’t have to stock multiple sizes. While these corner protectors don’t play a huge role with shipping protection, they do protect your work after being unpacked and the owner realizes that they don’t yet have a good place for it to be displayed.
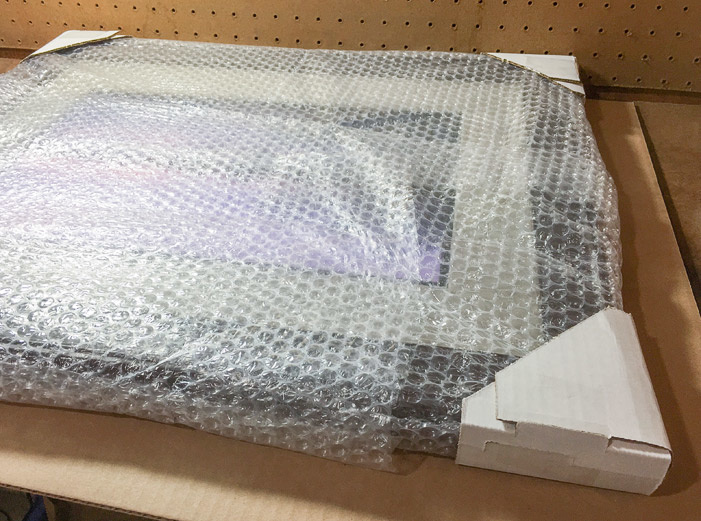
4. Make a Sandwich
No, not that kind of sandwich. This step requires you to have two flat cardboard sheets that are a few inches larger than the outer dimension of the frame. Using a sharp box cutter knife, double up the cardboard sheets and slice a pair of perpendicular cuts near the middle of the outside edges, two cuts for every side. Sandwich the frame between the cardboard sheets and then tightly bridge the top and bottom cut outs with packing tape. See the photo below and you’ll immediately know what I mean. What this is doing is creating a safety barrier for any side impacts the shipping box encounters.

5. Put It in the Box
Lay down a couple inches of packing peanuts at the bottom of your shipping box. Then, set your sandwiched frame in the box so that it stands directly centered. There should be no side that have more of a gap than its opposite. Also, look to see that there’s a couple of inches free on the topside so that you can pack peanuts at this end like you did on the bottom. Once you have the frame set, start filling up the sides and all open areas between the cardboard sandwich with packing peanuts. When the box becomes more full, give it a shake to make sure the peanuts are being set in without any gaps. Once you reach the top, add enough peanuts so that when you close the flaps there’s a slight amount of pressure needed to close it down. The pressure will disperse once the box gets handled a bit and won’t leave you with loose packing when it does.


6. Add a Warning
Once the box is sealed, it’s time to get it weighted and labeled. When it comes to “fragile” warning labels, some say it makes no difference whether you have them or not. Many of the packages that go through the shipping couriers have some kind of “fragile” or “handle with care” type of label on them, regardless of their actual contents. You can’t expect every employee to take them in to consideration. Nevertheless, it’s just one of the things you do because, well, your contents really are fragile. Using some labeling tape or a few sizable sticker labels, let it be known the weaknesses of your product whether they will be acknowledged by the couriers or not. I’ll add that some people also use “do not set box on corners” type labels for their framed works. This can be up to you, but with the way I pack we have the outer box, packing peanuts, inner sandwich cardboard, corner protectors, and bubble wrap keeping your frame corners damage-free. I choose to save on this (albeit minimal) expense and have had no issues.

Now that the boxing is finished, your package should feel solid with no inner movement when shaken. The outside of your box should look clean and professional with adequate warning labels and a prepaid shipping label adhered to the side. Your customers are sure to be grateful that you made their holidays a little less stressful.


*your customers
To the topic: Packing is important. Got a print on aluminium with a bend corner. Got replacement, but customers think twice the next time they order...