
Modern lenses are small miracles. They don’t defy the laws of physics, but they sure come close. Are you getting all you can out of your lens, though?
Depth of Field, or Lack Thereof
If you’re like most of us, you probably enjoy opening your lens to its widest aperture sometimes for that razor-thin, subject-isolating depth of field and that smooth bokeh. Of course, with that thin depth of field comes a thin margin of error for focus. If you’ve been careful about your focus points, you have good light and your technique is sound, but you still have a lot of out of focus shots, your lens and body might need an autofocus microadjustment.
Often, a camera body and lens will focus precisely, but not accurately. This means there is a consistent error in which the lens focuses too far forward of the subject or too far behind (i.e., the lens front focuses or back focuses). The key that allows us to correct for this error is that it is consistent; if we can measure its size and which direction it falls in, we can compensate for it by applying an equal and opposite correction. This becomes particularly important at wide apertures, where depth of field is so small that an error of a few centimeters in either direction can be the difference between making a shot and making a mess. Autofocus microadjustment (AFMA) allows us to make that correction by programming your camera body to consistently apply a compensation whenever that lens is attached.

This was shot on a 200mm lens at f/2.0, leaving very little room for error in focusing
Which Lenses Benefit
Not all lenses need AFMA. If you’re using a lens with a maximum aperture of less than f/2.8 or you never open up wider than that, the error any modern camera and lens makes will not exceed the range of your depth of field. On the other hand, if you frequently work at wider apertures, your lens may well benefit from an adjustment. However, it takes great care to make these modifications properly, lest a greater error might be introduced.
The first thing to know about autofocus microadjustment is that not all cameras support it. Supported Canon cameras include: 1D Mark III, 1Ds Mark III, 1D Mark IV, 1D X, 5D Mark II, 5D Mark III, 6D, 7D, 7D Mark II, 50D, and 70D. Supported Nikon cameras include: D3s, D3, D3X, D4, D4S, Df, D800, D800E, D810, D300, D300s, D600, D610, D700, D750, D7000, and D7100. If your Canon or Nikon camera is not on this list, there are no options for this sort of adjustment. There are two ways to go about performing an autofocus microadjustment: by hand or with the help of software designed for the task.
The DIY Method

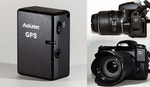
85mm DIY setup: I put this together in my kitchen using a ruler I printed online and a desk lamp from the piano room
To calibrate by hand, you’re going to need either a specially printed test chart (LensAlign makes excellent charts), or a ruler, or something similar with regularly spaced segments. You’ll also need strong lighting on the target (they don’t need to be specialty photographic lights, just make sure there’s a lot of light hitting it) and a lot of working distance. Next, you’ll need to create about a 45-degree angle between the focal plane of the camera and the test chart. This can be done either by laying the test chart flat and using a tripod to aim the camera, or by placing the camera parallel to the ground and the test chart at a 45-degree angle. If the angle is too large, you won’t be able to distinguish the focus between segments and if the angle is too small, you’ll have trouble visually separating the segments. The camera should be about 25 times the focal length of the lens away from the test chart. For example, if you’re using a 85mm lens, you’ll want the camera to be 85*25 = 2,125 millimeters, or approximately 7 feet away from the test chart, as shown above. Keep in mind that this distance is the line of sight, not the distance along the ground. Aim the center AF point at the center of the test chart, or at the middle of the ruler. If you’re using a zoom lens, use the telephoto end to begin.
If you’re using a Canon camera, set it to either remote shutter or the two second timer and use mirror lockup. Enter the C. Fn menu and select “AF Microadjustment,” then “Adjust by lens.” If you’re using a Nikon, set the shutter and mirror lockup similarly, then enter the setup menu and turn “AF Fine Tune” to on. Be sure you're working at or near maximum aperture.
Once you’ve done this, change the AFMA to a large negative value (-15 is a good starting place) and take several shots to offset random errors (remember, we’re tweaking accuracy, not precision). Increase the adjustment to -10 and do the same, continuing until you reach +15. Using the zoom function in playback (or a monitor), examine the shots to see which value shows the segment under the center AF point to be most in focus. Once you’ve determined this, repeat the procedure by narrowing the range you test; for example, if -5 seemed the sharpest, test again from -10 to 0, this time by single values. Repeat the examination to find the value that shows the center of the frame most in focus. Save this value as the adjustment for that specific lens. Whenever you attach that lens to your camera from now on, the camera will know to compensate by the tested amount. It’s rare that a lens will need more than 10 points in either direction. Some more advanced bodies will allow a zoom lens to calibrated separately at the telephoto and wide ends; if so, repeat the test at the wide end of the lens.
Specialized Software
If all of this seems to be a bit too much work, there is also excellent software that can help automate the task for you. Check out Austin Rogers’ review of Reikan FoCal, which I also use myself. It can not only help with the AFMA process, but can also offer some very interesting statistics about your lens, such as its sharpest aperture.
Finally, if you’re using a lens heavily, or it experiences extreme temperature differentials across seasons, consider checking and possibly recalibrating it every year or so.
Making autofocus microadjustments can be a time-intensive task, but if you routinely shoot at narrow depths of field, it can help ensure that you’re getting the best possible performance out of your body and lens.


I had a lens that needed fine adjust, but I just did a series of shots and adjusted fine tune until the image was properly focused. My target subjects were the eyes of a model for medium distance shooting (the typical distances involved in studio or portrait shooting), and a ruler shot at a 45° angle for close-up. Turns out that, at least on my Nikon D600, getting the ruler shot calibration setting took care of everything.
I honestly can't see someone thinking the manual mode is "too much work". It's not like monitor calibration where you have to perform it on a regular basis. The software is nice if you want the extra tidbits of info, but at the end of the day you have to get back to work. ;-)
Unless you shoot macro (or close-ups) and print your pictures 1:1, or cropping your pictures to display 100% crop, you are not going to notice slight focusing errors. The depth of field (and acceptable circle of confusion) is relevant also to the size of a final image enlargement and viewing distance. When calculating DoF, it is assumed that the picture will be printed 8x10 and viewed from ~25cm distance.
So most photographers shouldn't be worry about microadjustments. Unless they have nothing better to do ;)
That is just terrible advice. Something being out of focus can not be fixed in post. I do agree with some of what you said, but to say that those who do it only have nothing better to do is just plain wrong.
I didn't even mention post... And who said about "something being out of focus". The comment is regarding micro adjustments. If you can notice focusing problem without printing 1:1 or zooming 100% than micro-adjustments won't fix your problem.
Just for haters. 3 pictures taken with 85 1.2 wide open. I put camera on tripod and released shooter with cable. One picture is adjusted +20 other -20 and 3rd is set on 0. Please point which is which...
Focus point was set on arrows on the left box (center point)
You cannot tell at this scale but if you blow the photo up you can tell right away. The mere fact that the photo is scaled down makes it appear sharper. Many of my photos get enlarged to huge print sizes and it makes a huge difference.
Read my first comment ;) BTW, we have here examples with "extreme microadjustments", if we can call it this way...
Just for curiosity, how "huge" are your prints? Generally bigger the print, farther the viewing distance.
Top one is in focus, which is -20 and which is 20 is hard to say.
To be fair, I think this test assumes a few too many things. Assuming you're at about 7 ft away shooting with your 85 1.2 wide open, a DOF calculator says you have about 1.68 inches of in-focus area to deal with. So the difference won't show up dramatically in your test. Now if you're at the minimum focussing distance of that lens (say to do a close portrait) then you've only got .32 inches of in-focus area to deal with. At that distance, those micro adjustments can make a very obvious difference. So although for your shooting style it really might not make a difference, for others, it could be pretty dramatic.
You didn't read my first comment, did you? DOF calculator assumes enlargement to 8x10 print with viewing distance of 25cm... Change your enlargement size to web and your DoF will be much bigger. Again, for those who make prints it may be valid point but for most photographers that publish on web only +-5 adjustments won't make noticeable difference.
Of course I read your comment. In your first comment you mention printing to a 1:1 ratio. You seem to be confused as to how someone would take issue with your comment when you are referring to display on the web. However, not once did you mention display for the web. You only mention prints.
You are right here... I didn't say for web. I assumed that if you don't make prints, you present pictures on the web.
Although most of what you're saying is correct, you're forgetting about clients and art directors who will be viewing images onscreen at 100%. They will want to see perfect focus, period. They don't want to hear your argument, right or not, you lose. This especially so when shooting models where the eyes, or near eye, needs to be perfectly focused. So while I understand where you're coming from, there is importance in obtaining the most accurate focusing that your lens/camera combination can achieve.
You got point there. I wasn't considering professionals...
On the bottom image, the top edge of the left box is in focus (the part sticking up, where you can see the corrugated edge), where it is not in the other two. If you were taking a picture of a person, this is potentially the difference between having both eyes in focus, or just one. If I can see that box edge in focus on a test shot that has been "uploaded to the web", then you're going to be able to see a difference on a headshot with well defined eyelashes.
I prefer lens align. I have both reikan focal pro and lens align form Michael tapes design. Lens align gives better results every time.
This only applies to DSLRs with mirrors. It happens because the autofocus system in the bottom of the mirror box that is looking at light reflected from the sub-mirror doesn't line up perfectly with the sensor. Mirrorless cameras that use on-sensor focus systems never need any sort of focus adjustment.