
As photographers, we have a never-ending, ever-perpetuating growth of photos piling up on our hard drives. Inevitably, whether that work is professional or personal, our photos end up taking space on cloud storage accounts that we keep upgrading whenever we reach the limit. But what if you could cut the size of these files in half without losing any visible quality? You could save a lot of headache, not to mention, money.
I’m not going to get too technical on you. But if you watch HBO’s "Silicon Valley" or, alternatively, have any common sense, you would know that compression is a big deal when it comes to our computer data. Every time we find a way to compress data without losing quality, we enable faster transfer of files, less data usage on our mobile devices, the freeing of storage space for other uses, and, believe it or not, we even save energy, since hard disk or solid state drives don’t have to copy as much data, each byte of which takes energy to read and write.
JPEGmini is a fantastic tool that compresses all of your JPEG images without any visible loss in quality. I was skeptical about it for months, but I finally joined my fellow writers and bought JPEGmini Pro. After saving over 40GB in data on both my local hard drive and across my cloud services, I can gladly say it’s the best $100 I’ve ever spent.
We’ve featured JPEGmini on Fstoppers before, but I want to share some ways to save some serious amounts of data across your cloud services, and even on your Mac and iPhone through the Photos app. That last part can be a bit complicated, but it’s well worth it, and I’ll guide you through it below.
Part I: Dropbox, Box, Google Drive, Et Al.
Let’s start with the basics. Services such as Dropbox, Box, and Google Drive all work virtually the same. Each has a dedicated desktop application that ensures your data is synced across all devices as well as online. Thanks to this structure, compressing your JPEG files couldn’t be easier with these services. JPEGmini features a really easy to use drag and drop system that lets you take your entire Dropbox folder, for example, and drop it into the application. The app intelligently converts your files and, by default, saves over your old, larger files, replacing them with compressed copies that look identical in quality.
If you have Word documents, raw images, videos, and other types of files, you needn’t worry: JPEGmini skips those. And if you want to do this regularly as a part of a monthly maintenance system, JPEGmini skips files that it has already converted as well.
Of course, once you’ve converted everything once, it’s easy to stay on top of keeping your files compressed to begin with by exporting them with the JPEGmini plugins for Photoshop and Lightroom so you never even have to think about it again. But if you like to stick with your normal export practices, you can always use JPEGmini after the fact fact as well.
Part II: iCloud, Photos, and Syncing Across Apple Devices
Why Do This?
This is the big one: how do you use JPEGmini to compress all of those files in Photos and then have iCloud automatically sync and treat those newly compressed images as the master files in order to save that ever-dwindling and highly coveted iCloud storage space?
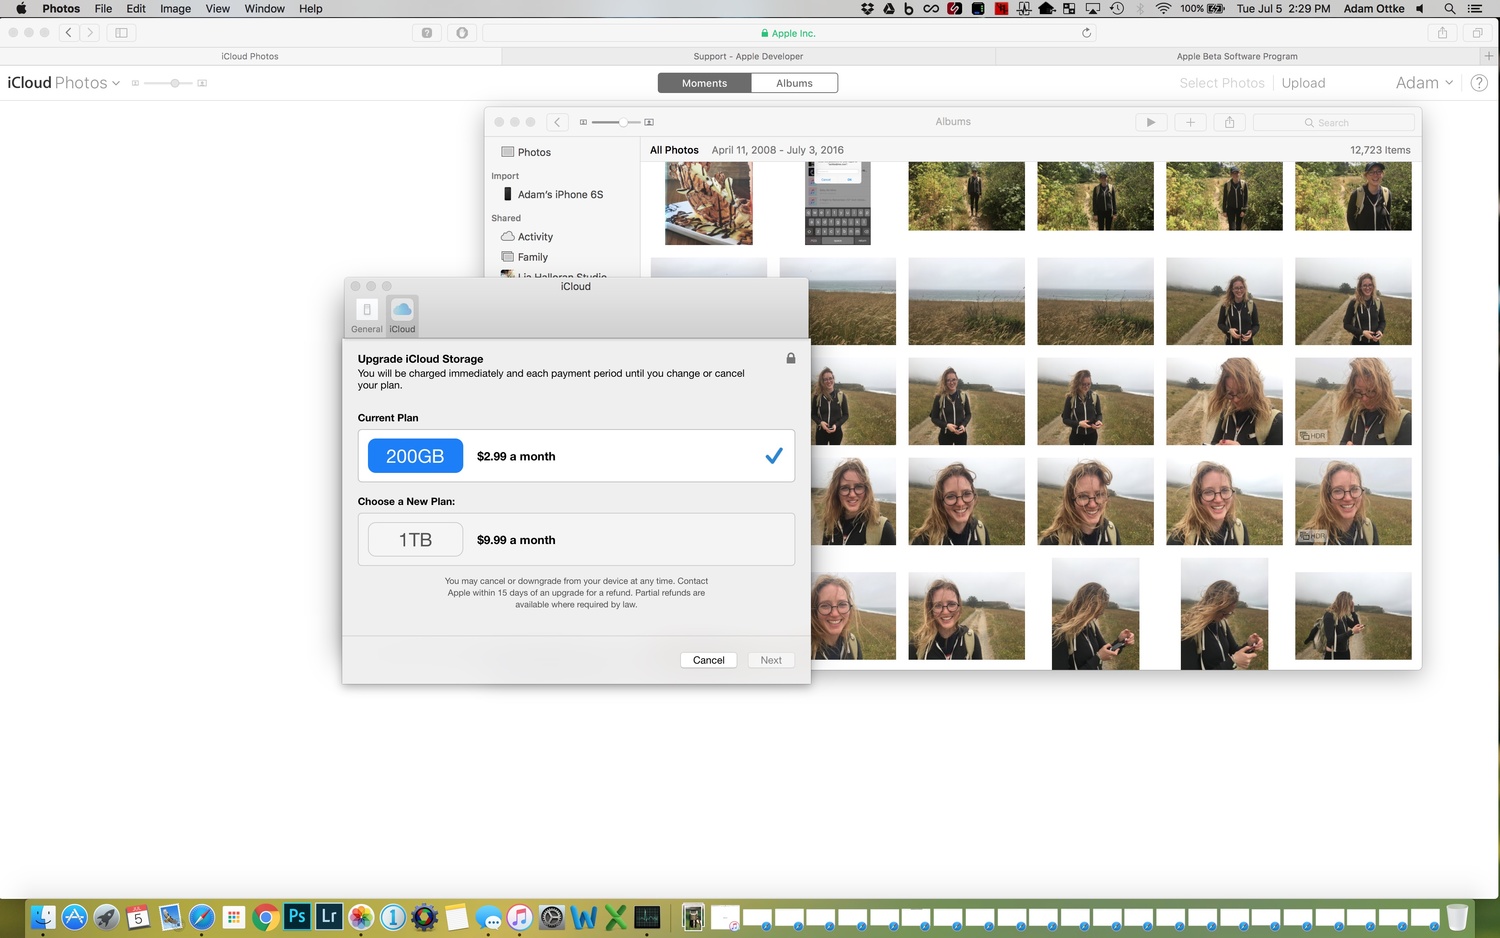
Recently, I was considering moving up from my 200GB plan at $2.99 per month to the 1 TB plan at $9.99 per month, as I was nearing my limit with my iPhone backups and iCloud Photo Library. That would have cost an additional $84 per year, which not having to do already almost pays for JPEGmini Pro. While I saved a bit of space by removing an old and unnecessary iCloud iPhone backup (a good idea, by the way, which you can do on your Mac via Settings>iCloud>Manage>Backups), I knew I could save a ton of space if I could compress all the images in my Photos library, which I’ve used for all of my personal and family photos since my first-generation iPhone back in 2007.
The problem with simply compressing all of these images on my Mac is that they’re already on iCloud, which wouldn’t necessarily “know” that I have newly compressed master files that I want to replace the older files with. So, here comes Mr. Scary: what I really need to do is to delete all of the images, videos, etc., on iCloud and have compressed versions be re-uploaded. Sounds fun. Okay, so it may not be so fun. But it’s very much worth it.
In this case, we’re talking about saving space on both the Mac and iCloud. If you don’t use iCloud Photo Library, which syncs all of your photos across your Mac and mobile devices that use the native Photos apps, you don’t need to worry so much about the iCloud-related portions of this guide. However, you really should be using the service, since it keeps everything backed up while also giving you the option to save local space by keeping only the most recent and used files locally on each device (it’ll still keep all the originals online in iCloud).
So here we go: a step-by-step process for saving a ton of space on every device. Once you do this, you’ll have smaller photo libraries on every device that uses Photos.
How to Do This
- Back up your entire computer in multiple locations in case anything goes wrong. You should be doing this anyway for yourself and your clients! And also, we can't take responsibility for any lost data in this process. Be smart about your backups — always.
- Connect all of the devices for which you want to have your photos and videos combined to your computer and Import All New Photos into the Photos app. Do this for each device to get the newest and most recent files onto your computer so everything is in one location: in your Photos library on your Mac. Yes, you’ll need to make sure you have some free space on your Mac to handle all of this.
- Back up everything again at this point.
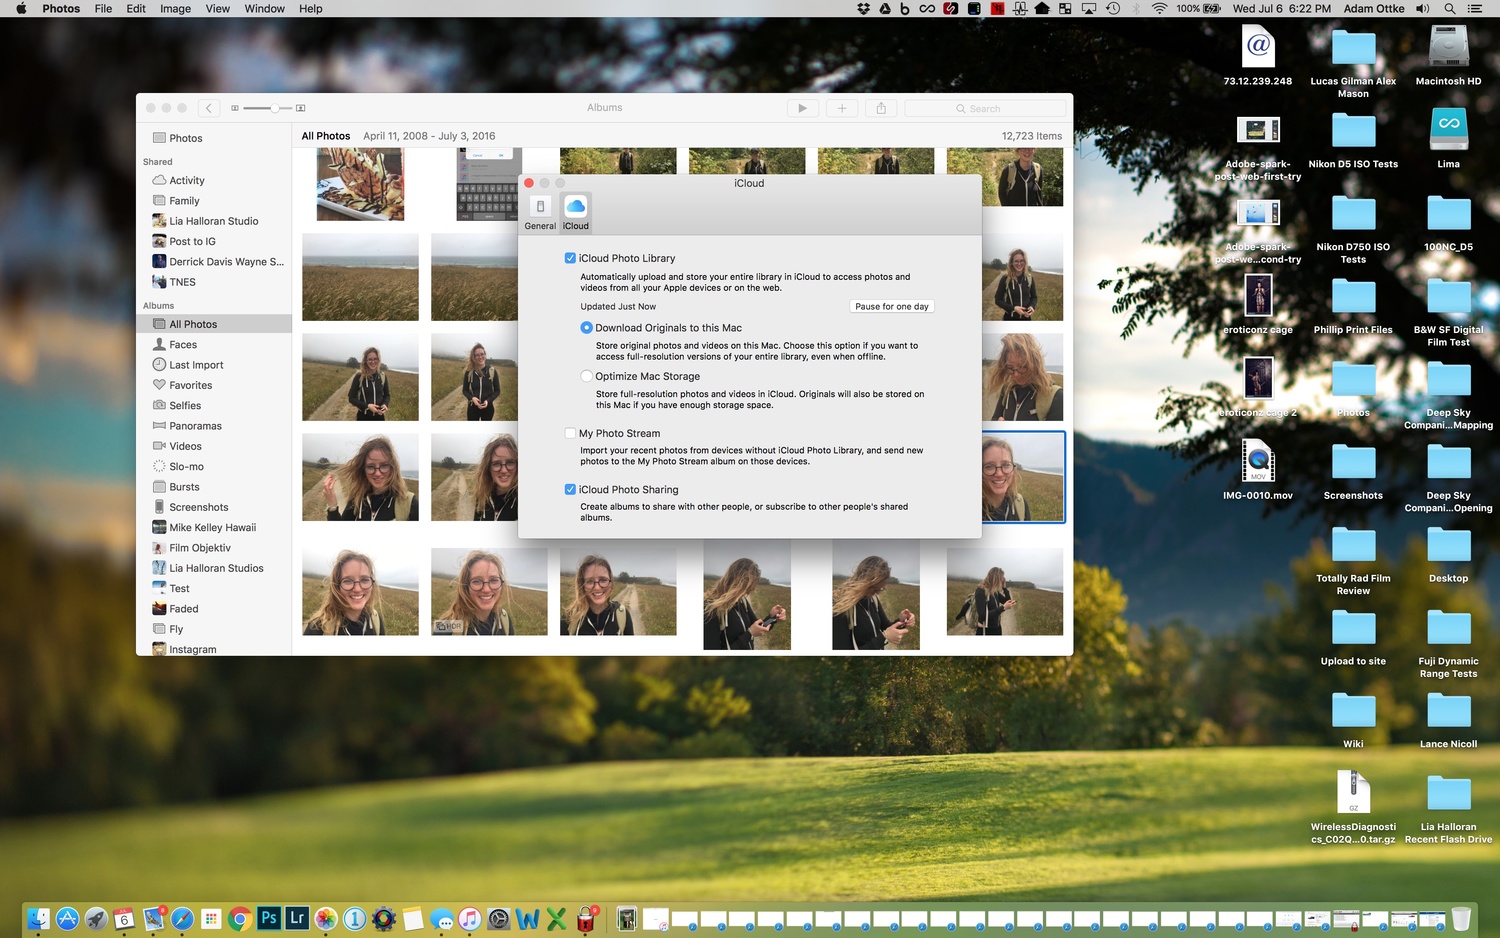
- Turn off iCloud Photo Library on all devices. This stops all syncing across devices. On Mac, find this setting under Settings>iCloud, and then select “Options” next to “Photos.” Uncheck the "iCloud Photo Library" option. Alternatively, open the Photos application and go to Preferences>iCloud, and then uncheck the same "iCloud Photo Library" option. On iDevices, navigate to Settings>iCloud>Photos, and uncheck the "iCloud Photo Library" option. Alternatively, this setting also exists under Settings>Photos and Camera.

Turning off iCloud Photo Library leaves this top box unchecked. Don't worry about the other two checkboxes. Those run on different servers and should be unaffected. However, my particular My Photo Stream was actually disabled by the end of this process. If this is the case with you, simply reenable it by re-checking that box at the end of this entire process.
- Find your Photos library on your Mac. It’s usually in the Pictures folder, but you can also find it from the Photos app by going to Preferences>General, and then selecting “Show in Finder” underneath the "Library Location" portion at the top.
- Show Package Contents: right-click, control+click, or “two-finger” click on the Photos Library. Select “Show Package Contents.”
- Open JPEGmini Pro. Purchase and download first if you haven't already. JPEGmini offers a free trial if you want to try a few photos, first. But save yourself the hassle and just trust it: it works like a charm.
- Drag the "Masters" folder into JPEGmini Pro. From the folders and files shown after selecting “Show Package Contents,” find the “Masters” folder. Drag this folder into JPEGmini Pro. You should see a warning that all files will be replaced (this is the default setting. If this is not your current setting, change it to be this way before continuing, as you want JPEGmini Pro to replace the files with the same file names in the same locations within the "Masters" folder).
- Wait a bit. This practice of patience is just a warm-up for the future. After continuing, JPEGmini Pro will take some time to process all of the files in your Masters folder. This includes videos and Live Photos, both of which will remain untouched. But all of the JPEG images will be compressed by a factor of at least or over two times in most cases. This process is extremely efficient in the use of your processor’s cores. This means it’s extremely good at using everything your computer can give it, so you will want to let everything rest for a bit if you can (or at least don’t go editing huge Photoshop files in the meantime). Be nice to your computer while you wait.

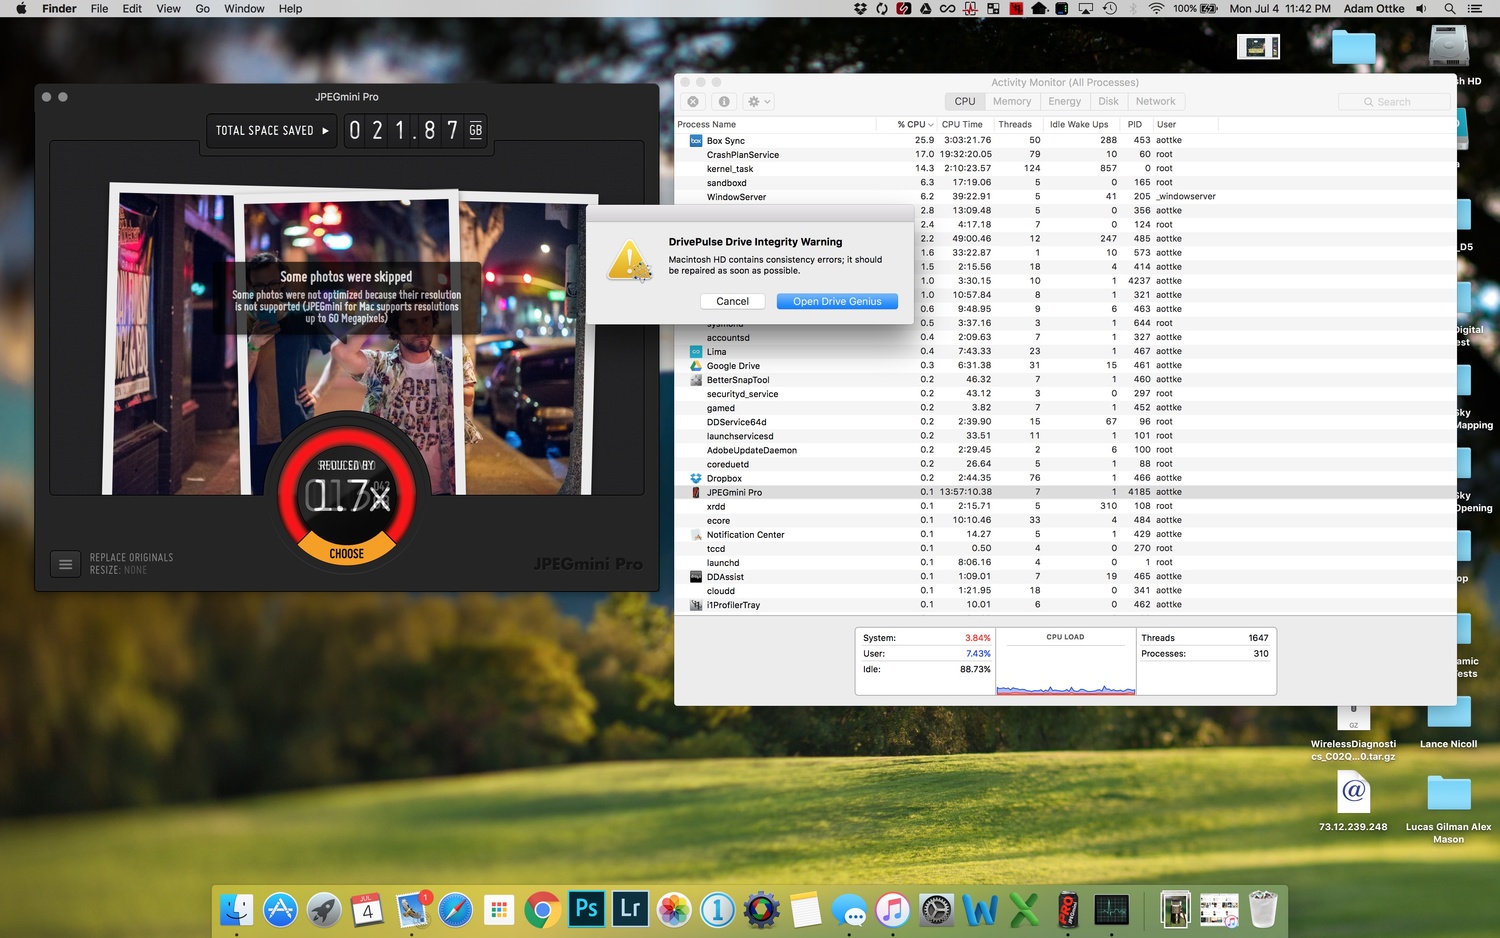
JPEGmini only takes what it can get, but it also takes ALL it can get. It's extremely efficient in that it uses every ounce of processing power available on your computer. It's smart to be nice to your computer and let JPEGmini go as fast as it can with minimal interference from other operations.

I have DrivePulse, an application through Drive Genius that monitors the health of my hard drive, running in the background at all times. I'm not sure if this was an unfortunate coincidence or if it's a usual part of the process of using JPEGmini, but this isn't the biggest deal. If you get a warning from OS X, which has its own utilities managing your hard drive health as well, simply restart your computer while holding down Command R to go into recovery mode. Once the screen loads, go to Disk Utility, select your computer's hard drive (usually called "Macintosh HD"), and run the "First Aid" utility. This should not take longer than a couple minutes, after which you can restart again. And it should be fine to wait until a convenient time to do this.
- Delete photos and videos on iCloud.com. While JPEGmini is doing its thing, you can start on the other major step of this. All of your images are still on your mobile devices and online in iCloud. You need to delete these files. After signing in at iCloud.com, you can delete all of the files in Photos by going to the top and clicking “Select.” Select All does not work, but you can select the very first image in the library and scroll to the bottom. Hold shift, and then select the last image to select all of the images in your library. At this point, you can select “Delete” at the top of the window. The image gallery below should help with all of these steps.
- Here’s the thing: if you have thousands of files on iCloud, you’ll probably have some issues doing this all at one. I got multiple errors when trying to delete so many files. So do some yoga, practice some patience, and try to do this in chunks. Select a few hundred photos at a time (sometimes I had luck with 1,200 photos or so, other times it was better to select no more than 500) until they’ve all been deleted.
- Don’t be surprised if some magically pop back. Take a lot of time to do this. Wait in between. Sign in and out of iCloud. Is this all quite ridiculous? Absolutely. Should Apple make this easier and more reliable? Absolutely. But since it is the way it is, we’ll just deal with it. It does work, eventually. Just stick with it.
- You may (or may not) notice that you won’t gain any storage back after deleting these files. That’s because they are still in the Recently Deleted folder/album, which can be found in its own album on the Albums page. From here, you can conveniently “Delete All.” This works better than deleting everything from Photos in the previous steps, but may also take a few tries and a lot of patience. Feel free to do this intermittently throughout the process as you delete files from Photos in the first place.
- All you care about is deleting every last thing. Files might come back. Try deleting them again. You may get error messages. Work though them. Just keep going until 10-20 minutes have passed. Then sign out and back in, and verify that not a single file exists.
- Delete all the photos and videos on your iPhone and other mobile devices. This is a much easier step than it is in iCloud. The best way to do this is to connect to your Mac and open Image Capture (you can search for it in Spotlight via command+space).
- Select all of the files on the connected device within Image Capture, and delete these files. This could take some time depending on how many files are on each device. Of course, only do this once you’ve made sure these files are in your Photos Library from Step 2, above.
As you can see, at this point, there are is virtually no meaningful data within my Photo Library on iCloud. At this point, you know you're done deleting files.
- Select all of the files on the connected device within Image Capture, and delete these files. This could take some time depending on how many files are on each device. Of course, only do this once you’ve made sure these files are in your Photos Library from Step 2, above.
- Turn iCloud Photo Library on again from your Mac (Settings>iCloud, then select “Options” under “Photos,” and check the iCloud Photo Library box). Once all of your images are deleted from your mobile devices and from iCloud, you need to put everything back online from your Mac. At this point, your master files in your Photos Library have all been compressed as much as possible. Turning on iCloud Photo Library will start the process of uploading back to iCloud, which could take 24 hours or longer depending on how many files you have.

A few moments after you turn on iCloud Photo Library, your computer should start uploading the thousands of files you have in your Photos Library to iCloud. This will take quite some time (a day or more in most cases). You can use your laptop in the meantime as usual, just try to have it on, plugged in, and connected to Wi-Fi as much as possible until this is finished. As you can see, my "My Photo Stream" was unchecked at this point. If this happens to you, you can re-check this now as well.
- Once everything is uploaded to iCloud, turn iCloud Photo Library back on for each mobile device. Theoretically, this can already be done when you do it for your Mac. But I like to let everything go in steps. Regardless, you should have no problem turning this feature on for everything at once.
- Wait a while longer, and you're done! After another day or two, all of your files should be downloaded back onto your mobile devices from iCloud. These will take up less space than they did before, but you can save even more space by turning on “Optimize Mac Storage” for local storage on your Mac and, similarly, “Optimize iPhone Storage” for local storage on your phone (or “iPad/iPod Storage” on other iDevices). This will leave most of the originals on iCloud, while it will download the most recent and recently used files onto each device. If you want to keep a file locally forever, simply add it to your favorites by clicking the little heart icon for each photo you want 24-hour access to. You can easily do this for entire albums as well. And finally, if you want to re-enable Photo Stream, which may have been automatically unchecked upon unchecking "iCloud Photo Library" on your mobile device, you re-check this option on all your devices, including your Mac.


Let me address one quick question: Why am I including videos and Live Photos in the entire sync, delete, upload, re-sync process? The answer is simply because it would be an almost impossible feat to find exactly where those video and Live Photo files are and to replace them into the new library we're creating both on iCloud and on the Mac. I wouldn't wish that on anyone. Instead, since JPEGmini intelligently skips these files, we can simply and easily just spend a tiny bit more time waiting for everything to sync back up on each end in order to ensure everything remains where it should be by the end of the process. But yes, your video and Live Photo files will remain identical to the ones before.
I did this all after an in-depth phone conversation with a particularly well-informed representative from Apple's publicly available phone support just to make sure it would work before I embarked on this mission. You can take advantage of Apple support for any of these iCloud steps if you wish as long as you still have AppleCare (any product from Apple purchased within the last year benefits from this service, but you'll have access to support for three years if you purchased AppleCare+ for any of your Apple products).
Results
I saved 16.6 GB of space, going from a 97.34 GB library to one just 77.74 GB in size. Of course, I happen to have a lot of 4K and full HD video footage on my devices, which JPEGmini won’t compress. So my savings are relatively small compared to what most people might see.
I don’t shoot JPEG, but it’s amazing to see how many times I simply wrote off a folder here and a folder there full of JPEG exports for various image delivery requests. While each folder might be just a couple hundred megabytes, it added up quite quickly over the years. Even more can be said about my family photos taken with my iPhone each year.
From this point, you can use JPEGmini’s included plugins for Lightroom and Photoshop to export all of your JPEGs immediately into the most compressed file possible. As for Photos and iCloud, doing yearly maintenance on the past year’s photos with the above steps is a good way to stay on top of keeping your library compact, as images are organized into folders by year within the “Masters” folder that is inside the package contents of the Photos Library. Beyond that, you don’t want to mess with figuring out which folder includes which images.
Thanks to this process (in addition to deleting the old iPhone backup I had on iCloud), I was able to save 40 GB of space, which will last me at least a year or two before I have to upgrade to the next tier of storage. Even more space was saved across other services. My Box account, which was almost completely full since I use it heavily for file delivery, is now at just 70 percent capacity. And my base-level, free Dropbox account is now just 43 percent full (I was getting daily storage limit warnings in that account). With enough care and minimal continued maintenance, your next upgrade for all of your services can be postponed as well. Better yet, you could find another use for all of this newly found “free space.”
How much space did you save? Did you find more uses for compressing your images across other services? Let us know in the comments.


I keep hearing about JPEGMini but how does it actually work? If it's compressing the files that much it has to be losing quality somewhere? I could see using it if you only do web stuff but what about for prints?
The way that I understand it (and this could be not exactly true) is that it compresses certain areas WITHIN the image that can be compressed further than other details within the image without losing quality in those areas, whereas normal JPEG compression more or less applies the same compression across the entire image. For example, if there's a huge area of the background of an image that's very uniform or similar in color, I would imagine that image could be compressed further by compressing that background while leaving the detail of the subject alone.
boy, I hate this click bait thing...How to save space? buy jpegmini
Hi Adam,
Thank you very much for a very descriptive process. Awesome.
I do have an issue and hope you might help me before going further.
1 - I use an iMac and a MacBook Pro + iPhone 5S and iPad Pro.
2 - For an unknown reason, I have 2 different photoslibrary files on my main macs?
On the iMac it is 90.76 GB and when I show package content, the Master folder shows all my yearly folders with dates, label and each picture is visible and labelled.
On the MacBook Pro, the library is only 13.5 GB and the Master folder is showing yearly folders and dates but I do not see any of my pictures while opening the folders.
Meanwhile, both my Photos applications are synchronised on iCloud with 26,675 photos and 115 video clips.
Both my iPad and iPhone are also synchonised.
So I assume that the difference is because I do not have enough space on my MBPro HD to keep the photos.
Therefore, I guess that I should proceed to JPEGMini Pro my photos only from my iMac folder and forget the MBPro file.
Thank you if you find a minute to clarify my issue, hoping that my explanation is clear enough.
Best regards
Frederic
Thanks, Frederic. I'm sorry you're having a complicated set of issues. Unfortunately, this is indeed because the process (and iCloud photo management) simply is just so.
With the information you provided, it's a bit tough for me to know exactly what is going on. First, Photos (formerly iPhoto) will create a new library and used to (or perhaps still does) leave the old one in place, just in case. I don't think this is your issue, necessarily, since there is quite a big difference between your library sizes. But this is still something to be concsious of.
Second, you may have optimize storage set to "on" for the MacBook Pro. If you turn this off (you need to make sure you have enough free space on that computer at least for the duration of this process), then all of the files should start downloading from iCloud. This could take some time, so be patient.
Alternatively, I would do this all only from one computer, in your case. Assuming you are storing your entire library in iCloud in addition to your main Mac, I would temporarily move the location of the MacBook Pro library so it doesn't "see" one. Then, go through the process in this article with the one mac. And then create a new library on the MacBook Pro once that's complete. The only thing here is that you might lose changes made to files from the MacBook Pro. You would have to know if all of those changes are already synced over to your iMac. But hypothetically, your MacBook Pro should auto populate all the images again directly from iCloud.
I hope this helps, but to take my recommendations under very careful consideration. To give you advice this broad with the little information I have -- just keep in mind that some of my suggestions may not work. But you can hopefully figure out which suggestion(s) can work for you.
Thanks.
Thank you very much, Adam for your time in replying to my issue.
This is brilliant. I have started processing all from the iMac and so far all is looking good.
It took, as expected, a bit of juggling to get all the photos deleted from iCloud.
The iPhone was easy and now the iPad is taking its time deleting 15,000+ photos from Image Capture.
I am not worried to lose any photos from the MacBook Pro as my main work is on the iMac.
I think that I understand now why there was a difference on both Mac...
The library on my iMac took over from my iPhoto previous one and kept the label "FL Photos Main Library.photoslibrary" and on the MBP it is labelled "Photos Library.photoslibrary".
So I guess that maybe I should rename my iMac to the default name like the MBP to avoid any confusion...? Should I do that just by editing the name in my iMac Pictures folder (before reconnecting the iCloud process)?
Thank you again for your kind input on this delicate matter.
JPEGMini Pro was impressive and took almost a whole night to go through my photos. It shows a saving of 21.8GB. Wow! Amazing.
Meanwhile, my photoslibrary file on the iMac still shows 80.57 GB, compared to 90.76GB, so that's only 10GB reduction and not 21.8 as per JPEGmini Pro result? I trust that it might reduce once iCloud is launched again...
Best regards
Frederic
Hi, Frederic. I'm glad this worked for you (so far, at least). As for renaming your computer (or the library file), I am again not quite sure to recommend. But whatever works for you to more easily distinguish your files/computers is probably a safe bet.
As for the data descrepancy, I would recommend waiting a bit and/or seeing what happens once everything is in place, after which you could restart. My current theory is that your computer simply hasn't properly updated the true folder size for you. Maybe something like a restart could help...but there's also the possibility something else unknown is going on, as always.
Great, again a thousand thanks for your time and kindness.
All is going very well. The iMac is filling up slowly and the MacBook Pro is in phase as well.
As per your recommendation, I will start the iPhone and iPad only once both Macs are fully clear.
You are right, I am sure that with this iCloud updating photoslibrary, and a restart, I might notice a drastic reduction of my file.
Take care and have a great weekend.
Awesome! It did not take that long and all was processed in less than 24 hours.
My 26,796 photos and 115 video clips are all back in iCloud and Photos library on my iMac.
It now takes only 69.6 GB on my iCloud management.
Meanwhile, after rebooting the iMac, my Photos library file shows 80.29 GB... about 10 GB less than before!
On the MacBook Pro it takes 8.84 GB since I do not store all of my photos there. Compared to 13.5 GB before. Not bad!
Anyway, as Adam wrote in his article, JPEGmini is definitely a great application recommended to all.
Best regards